Previously we saw how to set up a Unity project to work with the Oculus Passthrough API. If you haven’t checked out the first part of this series, we highly recommend checking it out as the API will not work without the correct setting.
In this blog, we’ll learn how to develop a scene implementing AR with passthrough. We’ll see the different components that are required for passthrough, set up the camera rig, and finally create an augmented interactable object. So let's begin!
In this blog, we’ll learn how to develop a scene implementing AR with passthrough. We’ll see the different components that are required for passthrough, set up the camera rig, and finally create an augmented interactable object. So let's begin!
Adding Passthrough Feature and Scene Setup
In this section, we’ll see all the components that we require in order to make the Passthrough work and set up our scene as well.
- In the Project window, navigate to
Scenes→ Open theSampleScene. - Delete the
Main Camerafrom the Hierarchy window. - Search for
OVRCameraRigin the Project window → drag and drop it in the Hierarchy
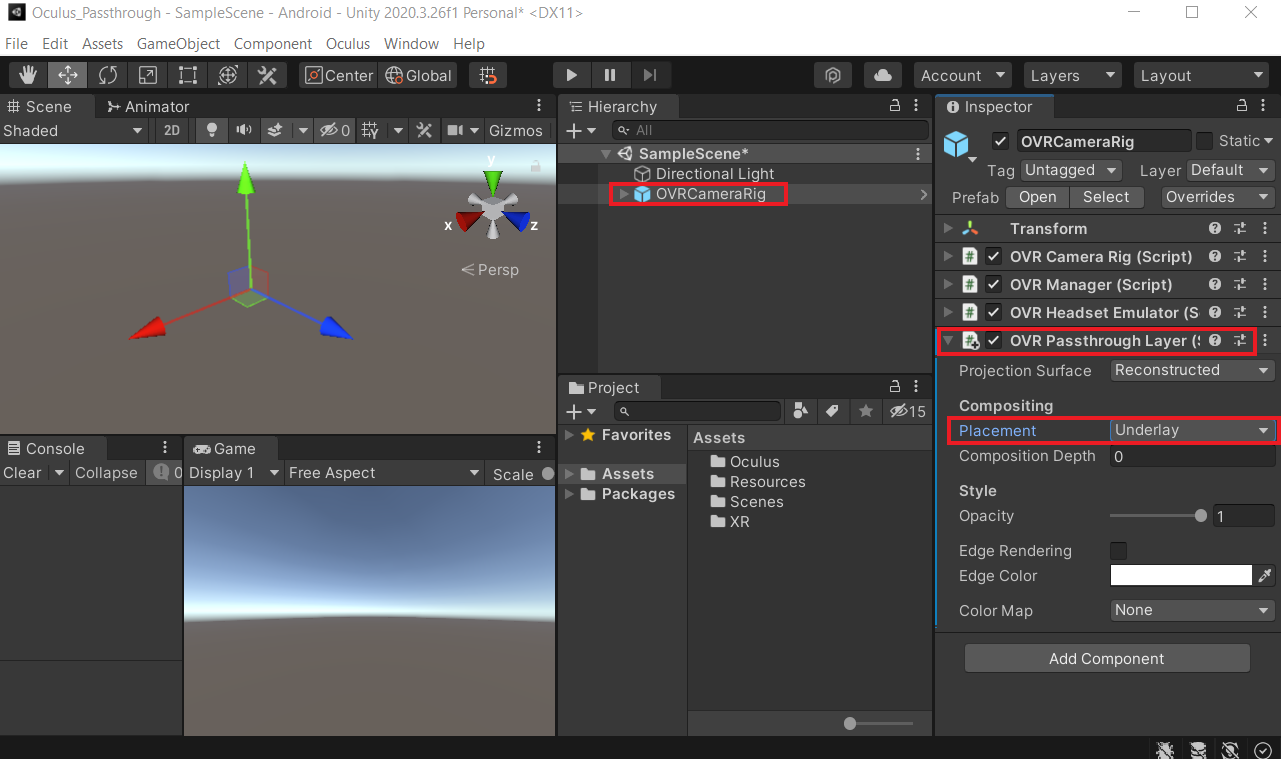
- Select the OVRCameraRig GameObject → under the OVR Management component, click on the General tab and make sure the Passthrough Capabilities is checked ✅ → scroll down and make sure the Enable Passthrough is also checked ✅
- Next, add the OVR Passthrough Layer component to it and select the Placement as Underlay from the dropdown.
- Let’s create a 3D cube by right-clicking on the Hierarchy window → select 3D objects → Cube. Adjust its scale to 0.5 units in all directions so that it’s not too big. Also, change its position such that it's slightly ahead of the Camera.
- Now, if you hit play and test it, you will not be able to see the passthrough feature working. Can you guess why? Well, that's because we need to get rid of the skybox and to do that:
- Click on
Window→Rendering→Lighting. - Select the
Environmenttab → select the Skybox Material asNone.
- Click on
- Now you can hit play and test the scene. You should be able to see the cube floating in your physical environment.

Allowing Interaction
In this section, we’ll add a few more components/prefabs to the scene. After which we’ll have VR controllers that can interact with the cube.
Adding VR Controllers
- Open the
OVRCameraRigprefab by clicking on it while holding the Alt key to view its children. - In the Project Window, search for OVRControllerPrefab → first drag and drop it on the
LeftHandAnchorGameObject and then again on theRightHandAnchorGameObject*.* - Select the
OVRControllerPrefabunderLeftHandAnchorGameObject and select the Controller asL Touchfrom the drop-down. - Next, select the
OVRControllerPrefabunderRightHandAnchorGameObject and select the Controller asR Touchfrom the drop-down.
Adding Grab Feature to VR Controllers
- Select the
LeftHandAnchorGameObject → add the componentOVR Grabber. - A
Rigidbodycomponent gets added automatically, uncheck the Gravity parameter and check the Is Kinematic from that component - For the
OVR Grabbercomponent, drag and drop theLeftHandAnchorGameObject into the Grip Transform parameter. Then, select the Controller asL Touchfrom the drop-down. - Add a
Spherical Colliderand change its Radius to 0.05 so that the collider just surrounds the controller.
- For the RightHandAnchor GameObject, follow the same steps above to add the grab feature. But, for the OVR Grabber component, drag and drop the RightHandAnchor GameObject into the Grip Transform parameter. Then, select the Controller as R Touch from the drop-down.
💡 Note: Make sure to check ✅ the Is Trigger for both the spherical colliders
Making the Cube Grabbable
- Select the Cube and add the
OVR Grabbablecomponent. - Add
Rigidbodycomponent → uncheck the Gravity parameter.
Now you can test the scene by playing the press button.

Conclusion
So we have seen how you can add GameObject to the scene and make it interactable. This is just the beginning of the journey to work with mixed reality. There are many other features that you can use to create different experiences. In the next blog, we’ll see how we can customize the Passthrough filter.

Created with