
Prerequisites
Before we get started, there are a few prerequisites you need to meet. Don’t worry, I’ll give you an overview of each one, and if you need more detailed instructions, you can check out our previous blogs here.
-
Create a Developer Account
Start by creating a developer account with Immersal.
-
Download the Immersal Mapper App from Playstore/AppStore
Log in using your developer credentials and download the Immers Mapper app. This will be essential for mapping your environment.
-
Map Your Environment
Once you’ve downloaded the app, you’ll need to map your environment. For this tutorial, I used the manual mode to carefully map the room where we’ll be setting up our AR experience.
-
Set Up a Unity Project with Immersal SDK
Finally, you’ll need to set up your Unity project with the Immersal SDK. Here’s a quick rundown on how to do that:
- Go to Windows > Package Manager.
- Click the plus symbol (+) and select Add package from Git URL.
- Paste the following Git URL and click Add: https://github.com/immersal/imdk-unity
Once that’s done, navigate to File > Build Settings, switch the platform to Android, and use the Project Validation Tool to fix any issues.
Setting Up the Scene
With the prerequisites out of the way, let’s start setting up our scene in Unity.
-
Delete the Default Main Camera
In your Unity hierarchy, select the main camera and delete it. We’ll be using a different setup for the AR experience.
-
Add XR Session and Origin
Right-click in the hierarchy, navigate to XR, and select AR Session and XR Origin. Set the position and rotation of both to zero.
-
Add Immersal SDK Prefab
In the project folder, search for Immersal SDK and add the appropriate prefab to your scene.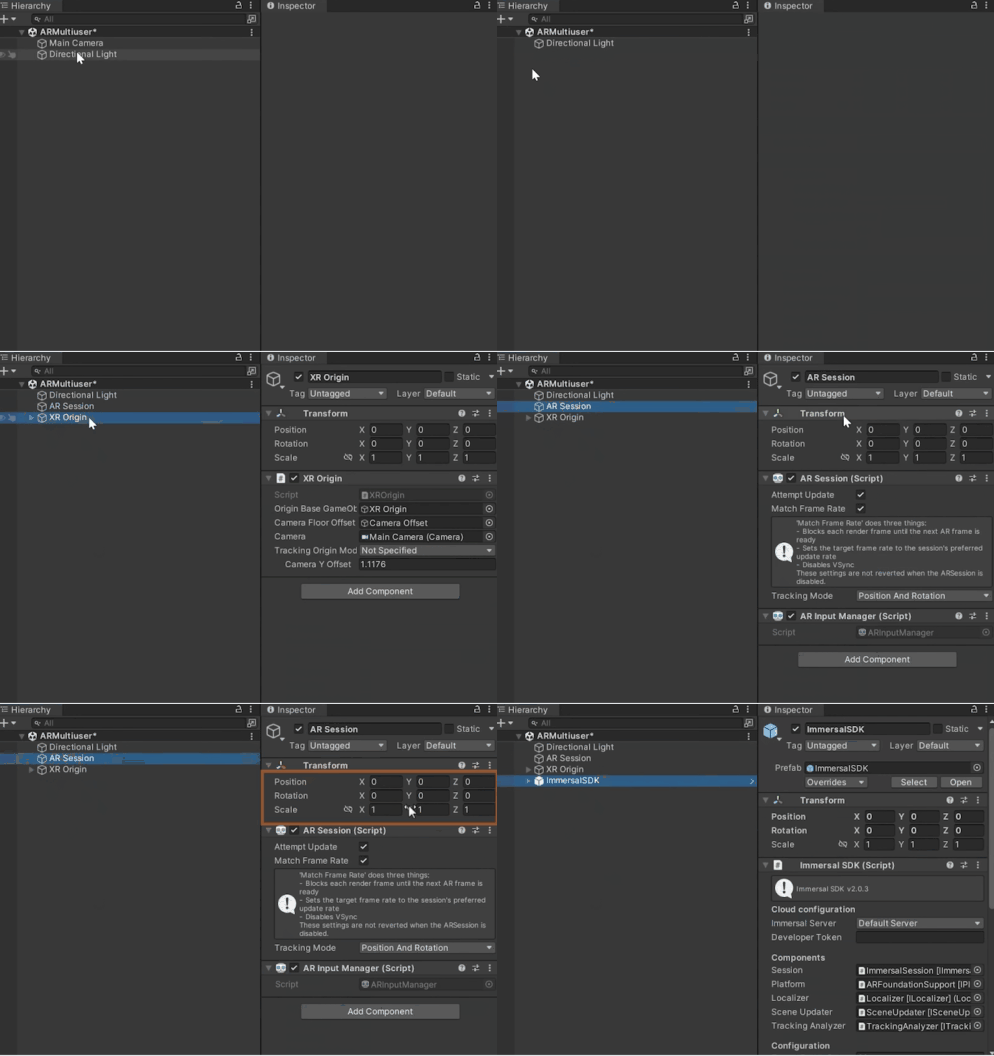
-
Log in to Immersal SDK
To retrieve the developer token, log in within the Immersal SDK using your developer credentials. Once logged in, the token will be visible in the settings.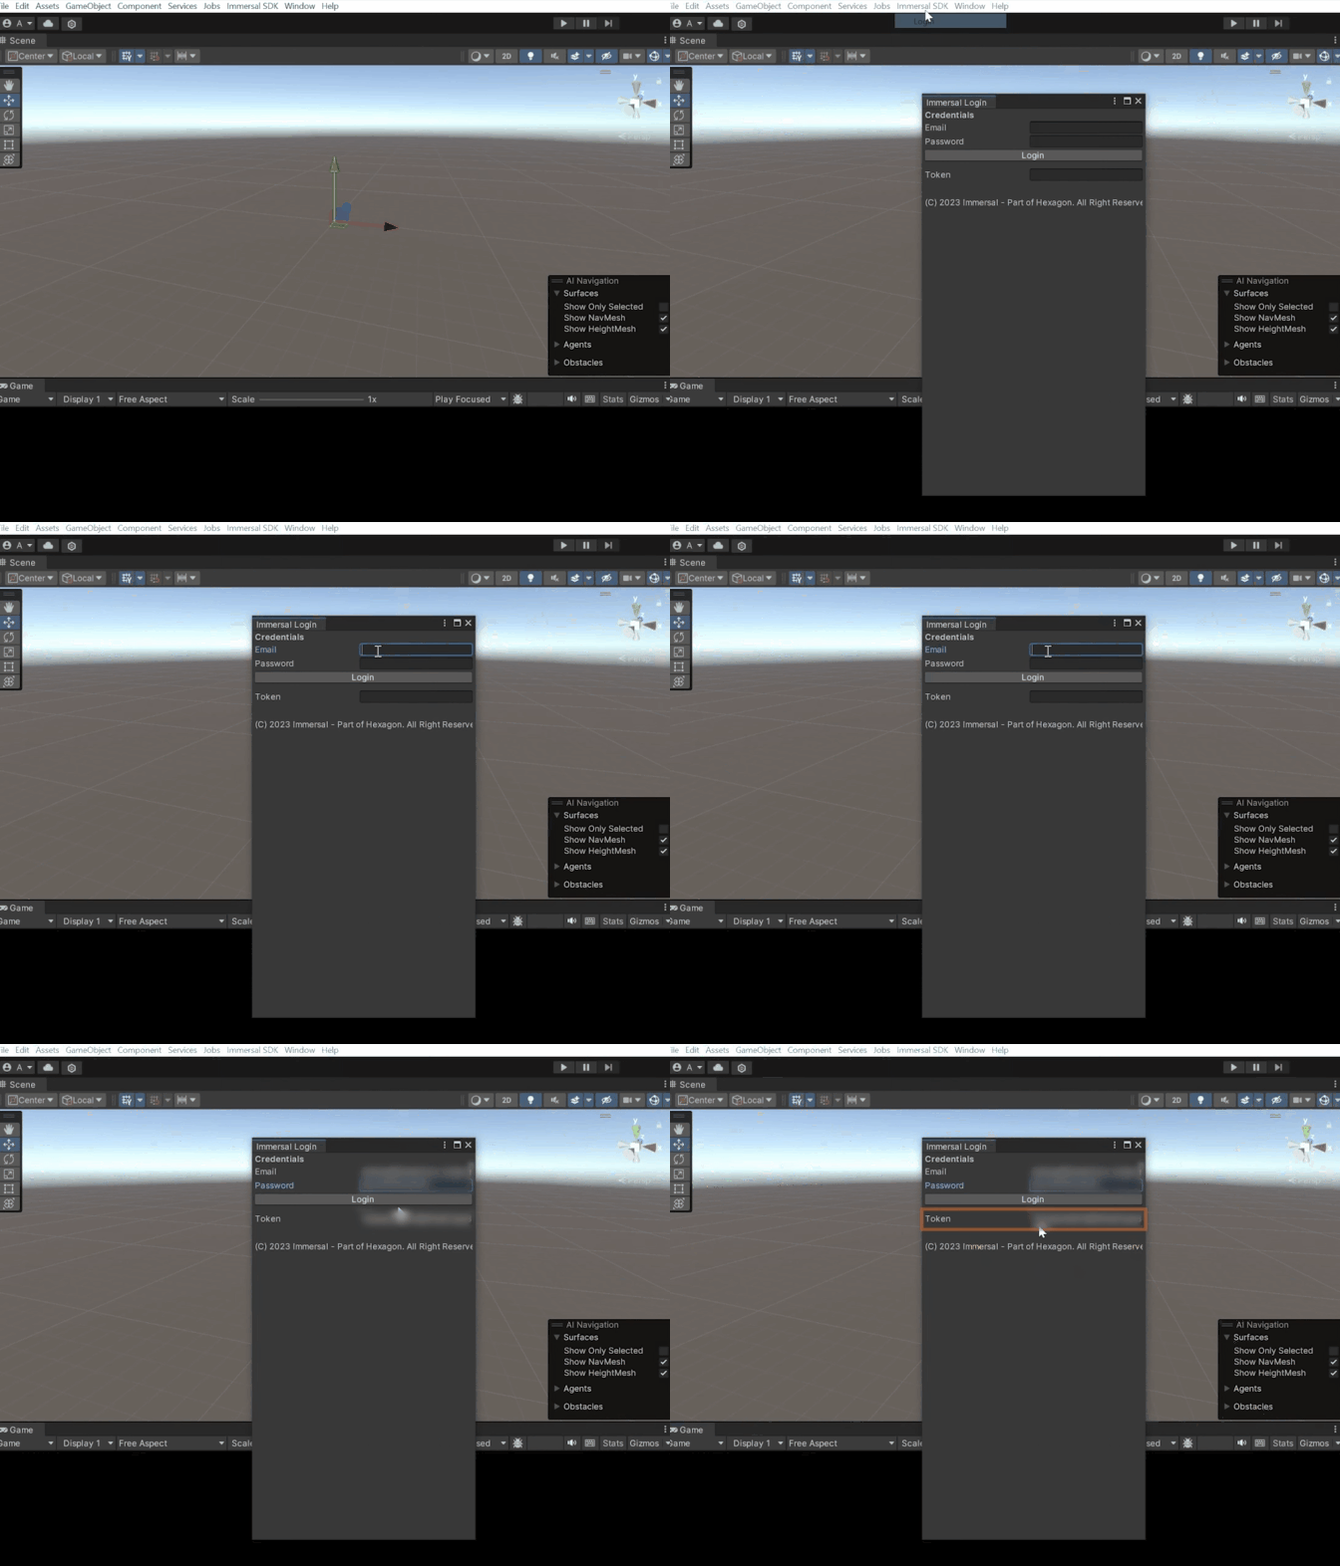
-
Create XR Space and Data Processors
Create an empty GameObject named XR Space, and add the XR Space component. Then, add two Data Processors and reference them accordingly.
-
Add Post Filter and Smoother
As children of XR Space, create two empty GameObjects named Post Filter and Post Smoother. Add their respective components.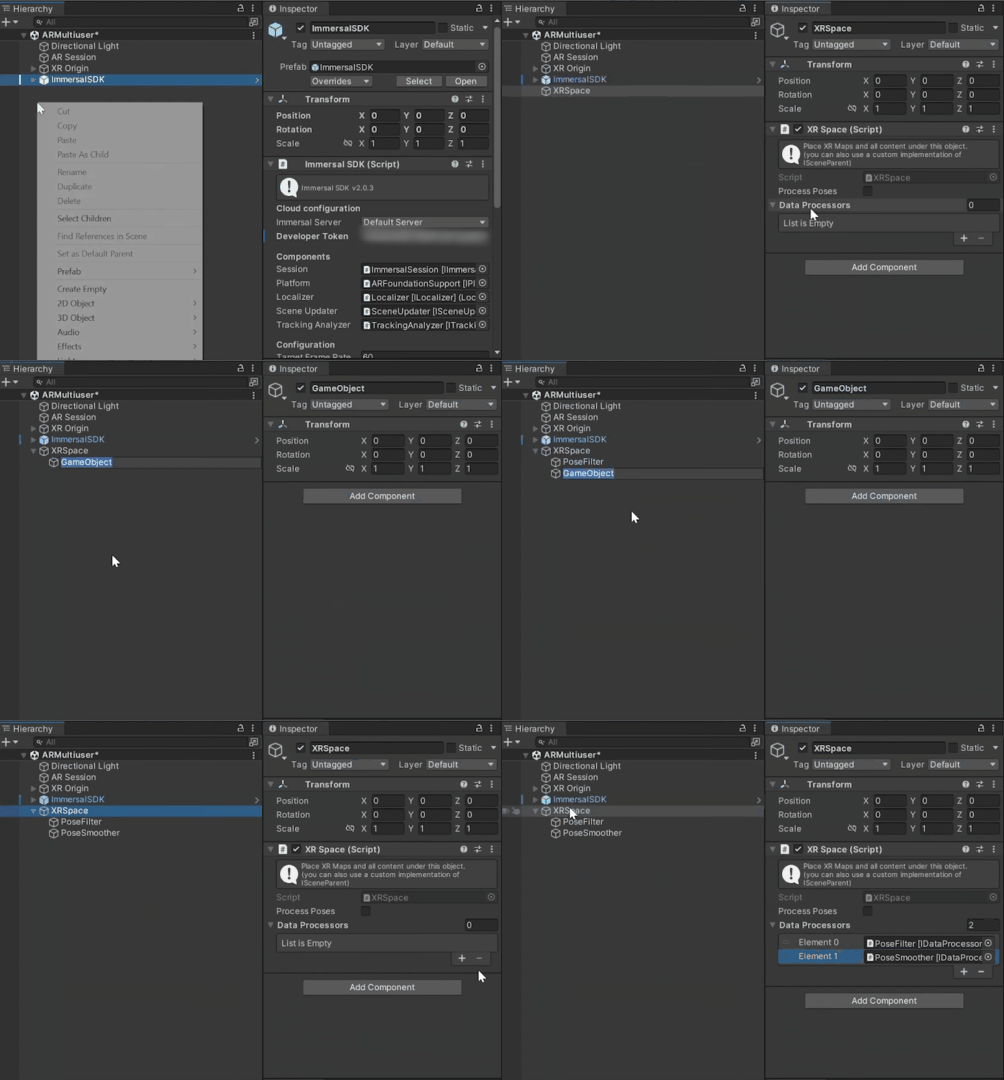
-
Download the Spatial Map
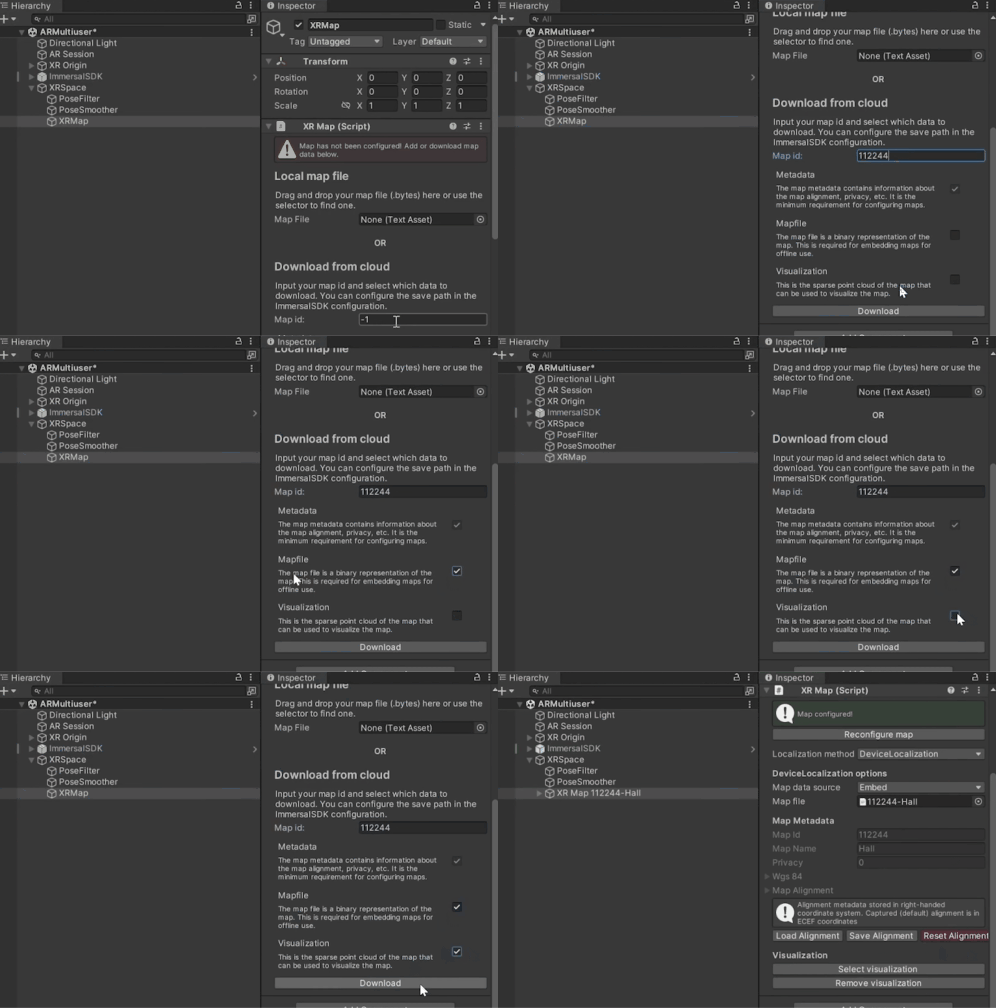
Under XR Space, create an empty GameObject named XR Map and add the XR Map component.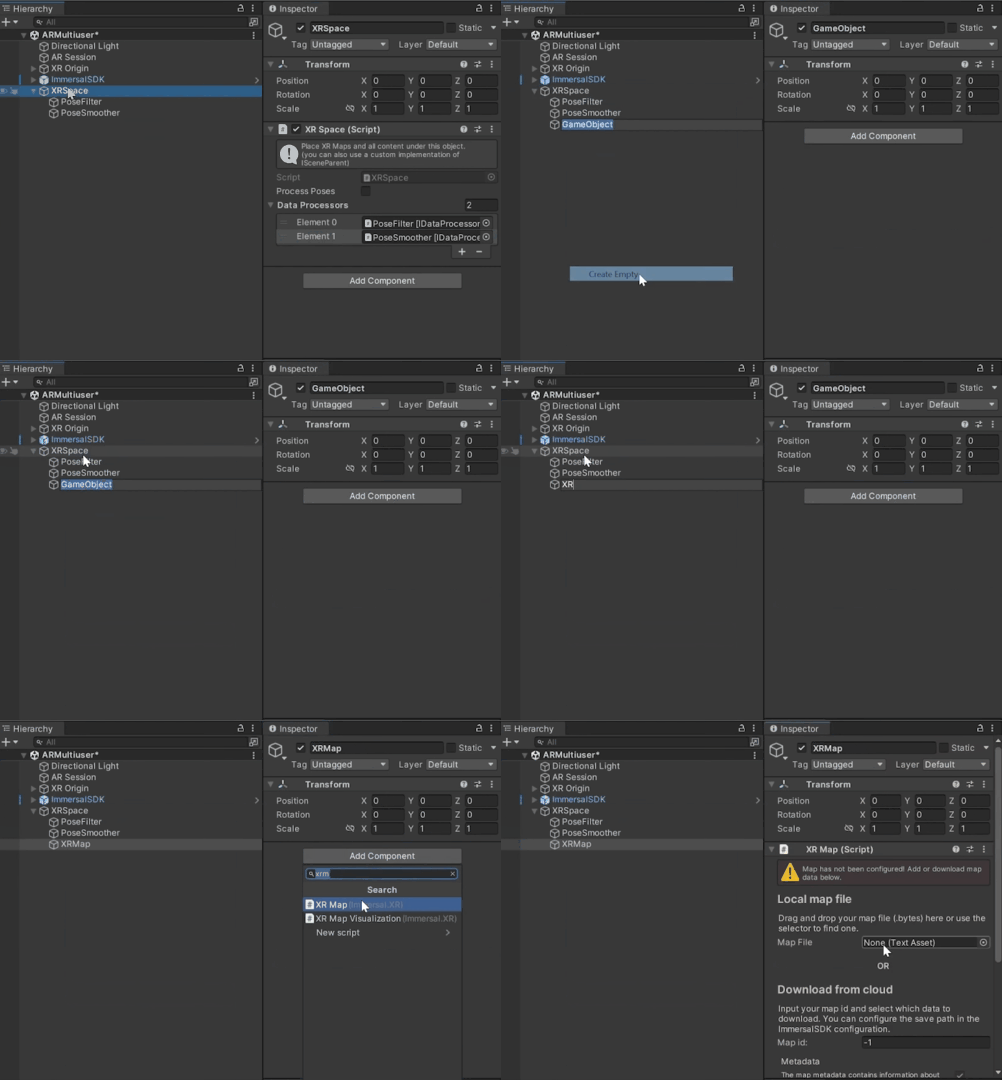 To download the map:
- Visit the developer portal and copy the map ID.

- Paste the map ID into Unity and check the boxes for Map File and Visualization. Click Download to get the point cloud of the mapped environment.
Downloading Required Assets and Setting Up Photon Fusion
Next, we’ll need some additional assets and packages to complete our setup.
-
Download and Import Assets
You’ll need the Dragon Boss Monster, Joystick Pack, and Photon Fusion. You can get all of these from the Unity's Asset store.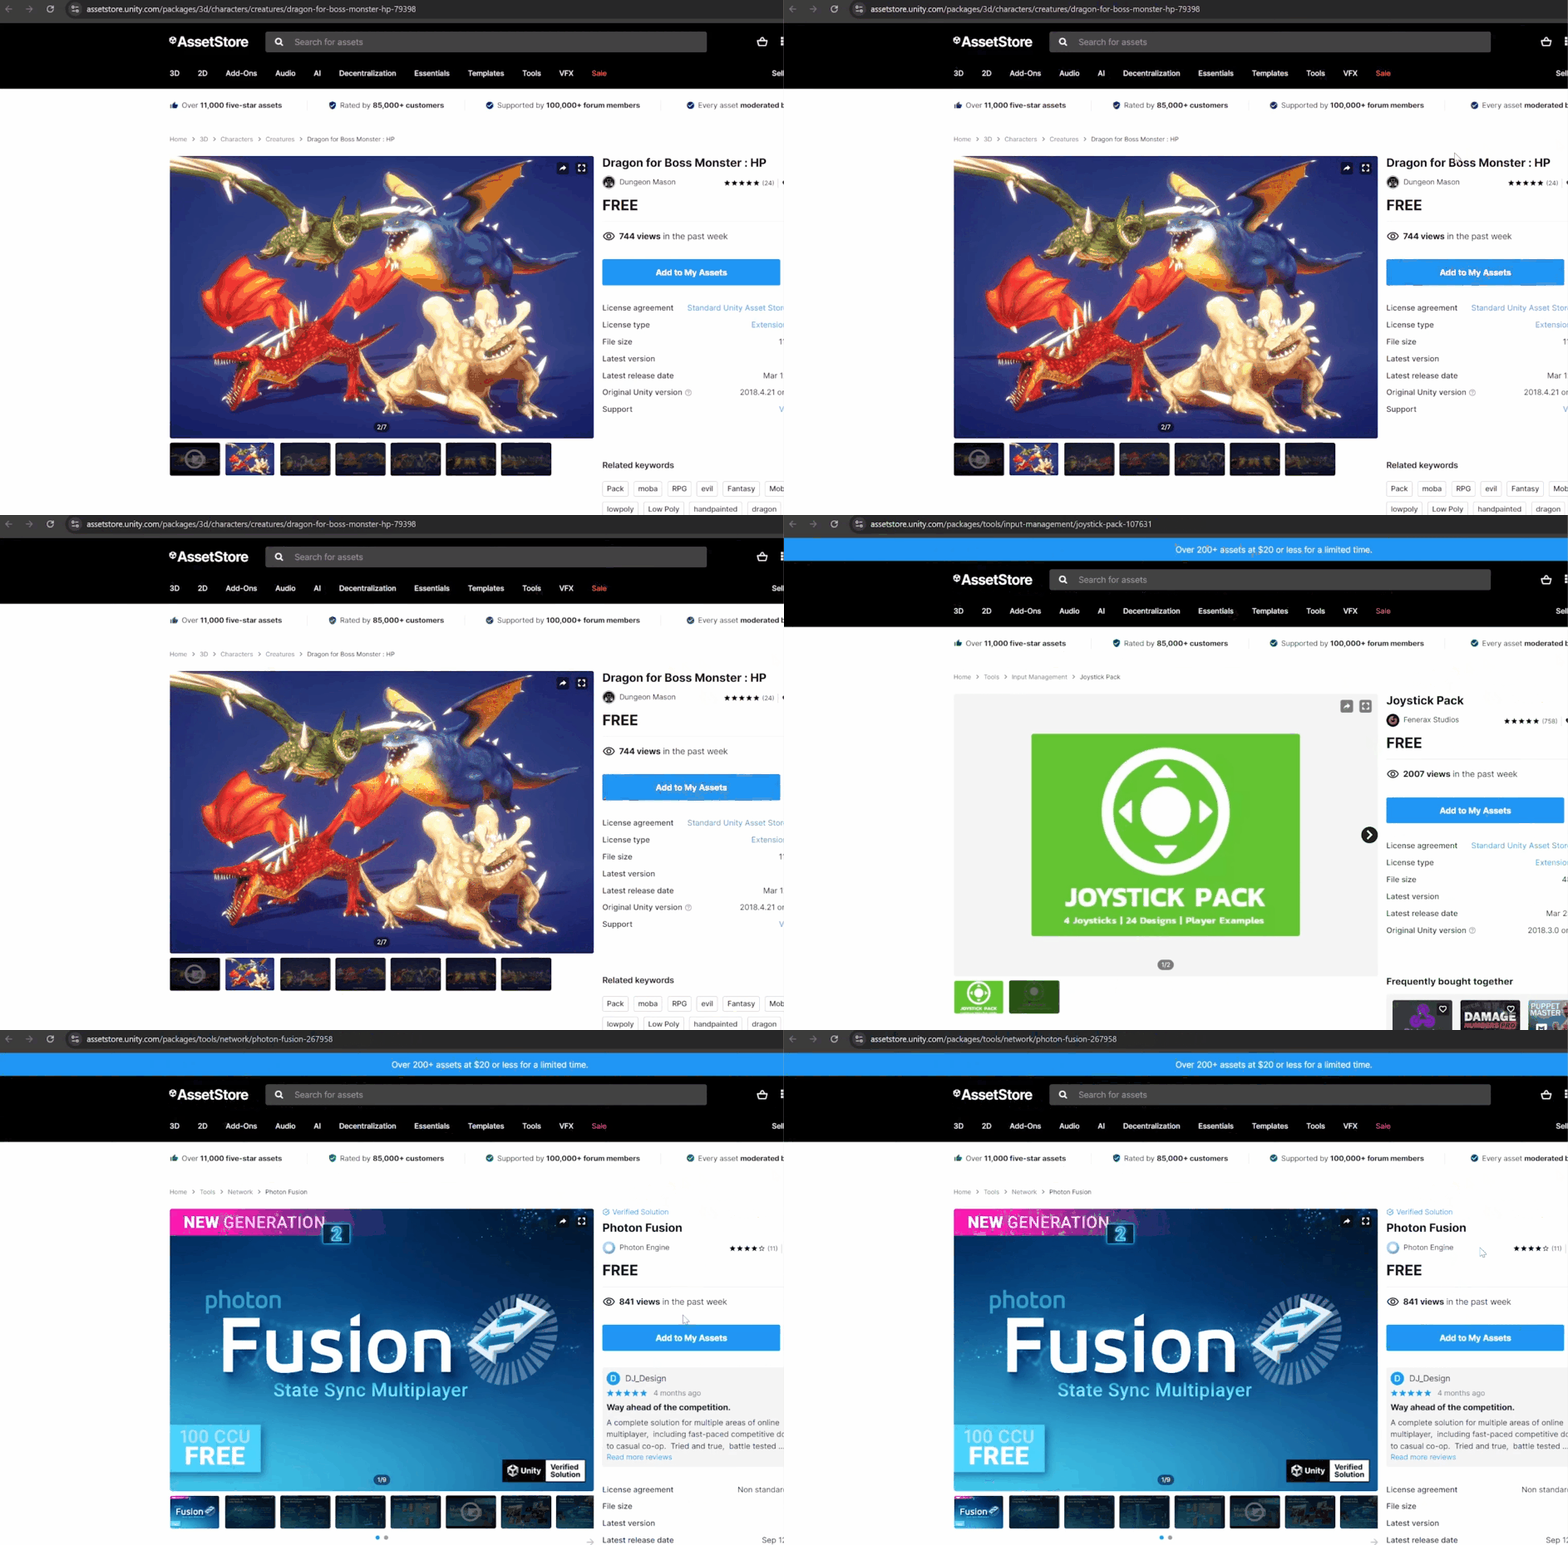
-
Photon Fusion Setup
Log into your Photon account, create a new app, and select Photon Fusion as the SDK. Copy the App ID and paste it into Unity.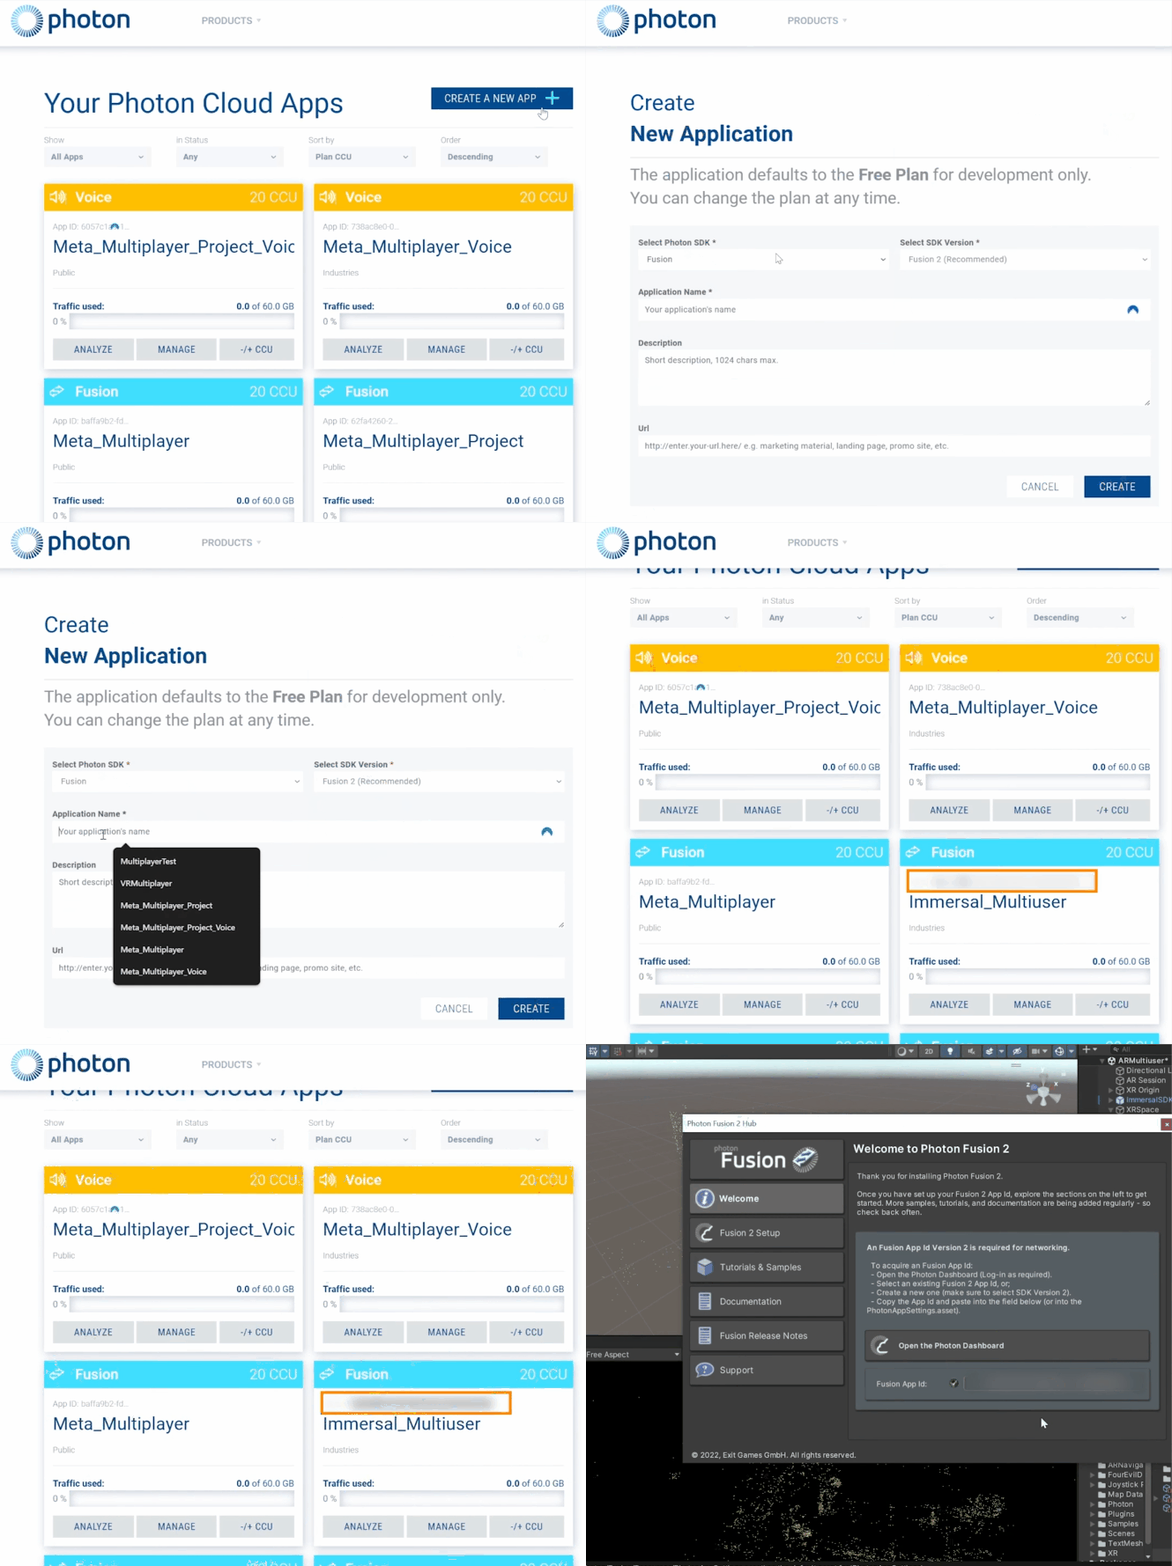
-
Download Immersive Multi-User Package
Download this Immersive Multi-User Package . This package contains prefabs like Debug UI, Joystick Canvas, and Multiuser UI. Add these to your XR Space.

Configuring the Multiplayer UI and Scripts
Now that the assets are imported, we need to configure the multiplayer UI and scripts.
-
Debug UI
Although optional, the Debug UI is helpful for debugging, as it can show errors or confirm multiplayer functionality. Open the Debug UI prefab and disable the Debug Scroll View for now.
-
Joystick Canvas
In the Joystick Canvas, you’ll find the horizontal and vertical fixed joysticks, which allow for player control. These are part of the Joystick Pack we downloaded earlier.
-
Multi-User UI
The Multiuser UI prefab allows users to create or join a room using an input field for the room code and two buttons—Create Room and Join Room.
-
Scripts Overview
Let’s go over the key scripts involved:
- Network Manager: Handles room creation, player connection, and player ID logging. It also invokes the OnPlayerJoin event when a player joins.
- Connection Manager: Simple script to create or join rooms based on input from the UI.
- Network Dragon Spawner: Responsible for spawning dragons for each player in the session.
- Dragon Controller: Manages the movement of dragons using joystick inputs.
- Game Manager: Coordinates the downloading of the map and spawning of dragons when players join.
- Spawn Behavior: Ensures networked objects are placed correctly under the
XR Space when spawned.
Setting Up Dragons
Now, let’s prepare the dragons for multiplayer.
Prefab Setup
- Navigate to the Dragon Assets Folder: Select three dragons from the assets.
- Fix Materials: Convert the materials to URP by selecting all materials and using Edit > Rendering > Materials > Convert Selected Built-in to URP.

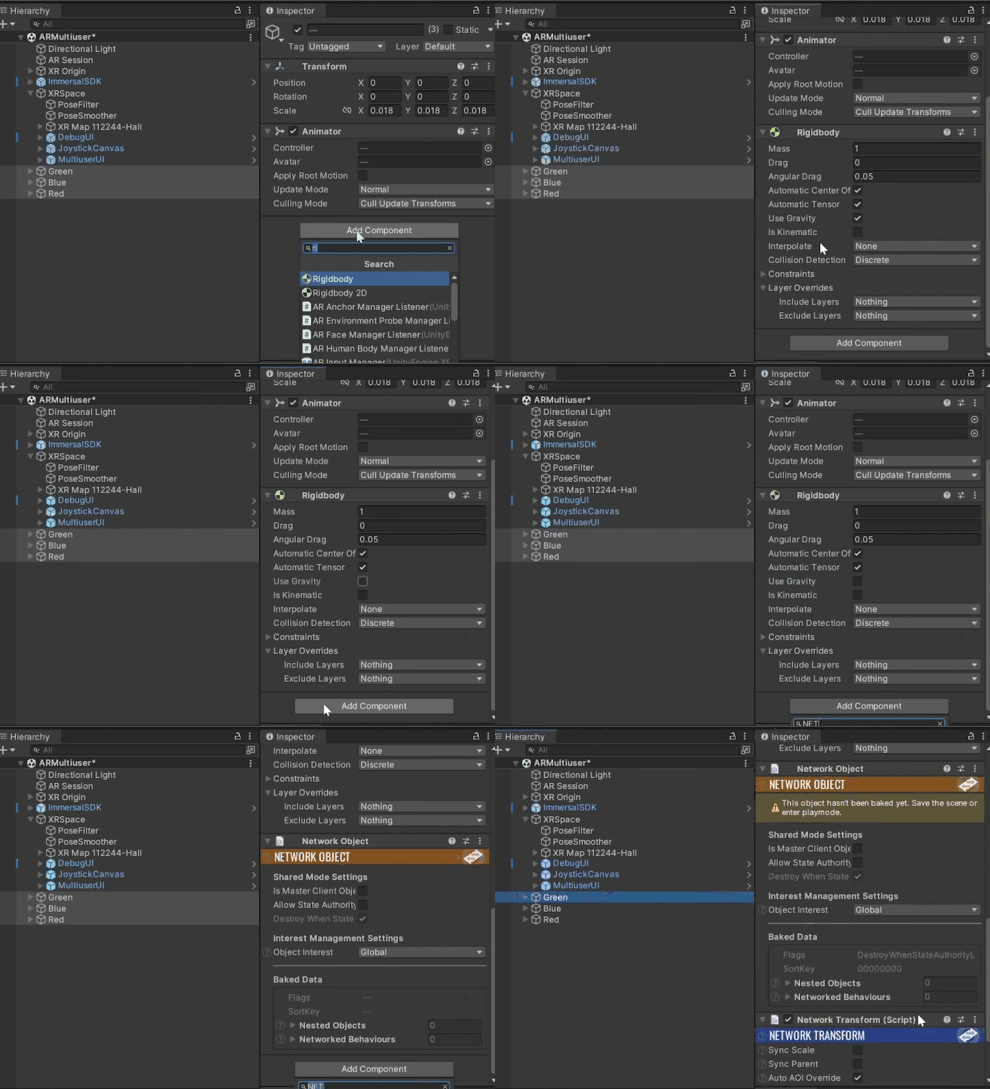
- Add Components: Unpack the prefab and add the following components to each dragon prefab:
- Rigidbody (uncheck Use Gravity)
- Network Object
- Network Transform
- Spawn Behavior
Animator Setup
Configure the animations for the dragons:
Make sure to set up transitions between these animations (e.g., from Idle to Takeoff, and from Flying to Gliding). You can loop the flying animations as needed.
Select the Dragons, move them into the project folder and delete it from the scene.

Reference Dragons in the Network Manager
Once the dragons are set up,
- Create an empty object as a child of XR Space call it as GameManager and add the GameManager component it.
- This needs a runner prefab so let's create one. Create an empty object object call it as Runner prefab → add the Network Runner and the SpawnBehavior component → then select the prefab and drag and drop it inside the prefabs folder delete it from your scene.
- Next add the network dragon spawner component to the network manager and here we can reference these three prefabs that we created earlier.
- Add DragonController Component and link the joysticks and other necessary components as required.

Game Manager
- Create an empty gameobject, name it GameManager and add the GameManager Component.
- Reference the necessary components as required.

Final Steps
Before building and testing the application, there are two more steps:
- Add Localization and Pose Indicators: Create a UI canvas and add the Localization Status and Pose Indicator prefabs to it. These will let the user know how well the device is tracking.

- Connect Buttons to Functions: Reference the buttons in the Multi-User UI and add the Connection Manager component to handle room creation and joining.

Testing the AR Multi-User Experience
Once you’ve set up everything, it’s time to test the app.
-
Build and Install
Build the app and install it on your device.
-
Create or Join a Room
You can now create or join a room using the Multi-User UI. Once players join, you’ll see dragons spawn in the environment, and you can use the joystick or touch inputs to control them.

Conclusion
With these steps, you’ve successfully created a local AR multi-user experience using Photon Fusion and the Immersal SDK. This setup allows multiple users to interact with a shared environment, providing a foundation for building more complex AR multiplayer experiences.
What’s Next?
This tutorial has equipped you with the skills to create a local AR multiplayer app. From here, you can:
- Add custom avatars or mini-games.
- Enhance interaction features.
We’d love to see your projects! Share them with us on LinkedIn or Discord.


 To download the map:


