
The bow and arrow are considered as high damage and stealth weapon in most games today. If you have played games like FarCry or Assassins Creed you will know how amazing they are to play with. With VR, we can take that experience to the next level. With the freedom to choose the type of bow, visual effects, sound effects, etc. we can create an immersive experience for the user.
This blog was inspired by Unity's prototype series.
1. Prerequisite
You must have a basic knowledge of installing the XR Interaction Toolkit, its components and properties, working with prefabs, and the basics of C# as well.
You should know how to set up a scene with a ground plane and an XR Rig. If not, this tutorial will help you get started with the XR Interaction Toolkit. You can learn more about prefabs here.
2. Importing and setting up the models:
2.1 Bow GameObject
Let's start by importing the models. We'll set up the Bow in such a way that the bow model can be changed easily without affecting any of the interactions.
- Create an empty GameObject and name it Bow.
- Drag the Bow prefab from the project folder and place it as a child of the GameObject Bow. Rename the bow prefab as BowPrefab.
- Add a Box Collider to the BowPrefab where the user can grab the bow.
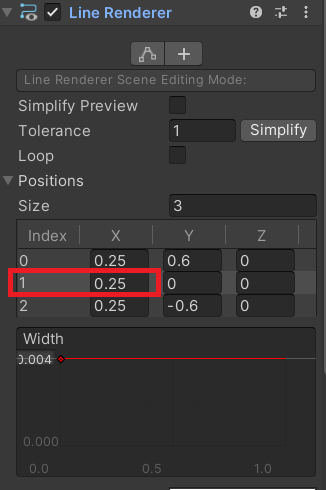
- For the string, we'll use a line renderer. So, create an empty GameObject as a child of the GameObject Bow and name it Line. Add the Line Renderer component→ Make sure the Use World Space field is unchecked → Set the Size of the position field to 3 and adjust its values so that it matches the bow → Add a material to the string, you can either create your own or make use of the String material provided along with the asset → Reduce the width of the line to a value of your choice.
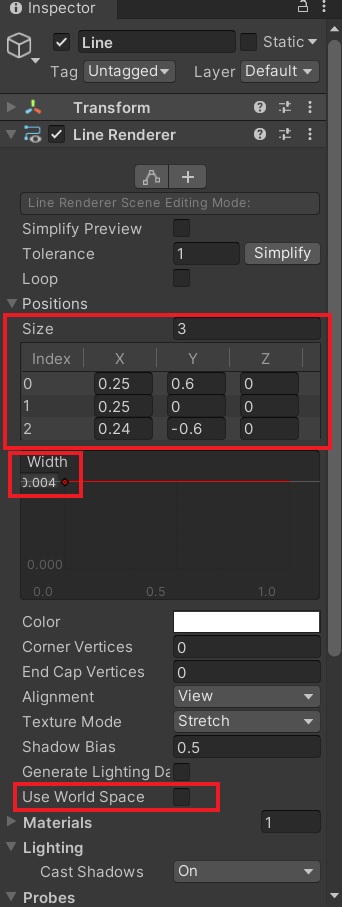
The reason for using the LineRenderer with 3 points is that its value at index 1 can be used to visualize the stretching effect of the string and the attachment point of the arrow.

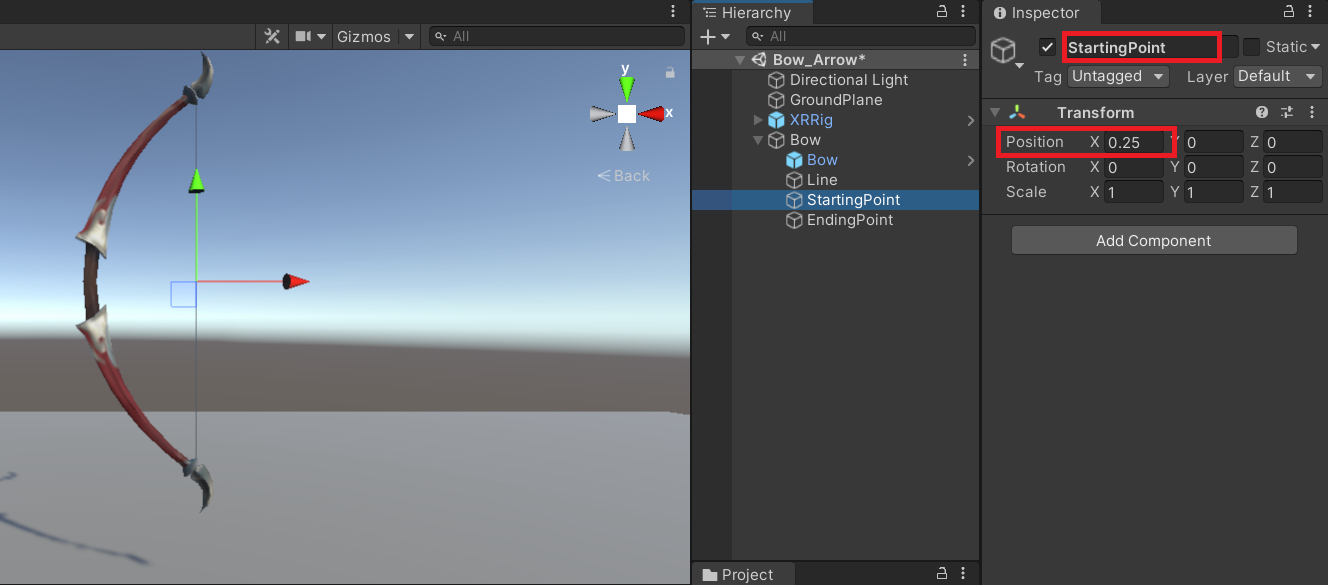
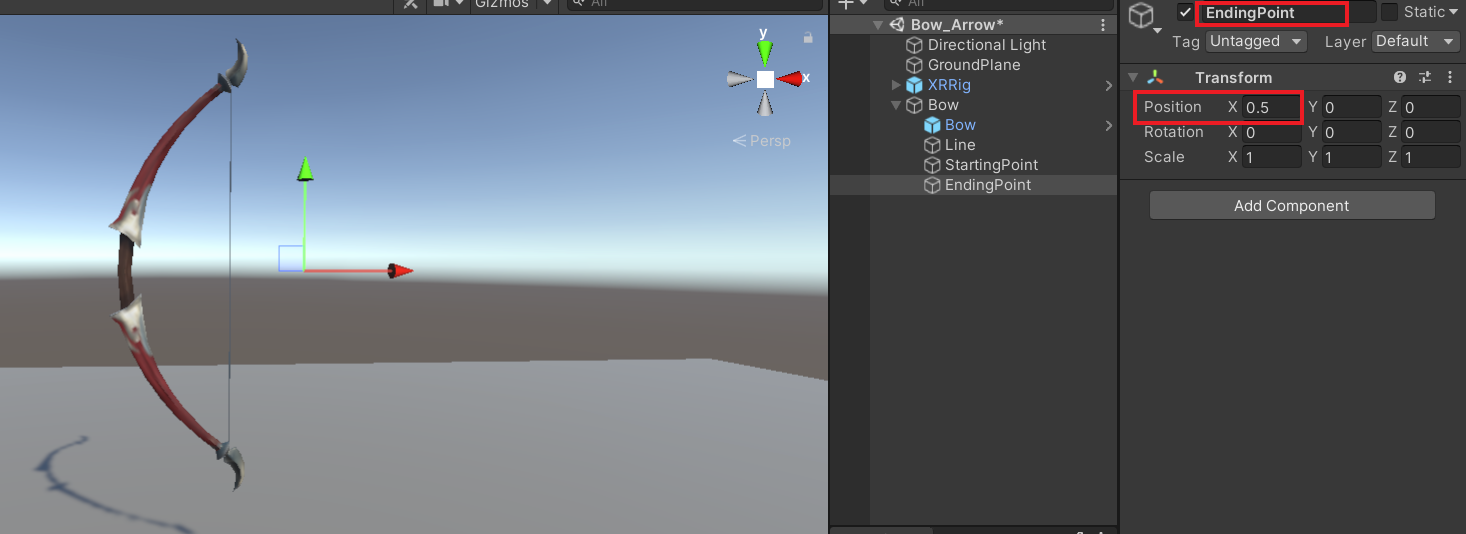
- Create two empty GameObjects as children of the GameObject Bow. → Name them StartingPoint and EndingPoint. The transform values of these GameObjescts will later be used as the starting and the ending point of the BowString. So, adjust the transform value of the GameObject StartingPoint such that it has the same value as the vertex at position 1 of the LineRenderer. Also, adjust the transform of the GameObject EndingPoint to a point where you feel the string would reach its maximum pull position.
- Create an empty GameObject and name it String → The transform value of this should be the same as the value of Line Rendered at index 1 → Add a spherical collider and check the "Is trigger" box → Adjust the collider radius. The collider radius will determine the space within which the string can be grabbed. This GameObject will later be used as an interface to pull the string (with or without the arrow).
2.2. Setting up Arrow GameObject
With the Bow GameObject created, next up is the Arrow GameObject.
- Create an empty game object and name it Arrow.
- Drag the Arrow prefab from the project folder and place it as a child of the GameObject Arrow. Rename the Arrow prefab as ArrowPrefab.
- Originally the arrow prefab will be facing downwards, so rotate it by -90 units about the x-axis such that the prefab is always facing the parent's local z-axis.
- Add a Box Collider to the ArrowPrefab where the user can grab the arrow.

- Create an empty game object as a child of the and name it as tip. Align it to the arrow's tip. (The transform of this game object will be used later while scripting the arrow interaction)
- Create a tag named Arrow and assign it to the Arrow GameObject.
3. Scripting the Interactions
We have 4 main features :
-
String Interaction
-
Bow Interaction
-
Arrow Interaction
-
Socket Interaction
These features will enable us to have the bow and arrow interaction in VR, as soon as we combine them.
3.1 String Interaction
This section focuses on the string interaction. Answering a few of the following questions will give you a better understanding.
- In which direction can we pull the string? In this project, the string movement is restricted only in one direction i.e backward. It is constrained to its local x-axis i.e it cannot be pulled left or right.
- What happens if the user pulls it in the other direction? If the string gets pulled towards the left or the right, visually the sting will get pulled backward, but the extent of the pull will be determined using vector calculation.
- To what extent can the string be pulled? The extent to which the string can be pulled is determined by playtesting the interaction.
- What should happen when the string is pulled? A floating type number should be returned which can be used later for implementing other features like moving the arrow, visualizing the string pull using a line renderer.
3.1.1 The Code
Let's code the string interaction that will enable us to pull the string between two fix points that we have already created above and return a value between 0 and 1 based on the position of the string.
In the next section 3.1.2 we have the breakdown of the code as well, so don't worry if you are not able to understand the math behind the code immediately.
Create a new C# script, name it StringInteraction and copy the following code. The code will return a value for the variable PullAmount when the string is grabbed and pulled. The value of PullAmount is based on the interactor's position and string position in world space.
3.1.2 The code breakdown
This section will help you understand the code, feel free to skip to Section 4.1.3 if you understood the program.
Declarations
The script inherits from XRBaseInteractable class.
| Variable Name | Type | Use |
|---|---|---|
| stringStartPoint | is of type Transform | To store the transform values of the starting point of the string |
| stringEndPoint | is of type Transform | To store the transform values of the ending point of the string |
| stringInteractor | is of type XRBaseInteractor | To assign the interactor that will be pulling the sting. In this case it can either be the left hand or the right hand. |
| pullPosition | is of type Vector3 | To store the position of the VR hand after pulling the string |
| pullDirection | is of type Vector3 | To store the direction of pull |
| targetDirection | is of type Vector3 | To store the direction the bow is facing |
| PullAmount | is a Property of type float | To store the pull value privately in this class. It is a read only and other classes can read the pull value using this property. |
| StringStartPoint | is a Property of type Vector3 | To store the local position of the variable stringStartPoint. It is read-only and other classes can read the local position value using this property. |
| StringEndPoint | is a Property of type Vector3 | To store the local position of the variable stringEndPoint. It is read-only and other classes can read the local position value using this property. |
This section will help you understand the code, feel free to skip to Section 4.1.3 if you understood the program.
Declarations
As the script inherits from XRBaseInteractable class:
- The access modifiers such as protected or public will be the same as the existing function.
- The keyword override is used as we are adding functionalities to already existing functions.
- The keyword base followed by the method call is used to call the same method of the base class and make sure its code was executed already, before adding our code.
- The functions OnSelectEntered or OnSelectExited are called when the Interactor (in our case the VR hands) grabs or releases the Interactable (String) respectively.
- When the function OnSelectEntered gets called, the Interactor is passed from the event arguments to the variable stringInteractor.
- Similarly, when the function OnSelectExited gets called, the Interactor is removed from the variable stringInteractor and the value of the variable PullAmount is set to zero. Setting the value to zero would mean that the string goes back to its original position.
Update and Calculation
- The ProcessInteractable function can be considered as the Update function for the XRInteractions. When the ProcessInteractable function gets called, ...
- ...it first checks if the updatePhase is Dynamic. What it means by that is only if the Interactables are getting updated in real-time then the following code will be executed. If they are getting updated in the Fixed or Late updatePhase, the interactions will not be smooth.
- ... it checks if the string is grabbed with the help of isSelected function.
If both the conditions are met, the position of the Interactor is assigned to the variable pullPosition, which is then passed as a parameter to the function CalculatePull.
-
CalculatePull is a function that takes a Vector 3 parameter ( in our case it's the position of the Interactor) and returns a value between 0 and 1. This function mainly involves mathematical calculations (vector calculations) and this is how it works
Consider the following example where the starting position of the string is at (0, 0) coordinate and the string can stretch max up to (0, -2) coordinate.
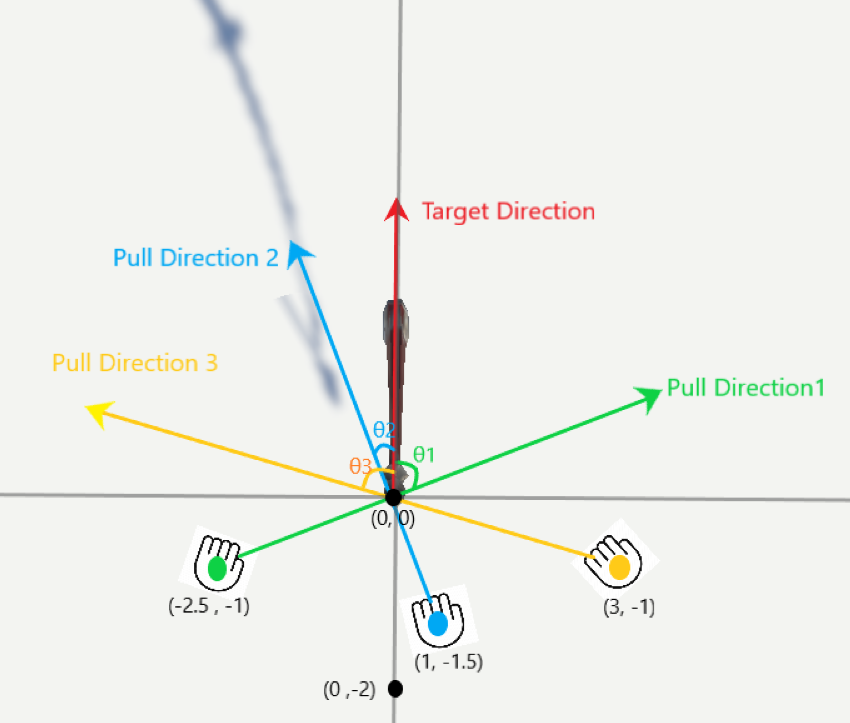
Vector3 pullDirection = pullPosition - start.position; The pullDirection vector is calculated by finding the difference in the position of the Interactor and the position of the string at the start. The value of the vector depends on how far behind the hand is with respect to the string's starting point and the direction depends on where the hand is positioned. For this example, let's consider three different pullPositions therefore three different pullDirection vectors.
Vector3 targetDirection = end.position - start.position; The targetDirection vector is calculated by finding the difference between the string's ending position and starting position. The value of the vector remains constant but the direction changes based on which direction in which the user is pointing the bow. For this example, let's consider the targetDirection as a vector starting from (0,-2) coordinate and passing through (0, 0) coordinate.
float maxLength = targetDirection.magnitude; maxLength is the magnitude of the targetDirection. The magnitude of the vector is the square root of (x^2*+y^2*+z^2). In this example, the targetDirection has the coordinates (0,0) and (-2,0), so the magnitude is sq.root of ( (x1-x2)^2 + (y1-y2)^2) = sq.root of ( (0^2) +(-2^2)) = 2 . So the value of maxLength is 2
targetDirection.Normalize(); The function Normalize() changes a given vector to a vector with unit length but the direction remains the same. In this example, the vector is having a magnitude of 2. After using the Normalize() function the vector will be facing the same direction but its magnitude is now 1. Why Normalize? The reason for doing this is so that we can get the pullValue to as close as 0 and 1. You will have a better understanding after the next section.
float pullValue = Vector3.Dot(pullDirection, targetDirection) / maxLength; The pullValue is calculated by finding the dot product of the pullDirection and targetDirection followed by division with maxLength. The dot product is calculated by multiplying the magnitudes of the two vectors and the cosine of the angle between them. For this example let's consider the angles as 37deg, 83 deg, and 31deg for pullDirection1, pullDirection2, and pullDirection3 respectively.
We know that magnitude of targetDirection is 1. Let calculate the magnitude for the pull directions: Case 1: The Pull Direction 1 vector has coordinate (0,0) and (-2.5, -1.0), on calculation, the magnitude equals 2.692. Case 2: The Pull Direction 2 vector has coordinate (0,0) and (1.0, -1.5), on calculation, the magnitude equals 1.802. Case 3: The Pull Direction 3 vector has coordinate (0,0) and (3.0, -1.0), on calculation, the magnitude equals 3.162.
Now that we have the magnitudes for both the vectors lets calculate the pullValue for both: Case 1: pullValue = 2.692 * 1* cos(37) / 2 = 1.03 Case 2: pullValue = 1.802 * 1* cos(83) / 2 = 0.33 Case 3: pullValue = 3.162 * 1* cos(31) / 2 = 1.123
If the target direction vector was not Normalized then the pull value would have been twice as big. This means, clamping the values between 0 and 1 would always return a number closer to 1.
return Mathf.Clamp(pullValue, 0, 1); The Clamp function is used to return the given value if it is within the min and max range. It returns the min value if the given float value is less than the min and returns the max value if the given value is greater than the max value. We need the value to be always between 0 and 1. For example, if the pullValue is -0.5, the value returned is 0. If the pullValue is 1.45, the value returned is 1. If the pullValue is anything in between 0 and 1, the same value is returned.
3.1.3 Testing
Before proceeding to the next steps, let's test if this works as intended.
- In the StringInteraction script, uncomment the line 44: Debug.Log("<<<<< Pull amount is "+ PullAmount+" >>>>>");
- Save the script and add it to the GameObject String.
- Drag and drop the GameObjects StartingPoint and EndingPoint in the respective fields.
- Add XRGrabInteractable component to the GameObject Bow → Add the collider of the BowPrefab → On the rigid body component check the box for Use gravity and Is Kinematic.

Note: While developing this project I made use of the XR Simulator for testing. I felt it speeds up the development process.
- Play the scene. Grab that string and slowly start pulling it.
- Once you start pulling, you can see the Console window logging the value of pullAmount, which will always be a value between 0 and 1.
You will not be able to see the string getting pulled visually and that is because we are yet to implement that feature. In the next section, we will use the pullAmount value to move the line renderer to represent the pulling action

- Exit the play mode → go back the script and comment the line 44: Debug.Log("<<<<< Pull amount is "+ PullAmount+" >>>>>"); You can delete it as well.
- First, remove the XRGrabInteractable component and then remove the RigidBody component from the GameObject Bow.
3.2 Bow Interaction
This section focuses on the overall bow interaction. The bow interaction involves:
- Making the bow grab interactable.
- Updating the line renderer to show the sting movement.
- Moving the GameObject String within the starting and ending point when pulled. (In the later stage, a socket interaction component will be added to the GameObject String. The socket will hold the arrow in place. So moving the GameObject String will in turn move the arrow.)
3.2.1 The Code
In the next section 3.2.2 we have the breakdown of the code as well, so don't worry if you are not able to understand the math behind the code immediately.
3.2.2 The code breakdown
This section will help you understand the code, feel free to skip to Section 4.2.3 (Testing) if you understood the program.
Declaration
| Variable Name | Type | Use |
|---|---|---|
| bowString | is of type LineRenderer | To update the mid-point of the line rendered based on the pullAmount |
| stringInteraction | is of type StringInteraction | To get the value of PullAmount |
| socketTransform | is of type Transform | To store the transform value of the socket interactor which is nothing but the transform of the GameObject String |
| BowHeld | is a Property of type bool | To store true if the bow is grabbed and false if it not grabbed. It is a read only and other classes can read the boolean value. |
- As the script inherits from XRBaseInteractable class:
- The access modifiers such as protected or public will be the same as the existing function.
- The keyword override is used as we are adding functionalities to already existing functions.
- The keyword base followed by the method call is used to call the same method of the base class and make sure its code is executed already, before/ after adding our code.
- The function Awake() is called when the script instance is being loaded. On Awake, the variables are initialized to get the respective components.
- The functions OnSelectEntered or OnSelectExited are called when the Interactor (in our case, its the VR hands) grabs or releases the Interactable (Bow) respectively.
- When the function OnSelectEntered gets called, the variable BowHeld is set to true.
- Similarly, when the function OnSelectExited gets called, the variable BowHeld is set to false.
Update and Calculation
- As stated earlier, the ProcessInteractable function can be considered as the Update function for the XRInteractions. When the ProcessInteractable function gets called, ...
- ...it first checks if the updatePhase is Dynamic. What it means by that is only if the Interactables are getting updated in real-time then the remaining code will be executed. The reason for having this check is, if they are getting updated in the Fixed or Late updatePhase, the interactions will not be smooth.
- ...it calls the function UpdateBow and passes the PullAmount as its parameter.
- The UpdateBow function takes a float value and updates the position of the line renderer and the socket. Wondering how it works?
- The positions array of the line renderer is set to a size of 3. It holds the start, center and endpoint of the bowString. The first and last points are fixed. So the positions of the middle point (index 1) have to be changed to visualize the string getting pulled, mainly the local x component of the position.
- float xPositionStart = stringPosition.stringStartPoint.localPosition.x; The local x position of the string's starting point is stored in the variable xPositionStart. In our case the starting position is (0.25, 0, 0) . So the value of xPositionStart is going to be 0.25.
- float xPositionEnd = stringPosition.stringEndPoint.localPosition.x; The local x position of the string's ending point is stored in the variable xPositionEnd . In our case the end position is (0.5, 0, 0) . So the xPositionEnd is going to be 0.5.
- Vector3 linePosition = Vector3.right * Mathf.Lerp(xPositionStart, xPositionEnd, pullAmount);
Vector3.right gives a vector with component only in the x-axis i.e it is a shorthand for writing Vector3 (1, 0, 0).
The lerp function linearly interpolates the pullAmount between the values of starting point and ending point. In our case it gives back the value in the range from 0.25 to 0.5 for a given value t. t is clamped from 0 to 1 and represents a percentage.
For example, t=0.5 gives back the middle of the range, which would be: 0.375.
t=0 gives back the starting value of the range, which would be: 0.25 and t=1 gives back the ending value of the range, which would be: 0.5.
Finally, the vector(1, 0, 0) is multiplied with the returned value which gives the current position of the string. That value is stored in the variable linePosition.

- bowString.SetPosition(1, linePosition); SetPosition is an API method of the LineRenderer component, which takes an index as integer, which corresponds to the vertex in the line and sets it to a given position defined as Vector3.
- socketPosition.socketTransform.localPosition = linePosition; When the string gets pulled / released, this line of code moves the socket along with the string. So that the arrow when attached to the socket can also move along as well.
3.2.3 Testing
Let's now test if this works as intended.
- Add the BowInteraction script to the GameObject Bow.
- The Bow has two colliders, one on the BowPrefab and one on the String. To make sure that the bow is grabbed only from the collider in prefab, drag and drop the BowPrefab in the collider field of the BowInteraction component.
- Later, a socket interaction will be added to the String GameObject which will hold/ keep the arrow in place. To move the arrow along with the string we need to drag and drop the String GameObject into the socket transform field.

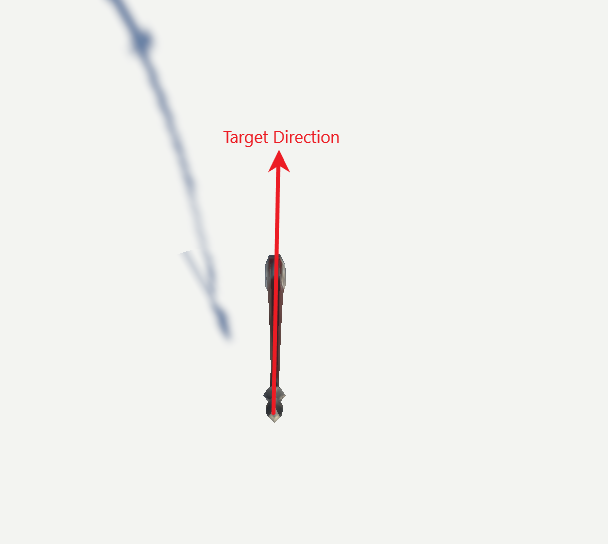
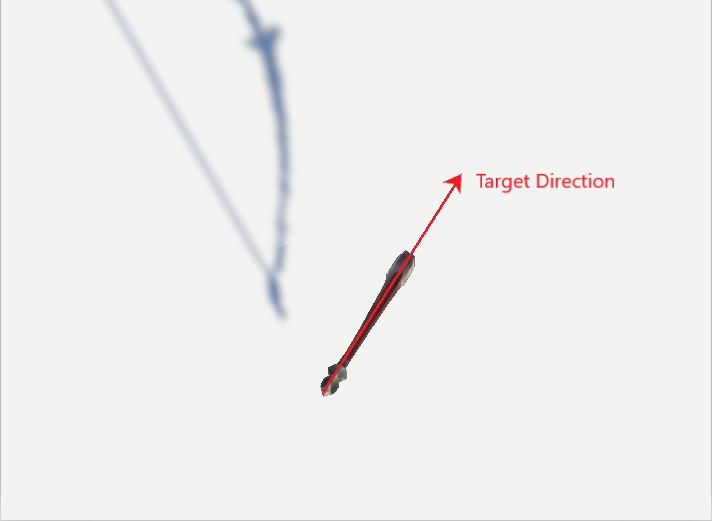
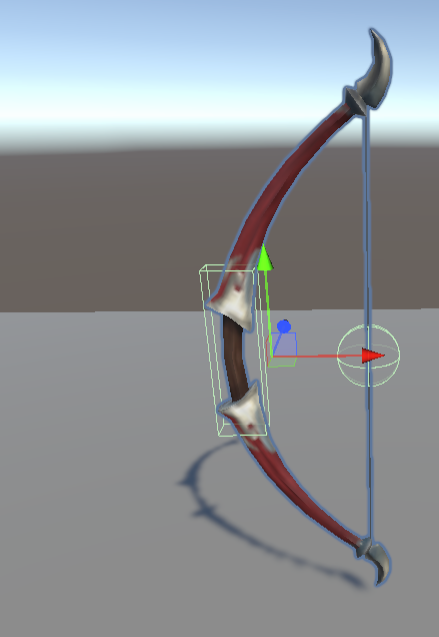
- Play the scene and test it by grabbing the bow. While doing that, there is possibility that the orientation could be wrong, as you can see below.
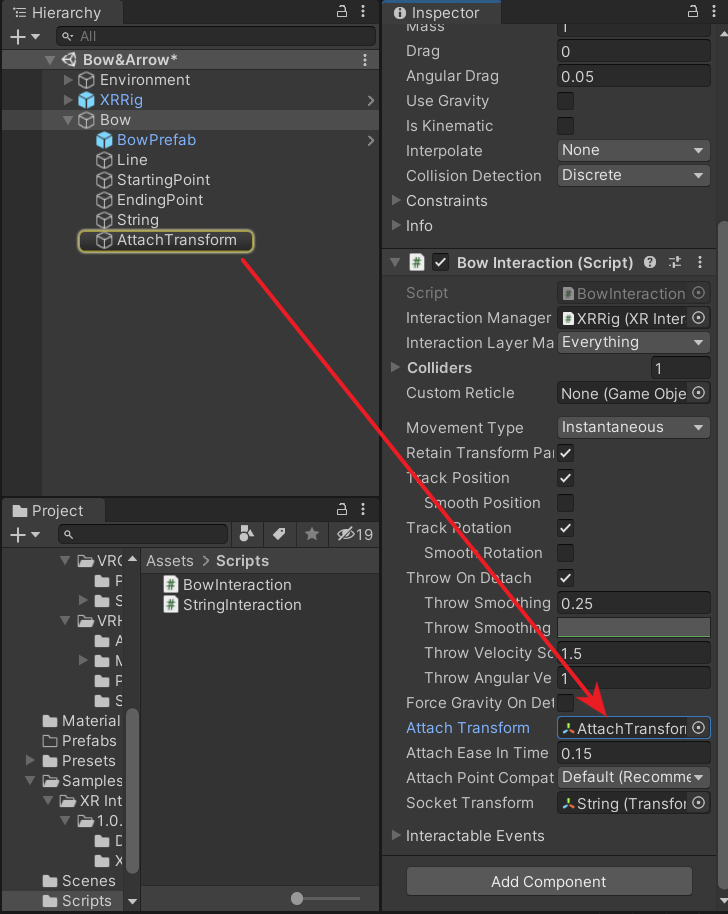
- To correct this, create an empty object as a child of Bow and name it AttachTransform. Set the rotation and position of the attach transform to the desired orientation. For this case the bow is turning about y-axis by -90 units, so set the rotation of the attach transform to -90 units in y-axis.
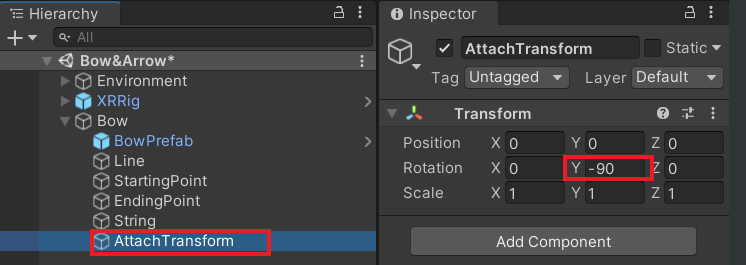
- Drag and drop this gameobject inside of the BowInteraction component's attach transform field.
Note: While developing this project I made use of the XR Simulator for testing. I felt it speeds up the development a lot since there is no need to put on the headset all the time.
- Play the scene once again and now you will be able to grab the bow. Also, you will be able to see the string getting pulled visually as well.
3.3 Arrow Interaction
In this section, we will set up the arrow such that it can be grabbed and fired using the bow. Answering a few of the following questions will give you a better understanding.
- How to fire the arrow upon release? We will apply a force in the forward direction.
- How much force should be applied? The force applied will be proportionate to the string pull amount.
- How to decide its path/ trajectory? By using physics and LookRotation API method of Quaternion that does vector calculations.
- What happened when it comes in contact with another object? The arrow will get attached to the object and it will impart some force to it if it has a Rigidbody component.
3.3.1 The Code
3.3.2 The code breakdown
This section will help you understand the code, feel free to skip to Section 4.3.3 (Testing) if you understood the program already.
Declaration
| Variable Name | Type | Use |
|---|---|---|
| xRGrabInteractable | is of type XRBaseInteractor | To make use of events that are called from this component |
| inAir | is of type Boolean | To store the value as True when the arrow is launched and False in other cases. |
| lastPosition | is of type Vector3 | To store the last position the arrow was as it moved through the air. Will be used for line cast. |
| arrowRigidBody | is of type Rigidbody | To make changes to the rigidbody component that is attached to the arrow. |
| speed | is of type Float | To store value which represents the speed with which the arrow flies when launched from the max stretch position |
| tipPosition | is of type Transform | To store transform of tip of the arrow is it moves in the environment. Will be used for line cast. |
Initialization
The function Awake() is always called before any Start functions and also just after a prefab is instantiated. (If a GameObject is inactive during start up Awake is not called until it is made active.) So, on Awake:
- The variables are initialized to get the respective components.
- The variable inAir is set to false, as the arrow is stationary at the beginning,
- The last position is initialized to a zero vector.
- The RigidbodyInterpolation parameter of the Arrow's RigidBody component is set as interpolate. Interpolation allows you to smooth out the effect of running physics at a fixed frame rate.
Update and Calculation
This section is a bit lengthy so I have broken it down into smaller parts
a) FixedUpdate()
Update runs once per frame, FixedUpdate can run once, zero, or several times per frame, depending on how many physics frames per second are set in the time settings, and how fast/slow the frame rate is. So, at the end of every frame, a check is being made to see if the arrow has been launched. If the value is true, the CheckCollusion() method is called and the last position variable is updated to the current tip position.
b) CheckCollision()
Finally, the arrow is made to stop using the StopArrow() method.
c) StopArrow()
It is a private method. This method assigns a boolean false to the inAir variable and sets the physics of the arrow to false using the SetPhysics() method.
d) SetPhysics(bool usePhysics)
It is a private method. This methods takes a boolean value and enables or disables the gravity and kinematic of the rigidbody component attached to the arrow.
When this method is called by passing a Boolean true, the gravity is enabled and kinematic is disabled and when Boolean false is passed as a parameter, the gravity is disabled and kinematic is enabled.
e) ReleaseArrow(float value)
It is a public method which can be called by other classes (This function will be called by the SocketInteraction script ).
It takes a float value and it passes this value to MaskAndFire() method. It sets the variable inAir and the physics to Boolean true. It also sets the last position to the current tip position when released. Finally, it starts a coroutine RotateWithVelocity(). Both the function MaskAndFire and RotateWithVelocity are explained below.
f) MaskAndFire(float power)
It is a private method, it takes in a float value and adds a force to the arrow. The magnitude of the force is going to be the speed (set in the editor) times the power (the value of the pull amount) and it applies the force in the forward direction (local z-axis). The force is applied by using the AddForce API method of the rigidbody component.
It also disables the collider on the arrow so that it does not snap back onto the socket. Apart from that, this method updates the layer mask to "Ignore", so that no object can interact with the arrow.
g) Enumerator RotateWithVelocity()
3.4 Socket Interaction
- To release the arrow when the string is let go.
- To pass the interactor(VR hands) from the Arrow interactable to the String Interactable. What this means is that, when the user brings the arrow close to the string, the script will automatically detach the hand from the arrow and attach it to the string(String Interactaction). Simultaneously, the arrow gets attached to the socket.
And why are we doing this? To have one smooth flow instead of having 2 additional steps i.e release the arrow in the socket and then grab the string to pull.
3.4.1 The Code
Create a new C# script, name it as SocketInteraction and copy the following code. The code will allow the user to attach the arrow to the string and fire it in a single flow. This script will be inherited from the XRSocketInteractor class.
In the next section 3.4.2 we have the breakdown of the code as well, so don't worry if you are not able to understand the logic behind the code immediately.
3.3.2 The code breakdown
| Variable Name | Type | Use |
|---|---|---|
| handHoldingArrow | is of type XRBaseInteractor | To register the interactor which is holding the arrow. The interactor will be passed to the variable when it enters the socket and and removed when the interactor leaves the socket. |
| currentArrow | is of type XRBaseInteractable | To register the interactable i.e arrow when it snaps into the socket. |
| stringInteraction | is of type StringInteraction | To make use of the events and property from the StringInteraction component. |
| bowInteraction | is of type BowInteraction | To make use of the property from the BowInteraction component. |
| currentArrowInteraction | is of type ArrowInteraction | To make use of the public method from arrow interaction component, which allows us to fire the arrow |
- The function Awake() is always called before any Start functions and also just after a prefab is instantiated. On Awake, the variables stringInteraction and bowInteraction are initialized to get the respective components. The rest of the variables will be initialized only when an event takes place or when a certain condition is met.
- The functions OnEnable() and OnDisable() is called when the object becomes active and disabled respectively. OnEnable a listener is added to receive the call back from selectExited event of the string interaction. i.e when the hand let go of the string. When the listener gets that callback, the method ReleasaeArrow() is called. And, OnDisable the listener is removed.
- When the interactor first initiates hovering over an Interactable the event OnHoverEntered() gets called. When this function is called, the interactor (VR hand) is assigned to the variable handHoldingArrow.
- Next, only if the interactable is an Arrow and the bow is held, then the SelectExit and SelectEnter API methods of the interaction manager are used to first exit the hand - arrow connection and enter the hand - string connection.
- When the hand exits the arrow, the socket interactor automatically snaps the arrow in place. This is the same as releasing the arrow into a socket
- The event OnSelectEntered is called when the arrow snaps into the socket. This event calls a method to store the arrow.
The StoreArrow is a private function that takes the interactable and stores it in the variable currentArrow only if the interactable is an arrow. This check is making sure that only arrows are registered.
Then, the variable currentArrowInteraction is initialized to get the ArrowInteraction component from the stored arrow.
This method is invoked from the ExitEvent call back of the StringInteraction component. The event arguments are passed from the StringInteraction component.
The string can be exited in two ways. One is when the string is pulled and let go and the other is when the bow itself is released while pulling the string.
Now, to make sure the following functions are called only when the string is released while holding the bow with an arrow attached to the socket, the if conditional statement is used. When this statement is true, the methods ForceDetach, ReleaseArrowFromSocket and ClearVariables are called.
c. ForceDetach() and ReleaseArrow()
The method ForceDetach uses the SelectExit API method of the interactionManager to forcefully exit the arrow from the socket interaction. The keyword this refers to the socket interactor.
The method ReleaseArrowFromSocket invokes the method ReleaseArrow of the ArrowInteraction component and passes the PullAmount as a parameter.
d) ClearVariables()
This method ensures that all the variables currentArrow, currentArrowInteraction and handHoldingArrow are set to null so that the variables are clean when a new interactor (left or right hand) and with a new interactable (next arrow) enter into the socket.
e) Movement type
There are three types of Movement type Instantaneous, Kinematic and Velocity tracking. Instantaneous movement enables the arrow in the socket to move along with the bow in sync. The other two give a lagging effect.
3.4.3 Testing
- Add the ArrowInteraction.cs script to the arrow GameObject, then drag and drop the tip game object as component's tip position. Set the speed to 20.
- Add the SocketInteraction.cs script to the string GameObject.
- Create an empty game object as a child of String and name it to attach transform → Enter -90 units in y-direction rotation → Drag and drop this into the AttachTransform field of Socket Interaction component. This ensures that the arrow is facing the correct direction when attached to the socket.

- Create a new layer named Ignore and from the interaction layer mask field of the Socket Interaction, uncheck the Ignore layer.
4. Conclusion
In this blog post which was the 3rd part of the Bow & Arrow series, you have learned to create a bow and arrow experience in VR. So what’s next??
What we learn was just the basic interaction. You can polish this further and add more features like:
- Quiver interaction which spawns arrow as and when you use an arrow.
- A script to enable and disable the socket when the bow is held and released respectively, so that arrow can be attached only when the bow is held.
- Particle effects for the arrow as it flies through the air.
- Change color of the string as it gets pulled and particle effects after the string has been released.
- Adding sound effects, etc
I hope you will try to create some of those features mentioned earlier on your own, so in that way you learn a lot more. But no worries if you find it difficult, we will have separate tutorials for that as well in the future.
