Want to watch the video instead?
1. Installing Packages and AR Setup
Let’s begin by downloading the AR packages.
- Click on
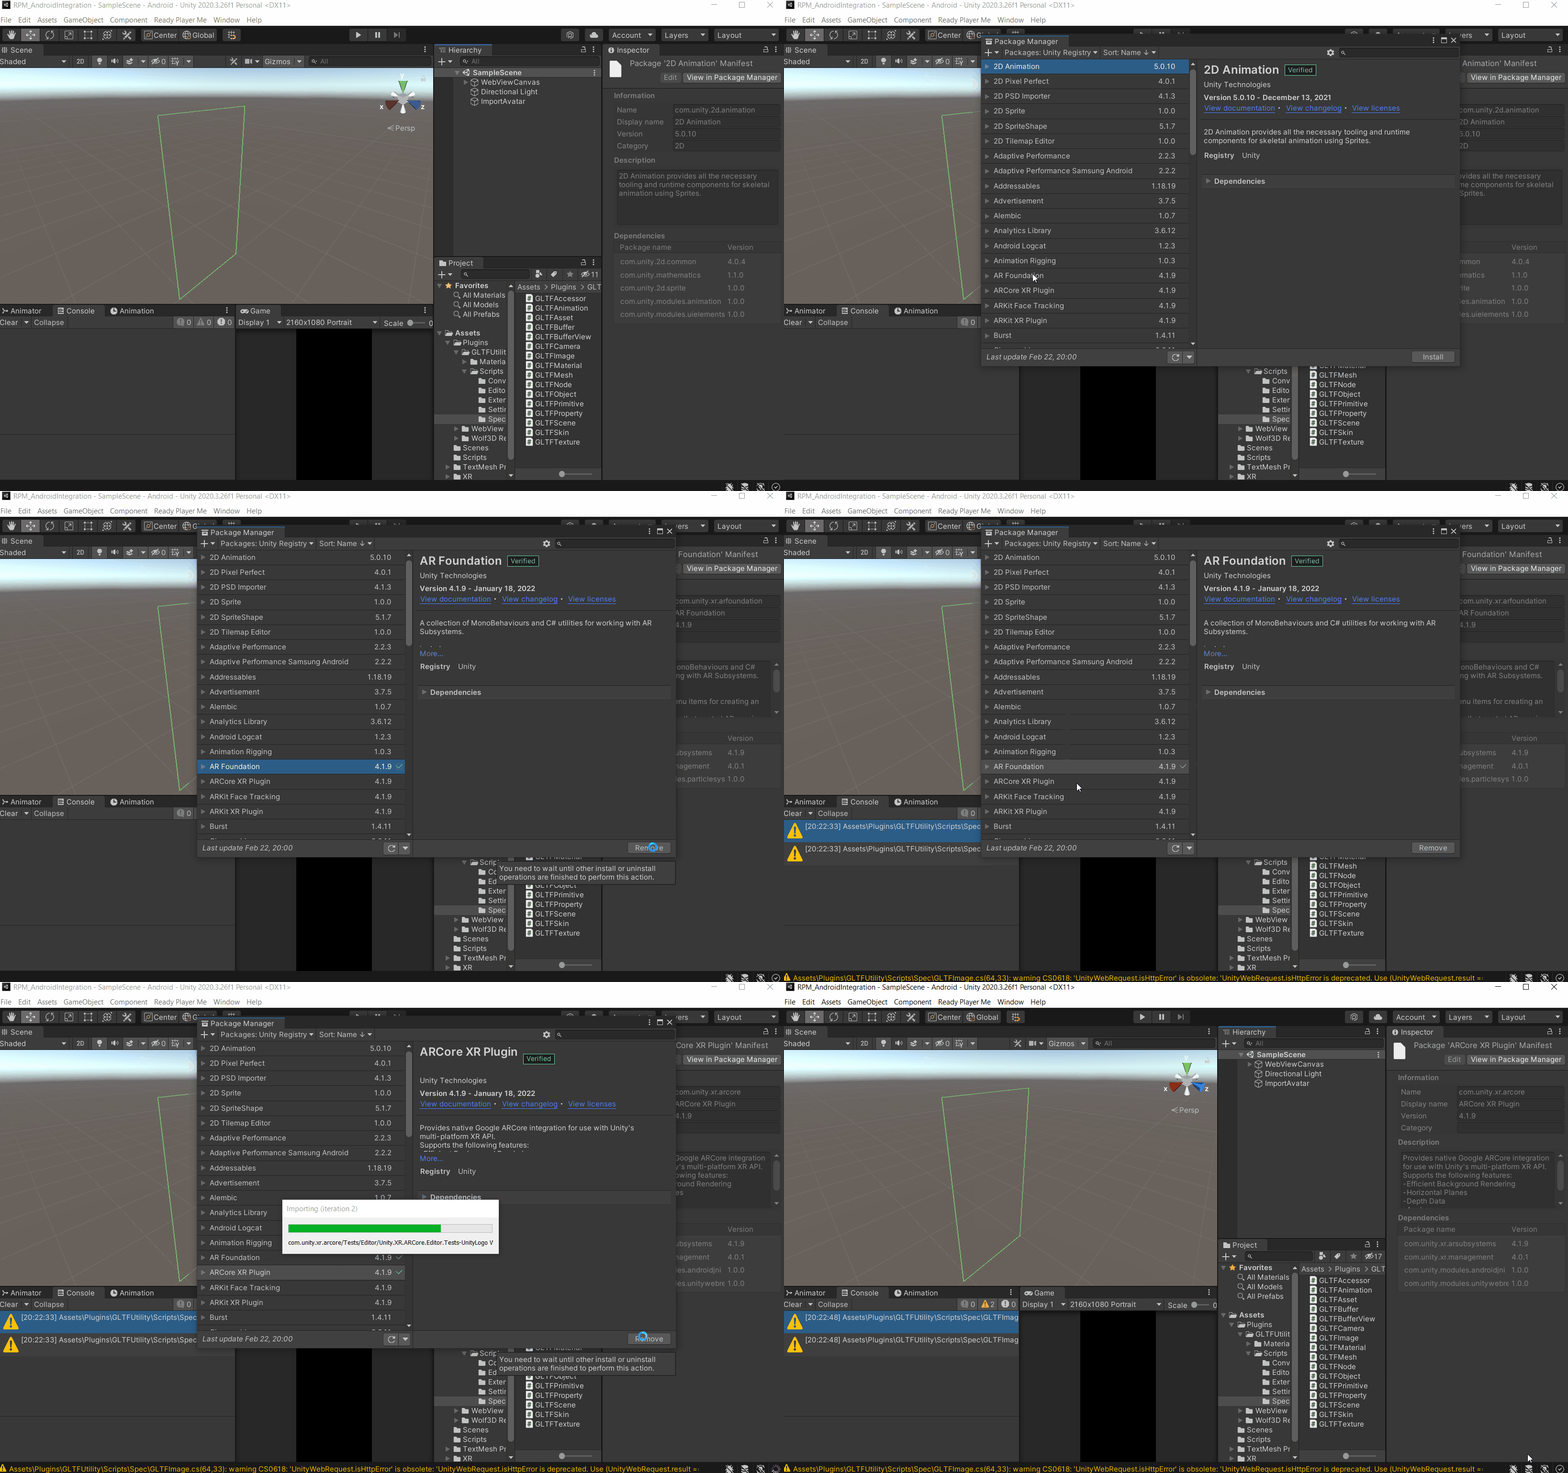
Windows→Package Manager→ select theARFoundation v4.1.9and clickInstall. - Also, select
ARCore XR Plugin v4.1.9and clickInstall.
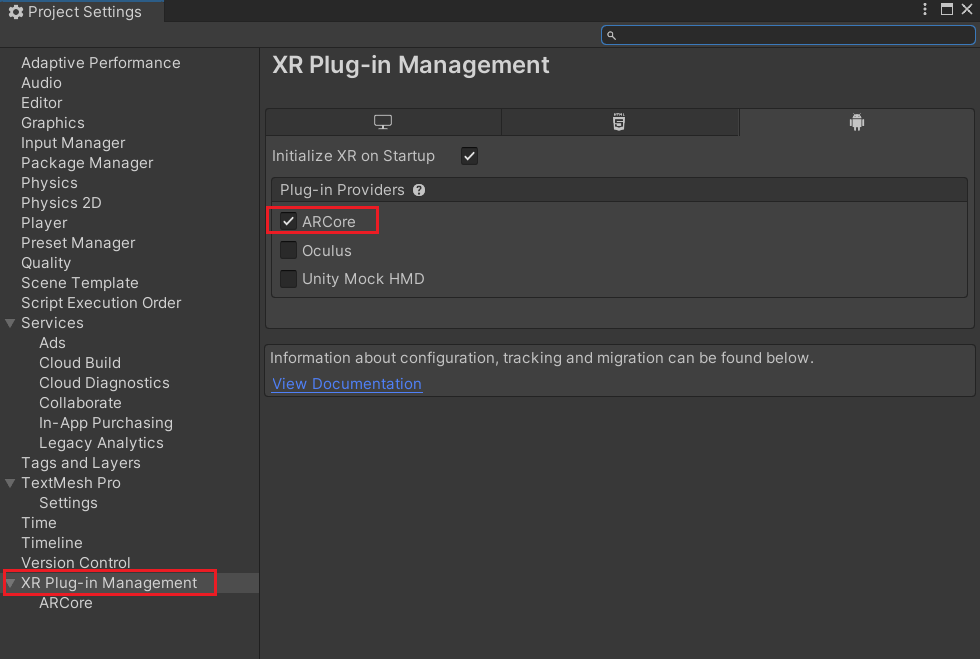
- Close the packager manager and now we can enableAR Core by navigating to Edit → Project Settings. Here, select the XR Plug-in Management tab and check ✅ AR Core.
2. Setting up the scene for AR:
Now let’s set up the scene for AR by adding a few components.
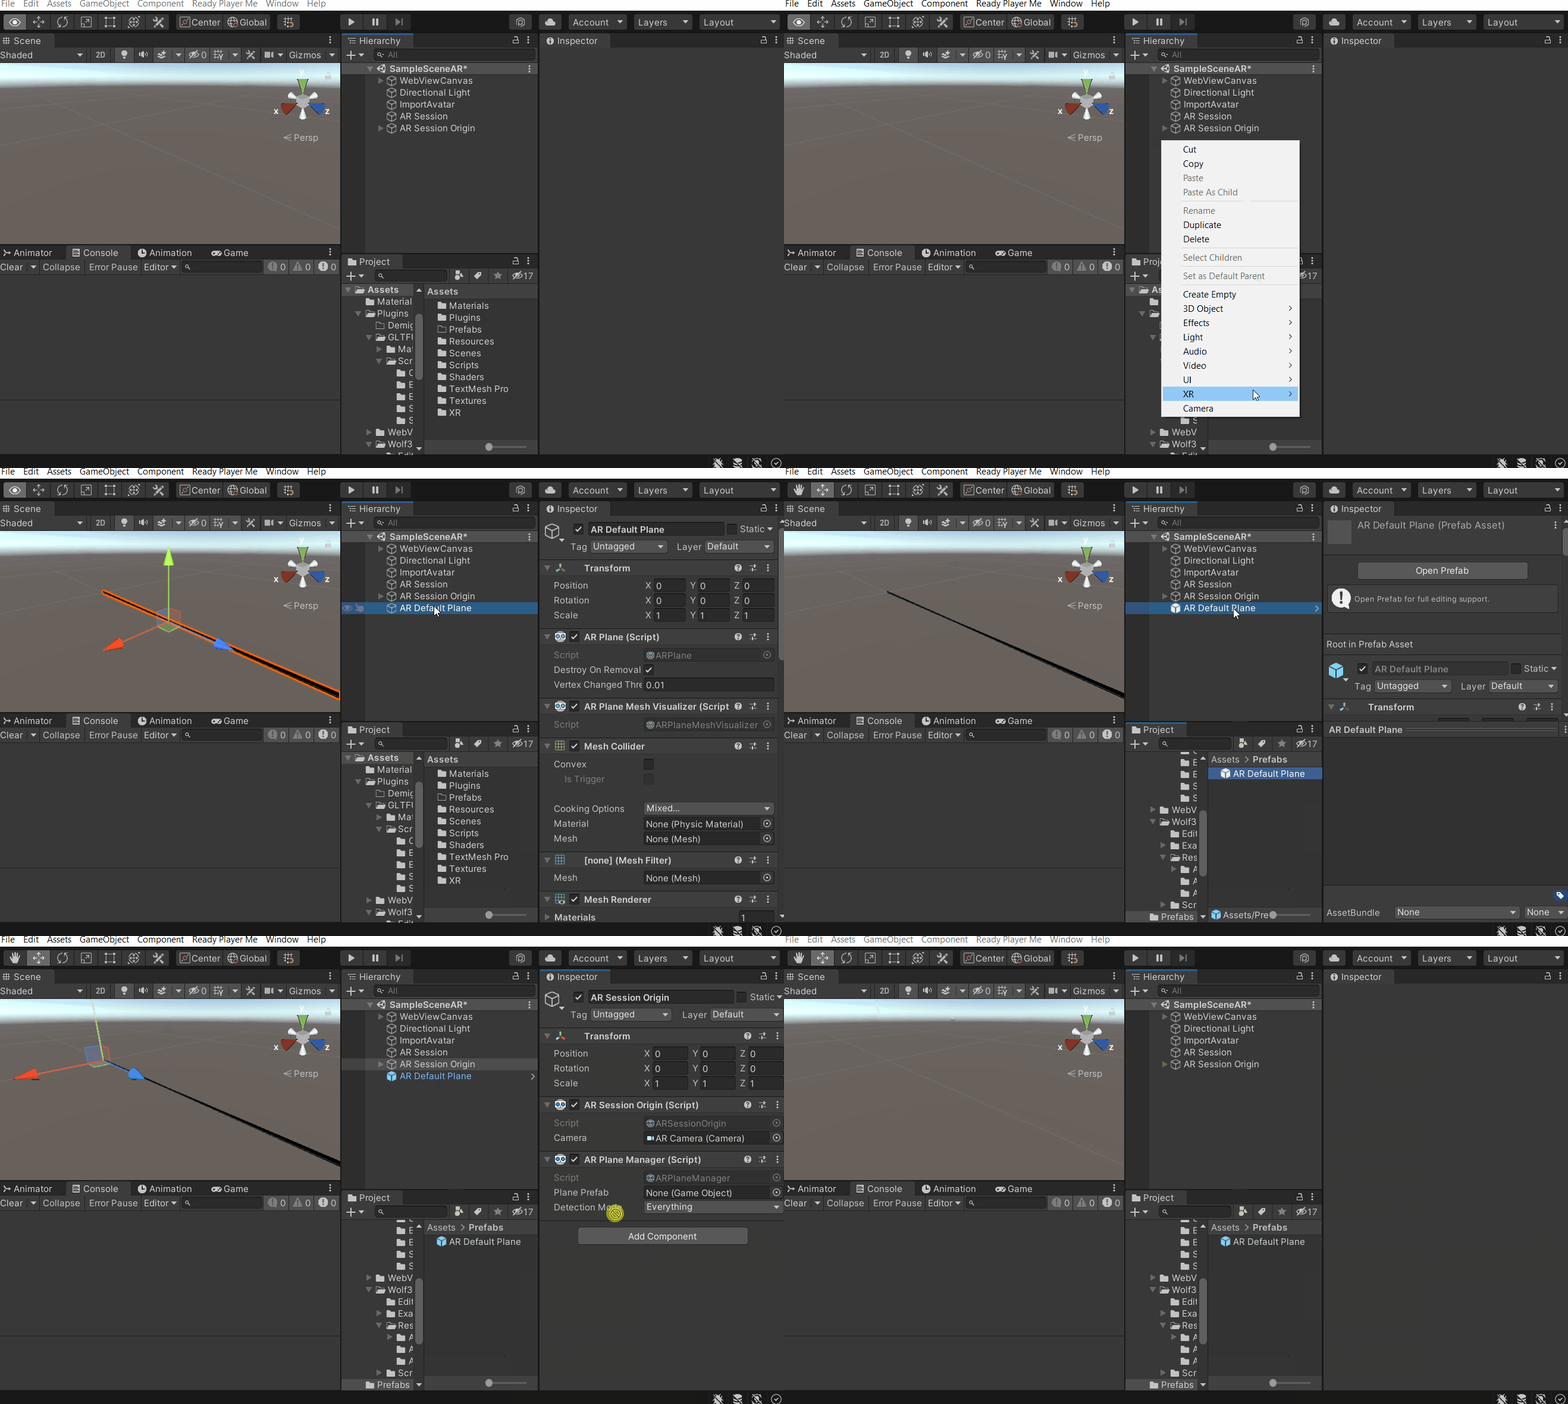
- In the Hierarchy, right-click and select
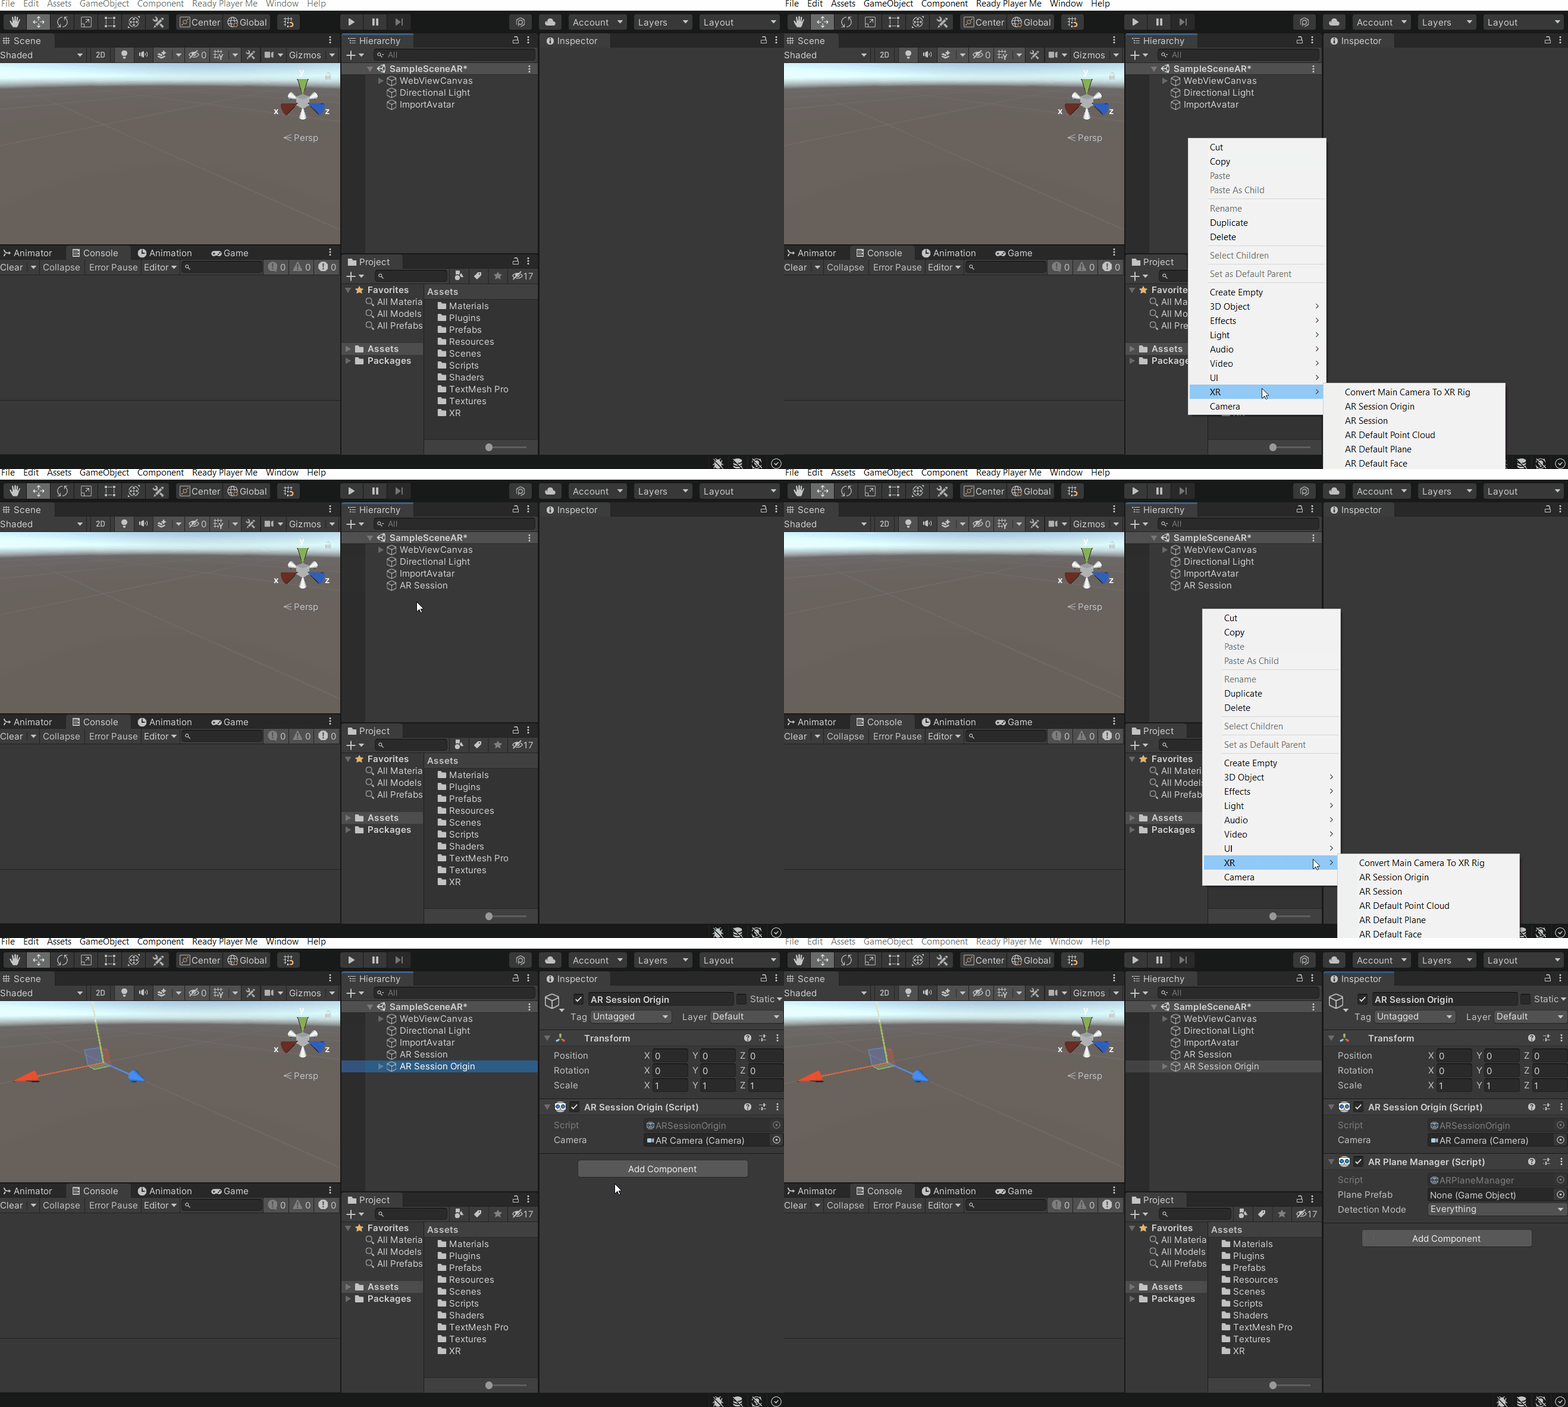
XR→AR session.This will create a new AR Session GameObject withAR Sessioncomponent andAR Input Managercomponent - Next, right-click in the hierarchy window once again and select
XR→AR Session Origin.This will create a new AR Session Origin GameObject with theAR Session Origincomponent. It also creates an AR Camera Gameobject as a child with required components like aCamera,AR Pose Driver,AR Camera Manager, **andAR Background. - Additionally, add
AR Plane Managercomponent to the AR Session Origin GameObject
- The
AR Plane Managercomponent requires a plane prefab. This prefab will be the visual representation of the planes getting detected. So, to create a plane prefab:- Right-click in the Hierarchy window and select
XR→AR Default Plane. - Drag and drop it in the project folder to convert it as a prefab.
- From the project folder, drag and drop the AR Default Plane prefab into the
AR Plane managercomponent. - Finally, delete it from the scene.
- Right-click in the Hierarchy window and select
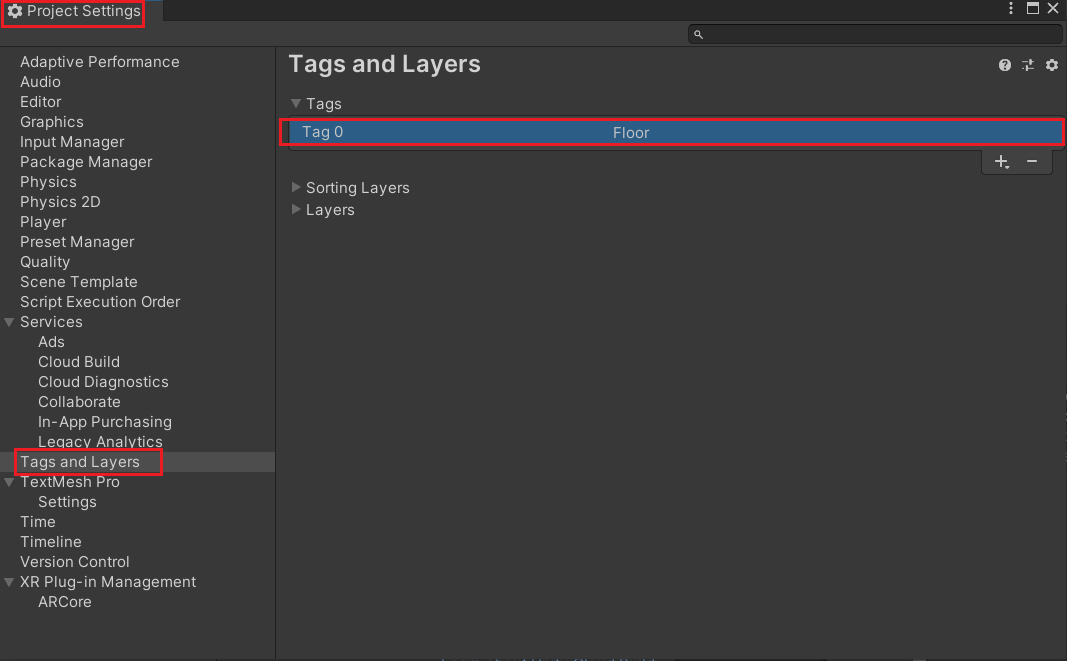
- Later on, we'll be detecting horizontal planes and when a plane of a certain size is found, we’ll have to assign it a tag. So, create a tag called Floor by navigating to Edit → Project settings → Tags and Layers → under Tags, click on the plus ➕ button to add a new tag and name it as Floor.
3. Downloading Animations
The Ready Player Me SDK comes with an inbuilt idle animation and a walking animation. We need to download the animation to rotate the avatar either on the left side or the right side.
- Before we download the animation, create an empty folder and name it Animations in the Project window.
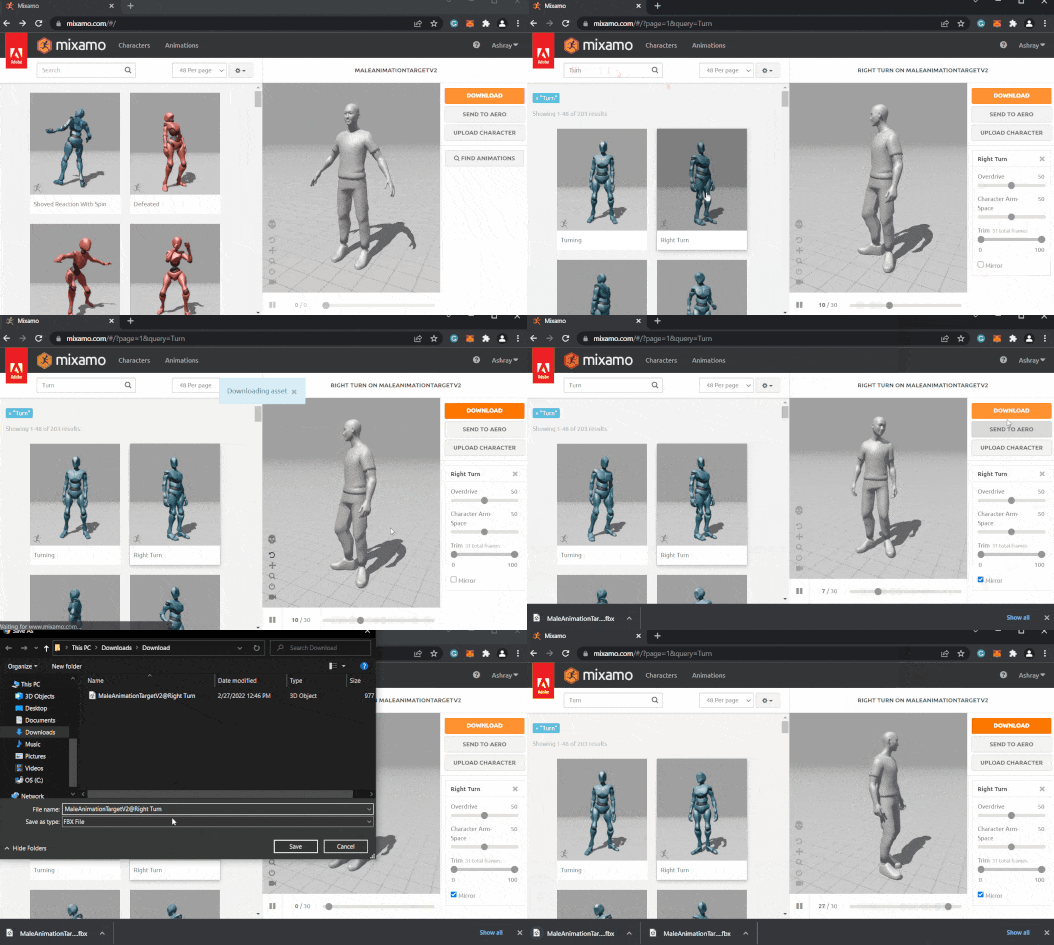
- On your web browser, visit the Mixamo website and upload your avatar → search for turn animation → select the appropriate animation for right turn→ click on
Download→ select the Format asFBX for Unityand save it on your device. - Then, check the box ✅ for Mirror and download it once again → Rename it from Right turn to Left turn and save it on your device.
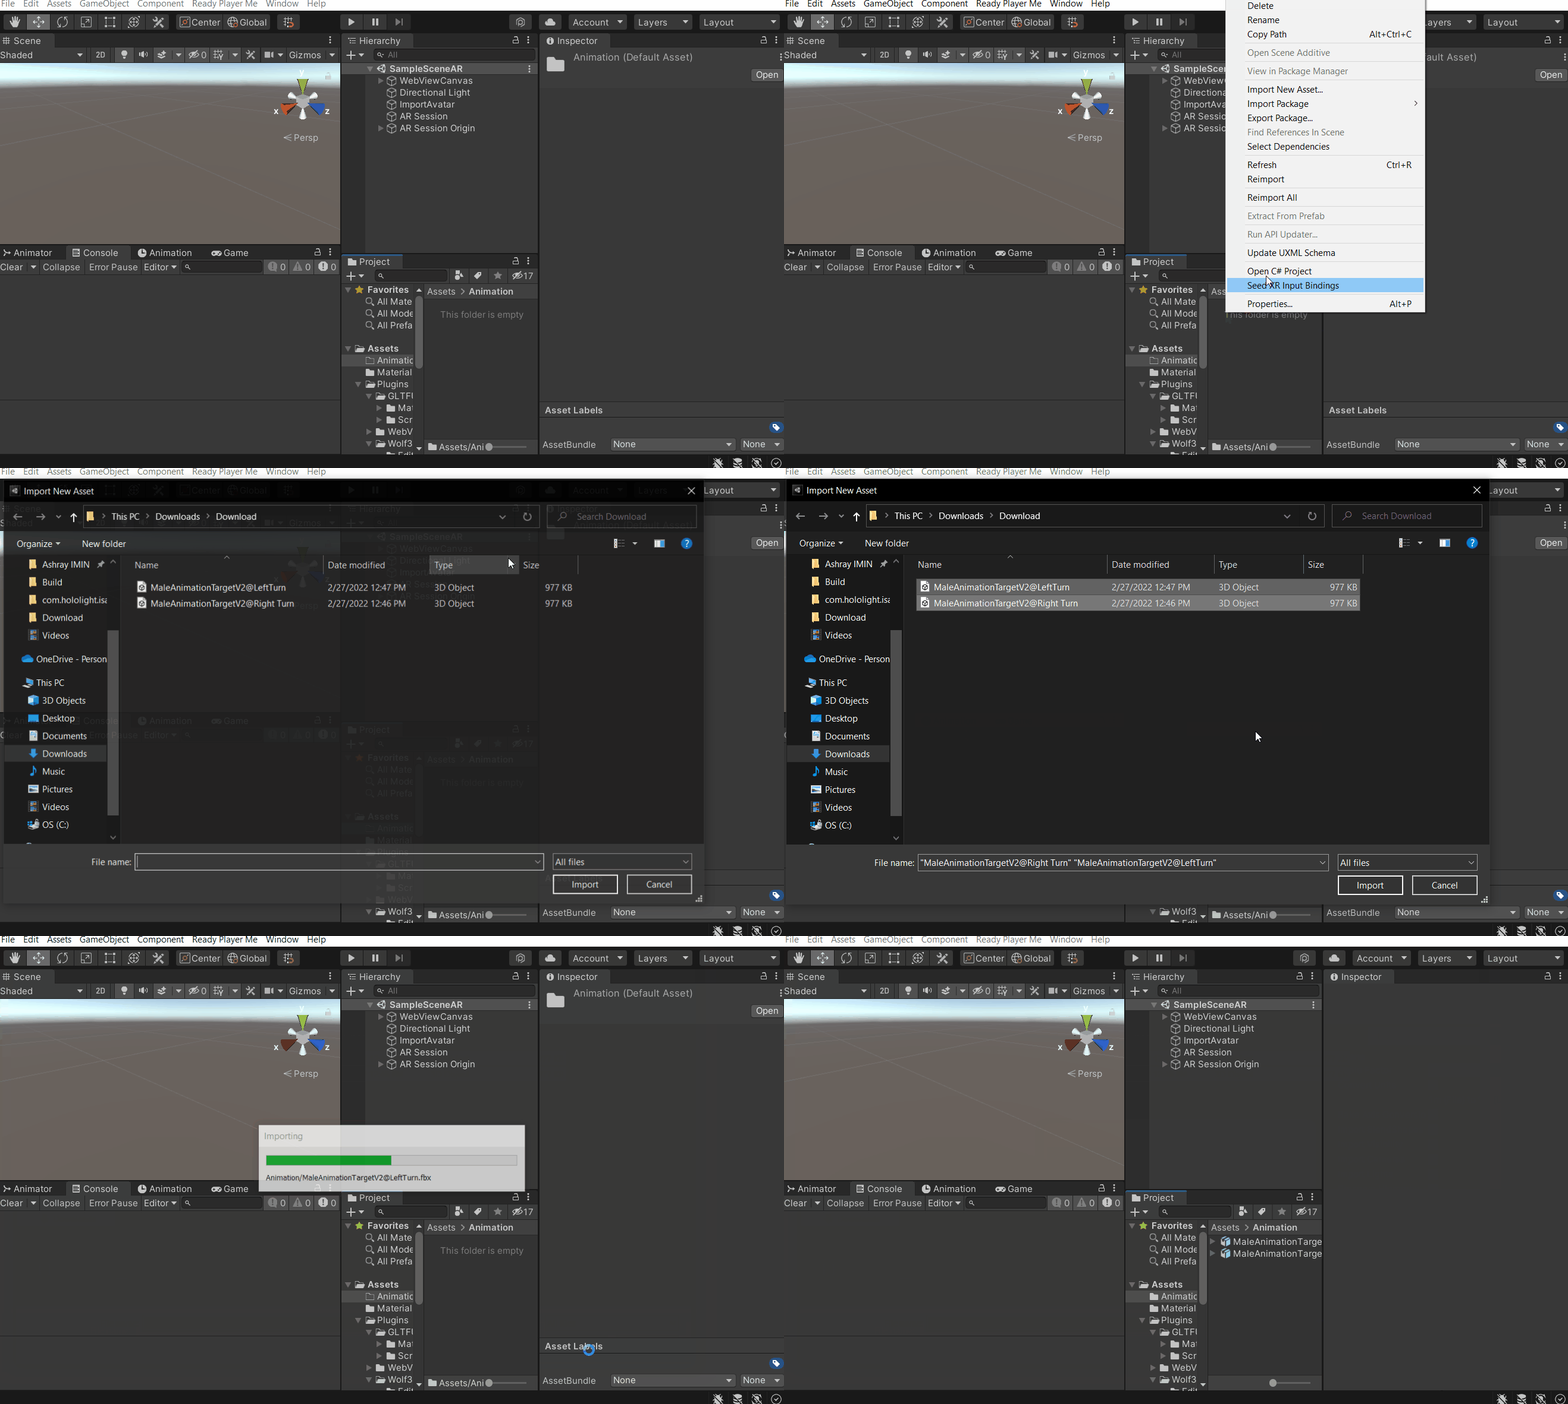
- Now switch back to Unity and import the downloaded FBX files in the Animations folder. You can do that either by dragging and dropping or simply right-click in the Project window, select Import New Asset and then select the two files.
- As we want the animation to match with the Avatar’s rig, select both the models → click on the Rig tab → select the Animation Type as Humanoid → select the Avatar Definition as Copy From Other Avatar → select MaleAnimationTarget V2 or FemaleAnimationTarget V2, as per your choice → click Apply.
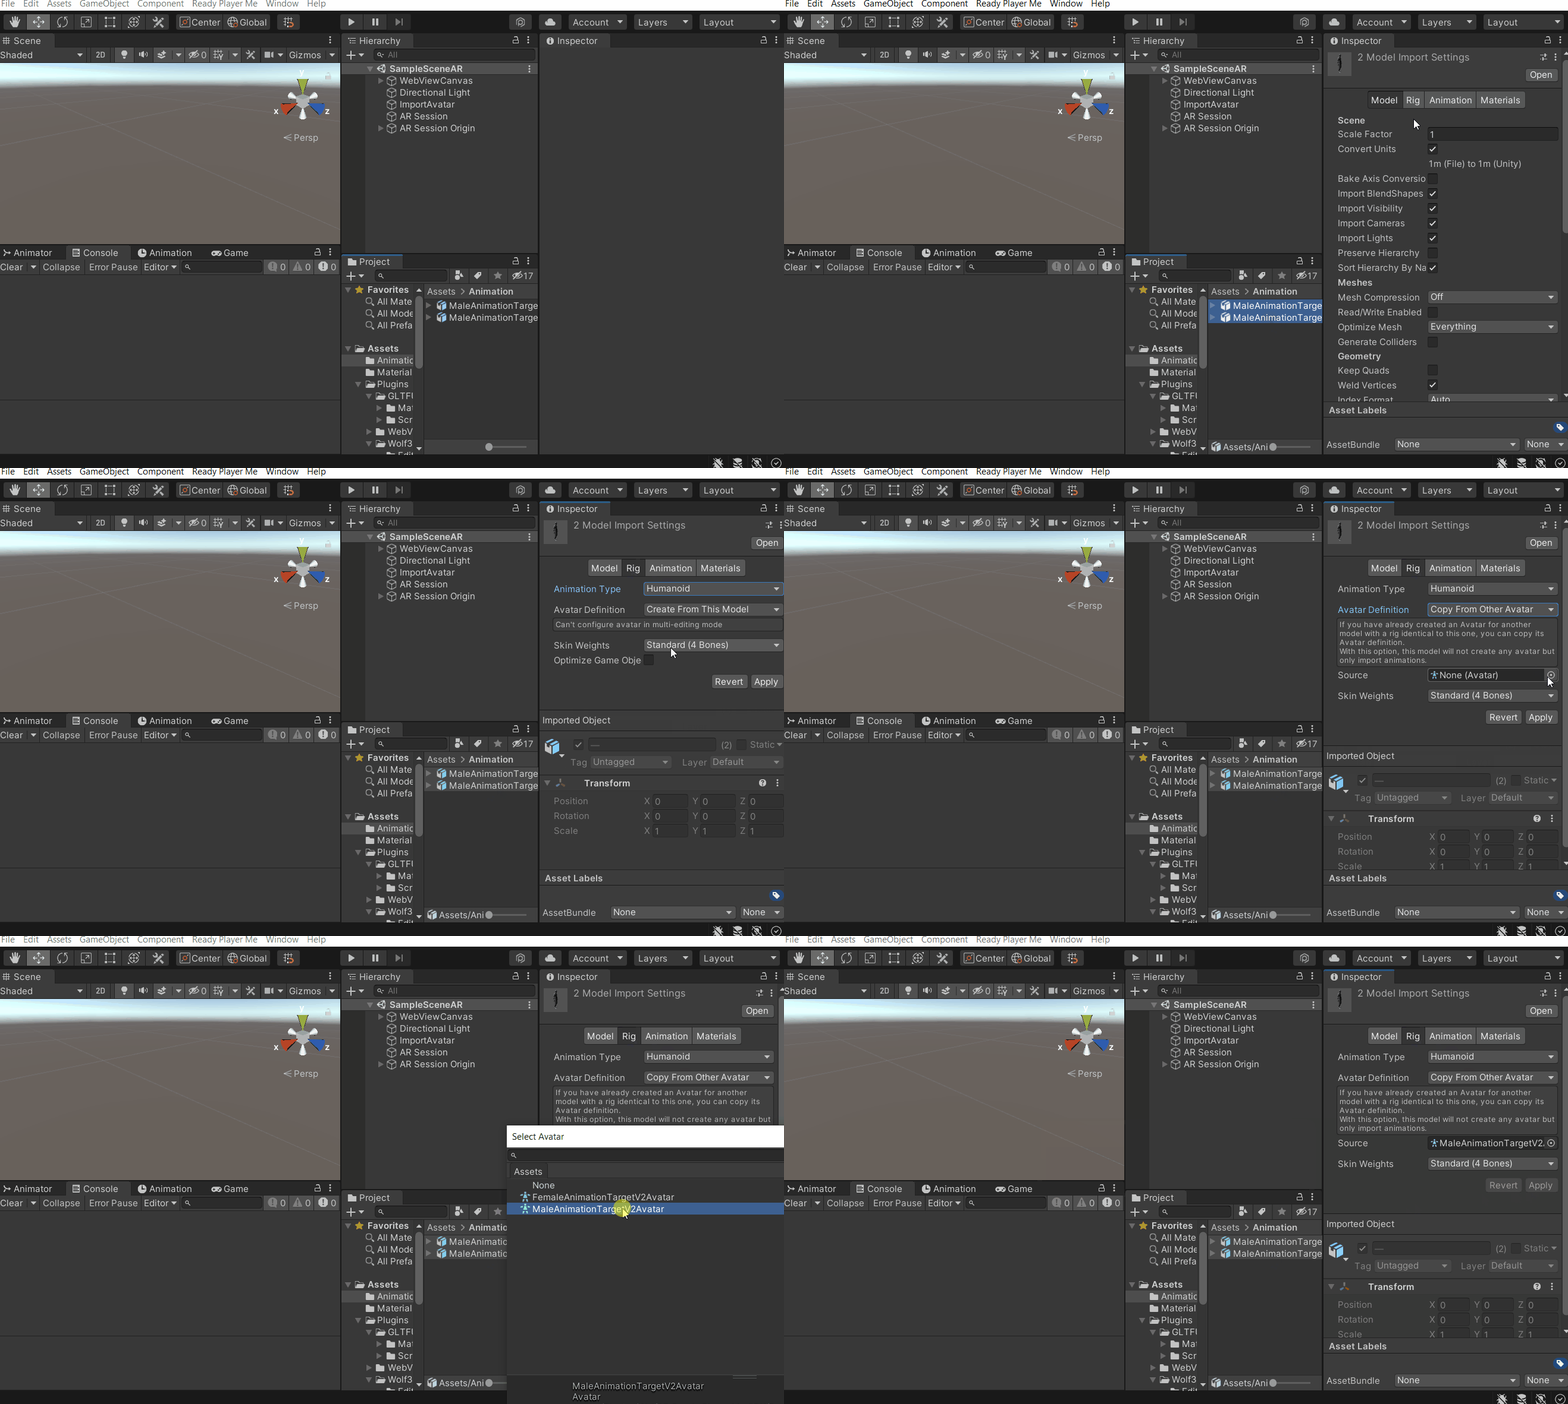
- Select the models one at a time → click on the Animation tab → check the box ✅ for Loop Time
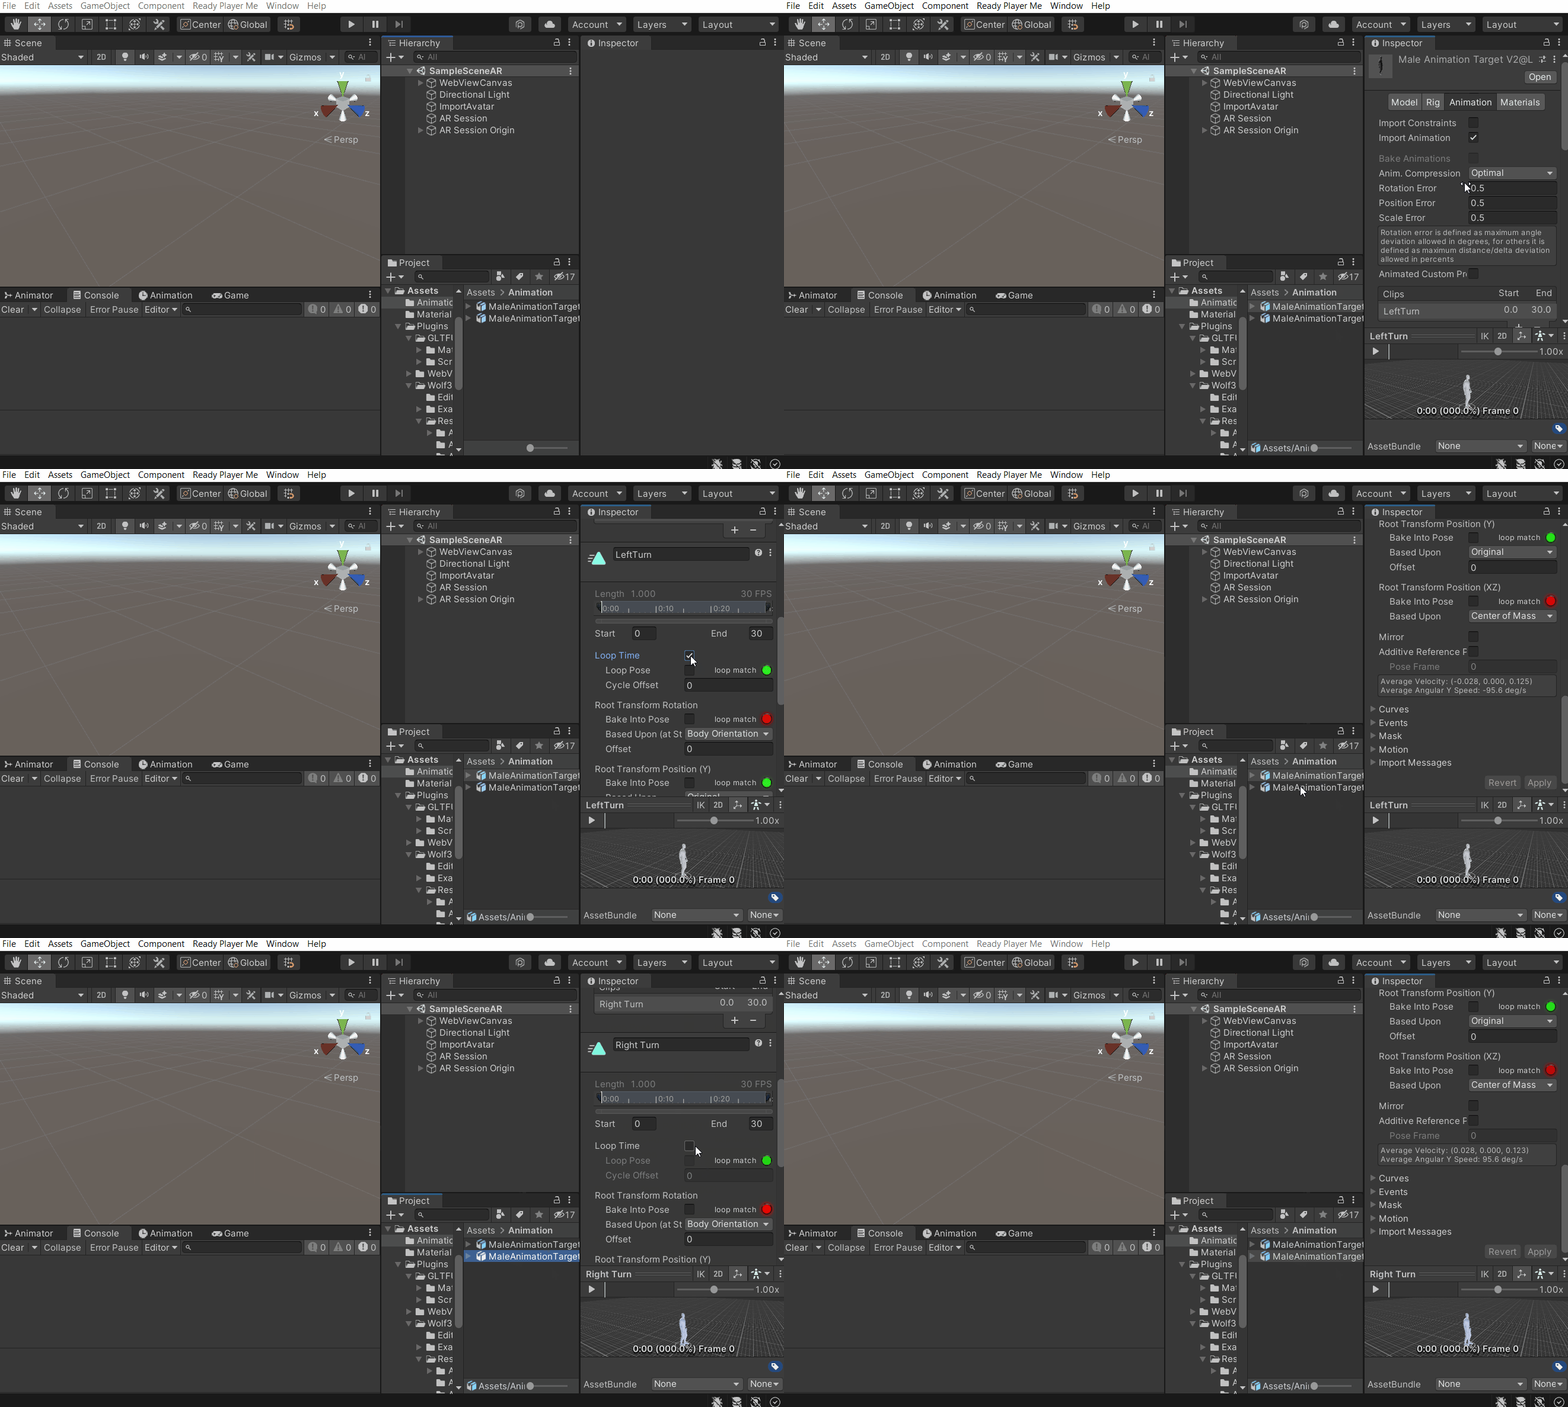
4. Setting Up The Animation Controller
We’ll have to create and set up an Animation controller with different boolean parameters. With the help of those parameters, we’ll be able to transition between different animations states.
- Navigate to
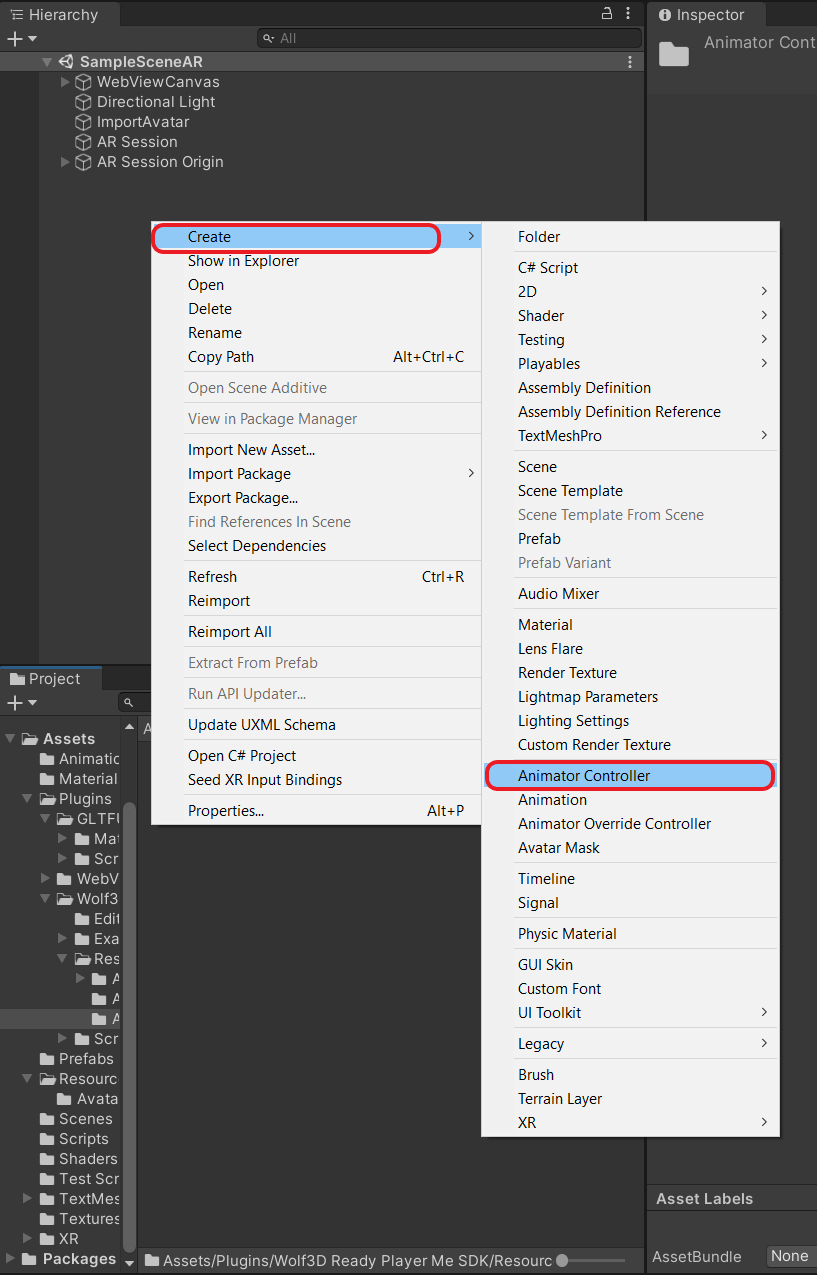
Assets→Plugins→Wolf3d Ready...→Resources→AnimatorControllers. - Create an Animator controller by right-clicking in the Project window →
Create→Animator Controller→ name it ‘AvatarAnimator’
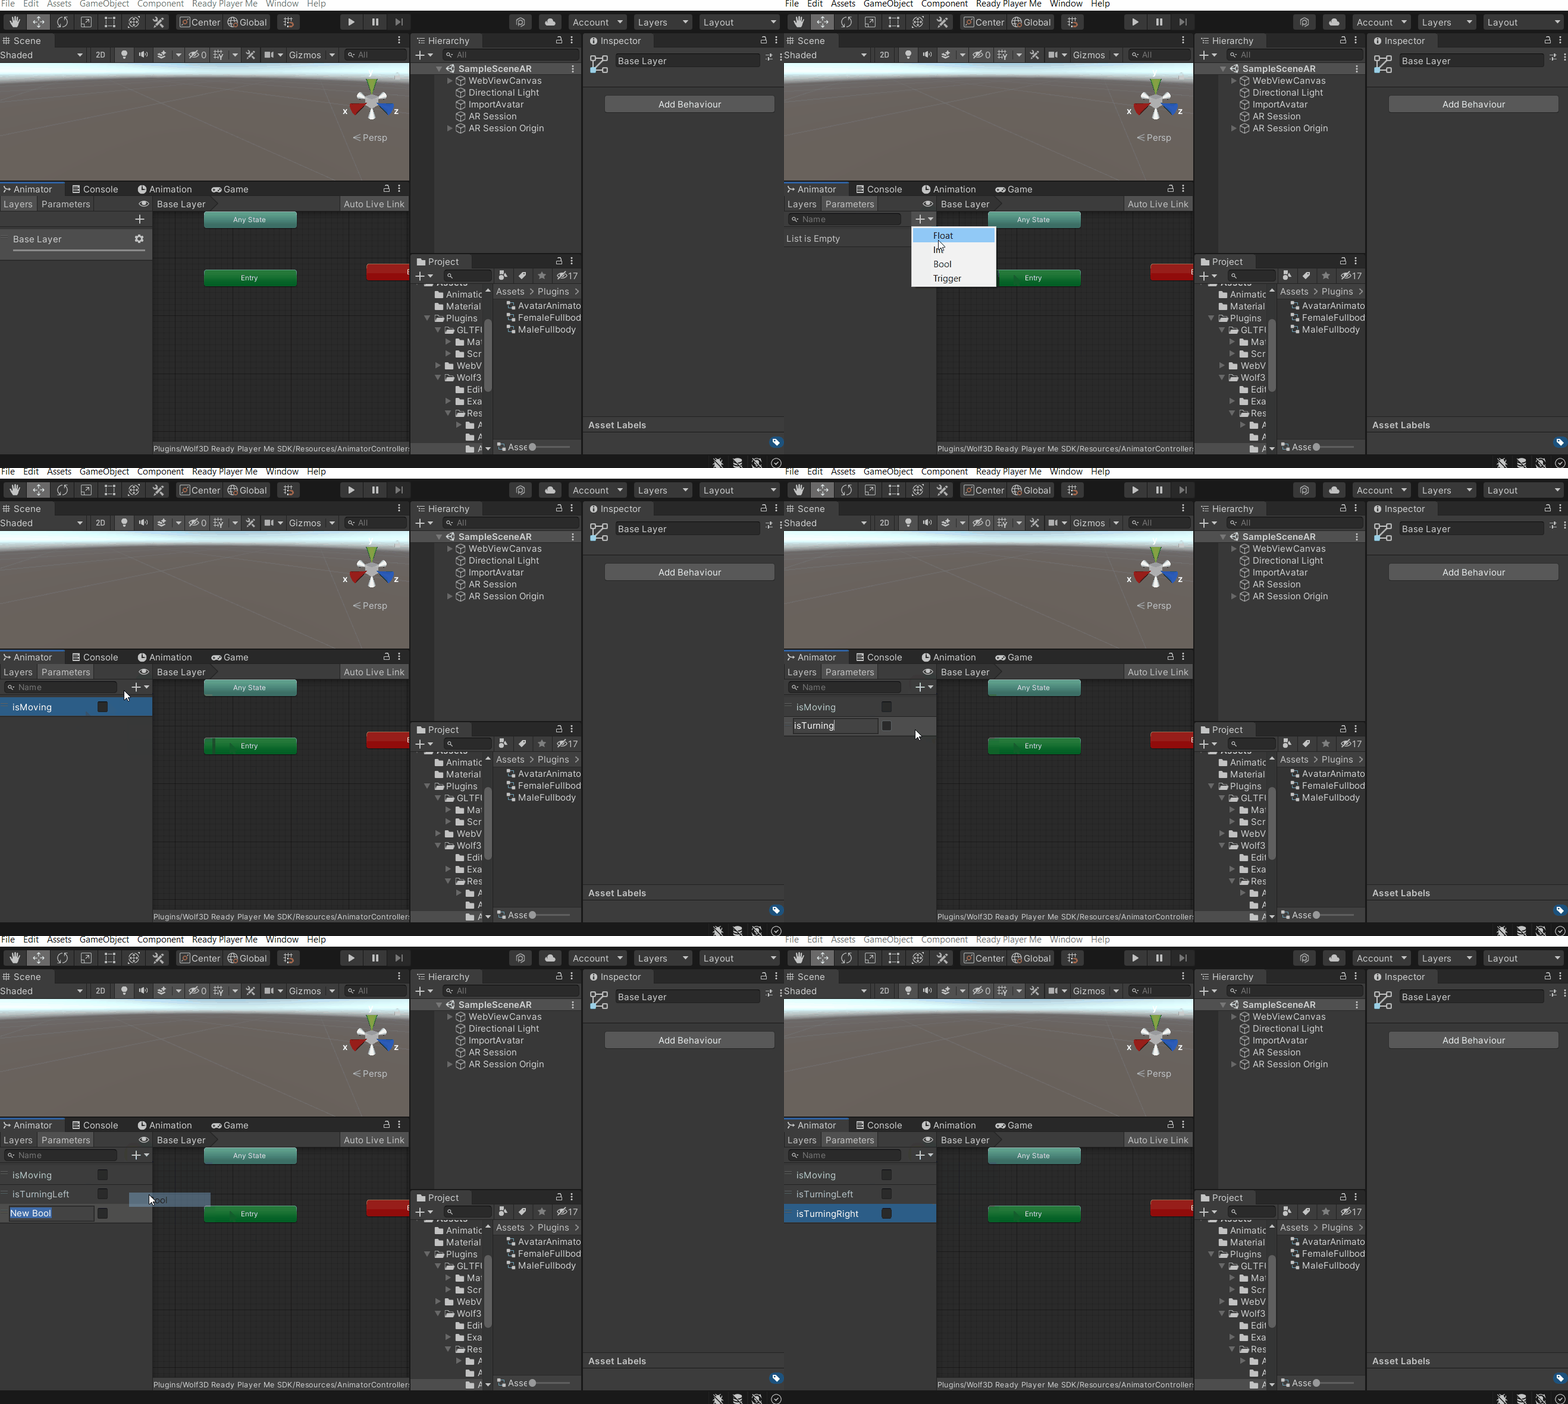
- Open the AvatarAnimator→ click on the Parameters tab → add a Bool parameter by clicking on the plus sign + and name it isMoving. Similarly, add two more bool parameters and name them as isTurningLeft and isTurningRight.
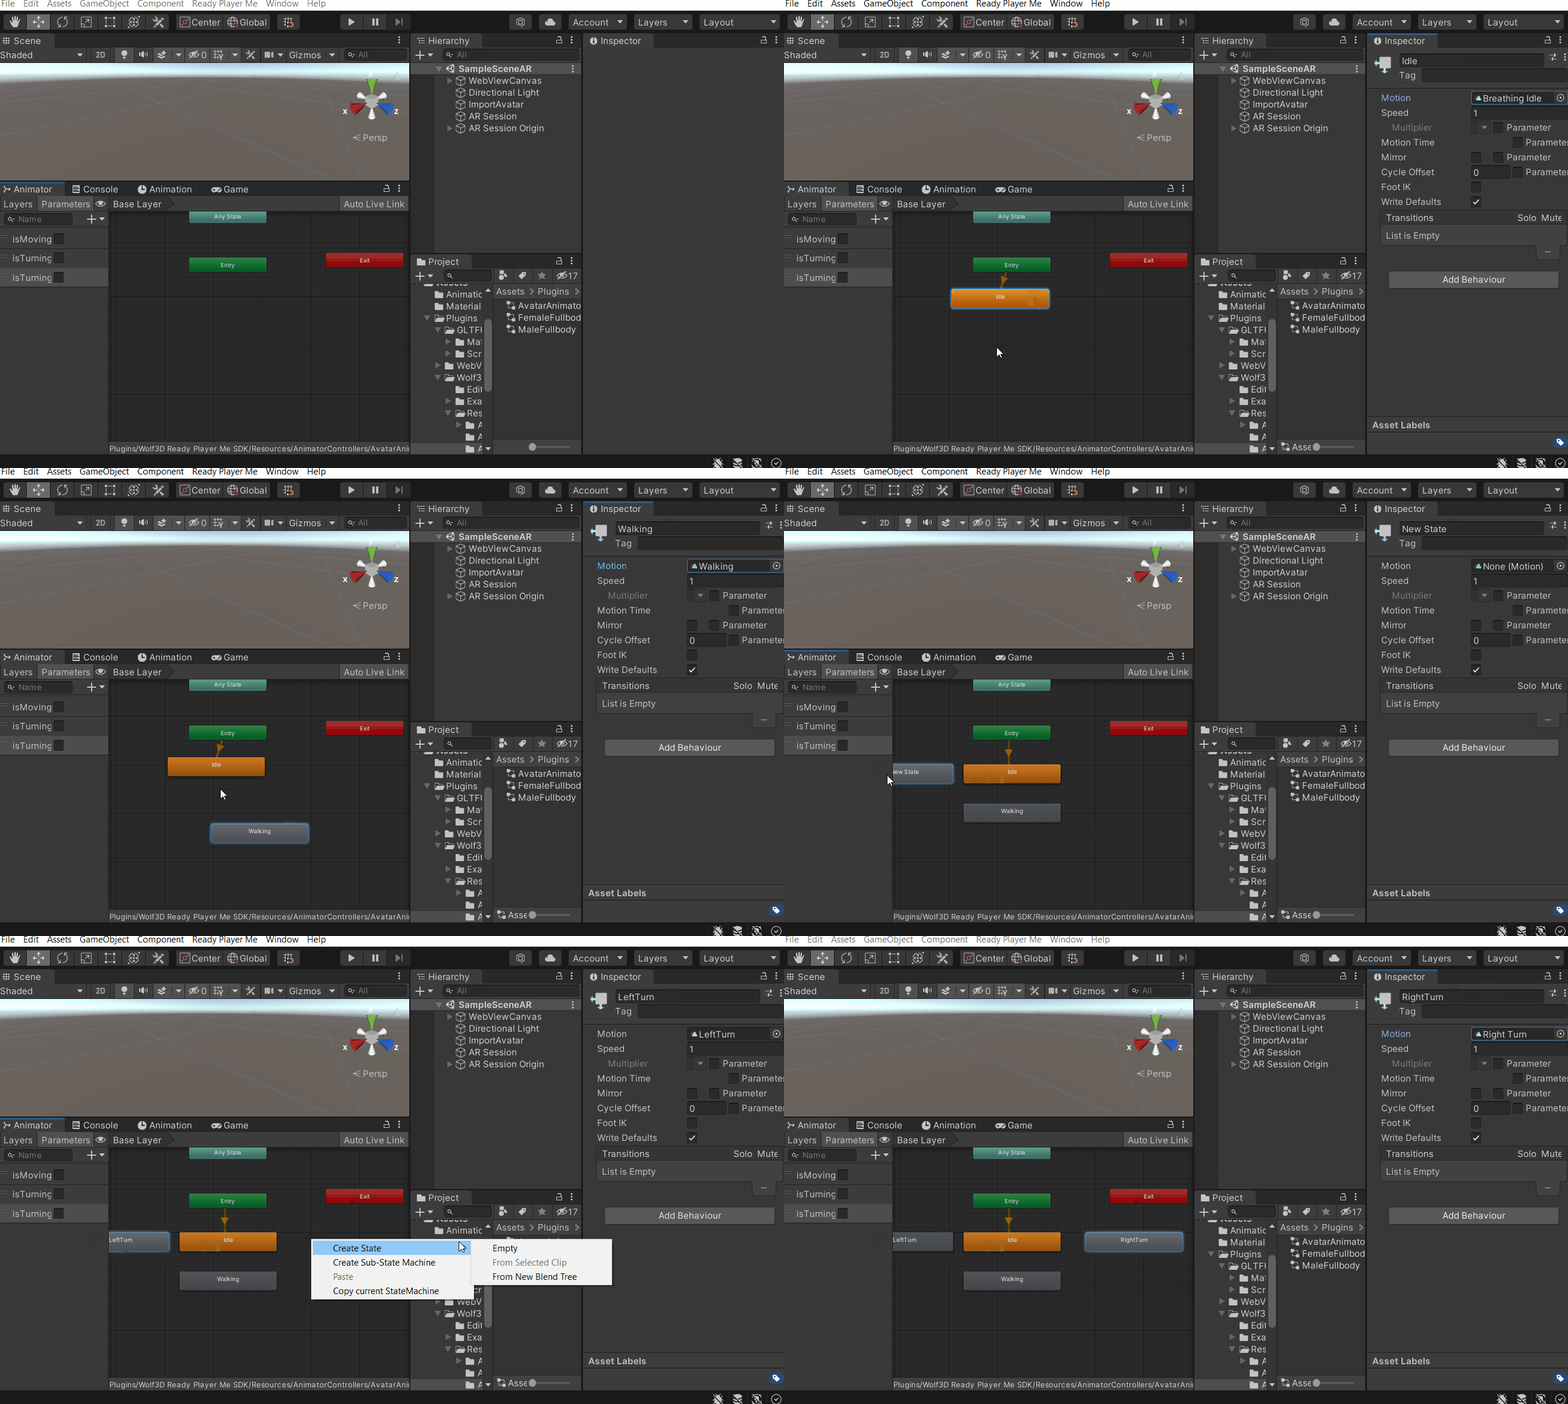
- We need to create four animation states for our avatar and those are Idle state, Walking state, Turning Left state, and Turning Right state. To do that :
- Right-click on the base layer→
Create State→Empty→ name it as Idle → add the Breathing Idle animation in the motion field. - Create another empty state → name it as Walking → add the Walking animation in the motion field.
- Similarly, create two more empty states → name it as LeftTurn and RightTurn → add the LeftTurn and RightTurn animation in the motion fields respectively.
- Right-click on the base layer→
- Now, to make transitions between the states:
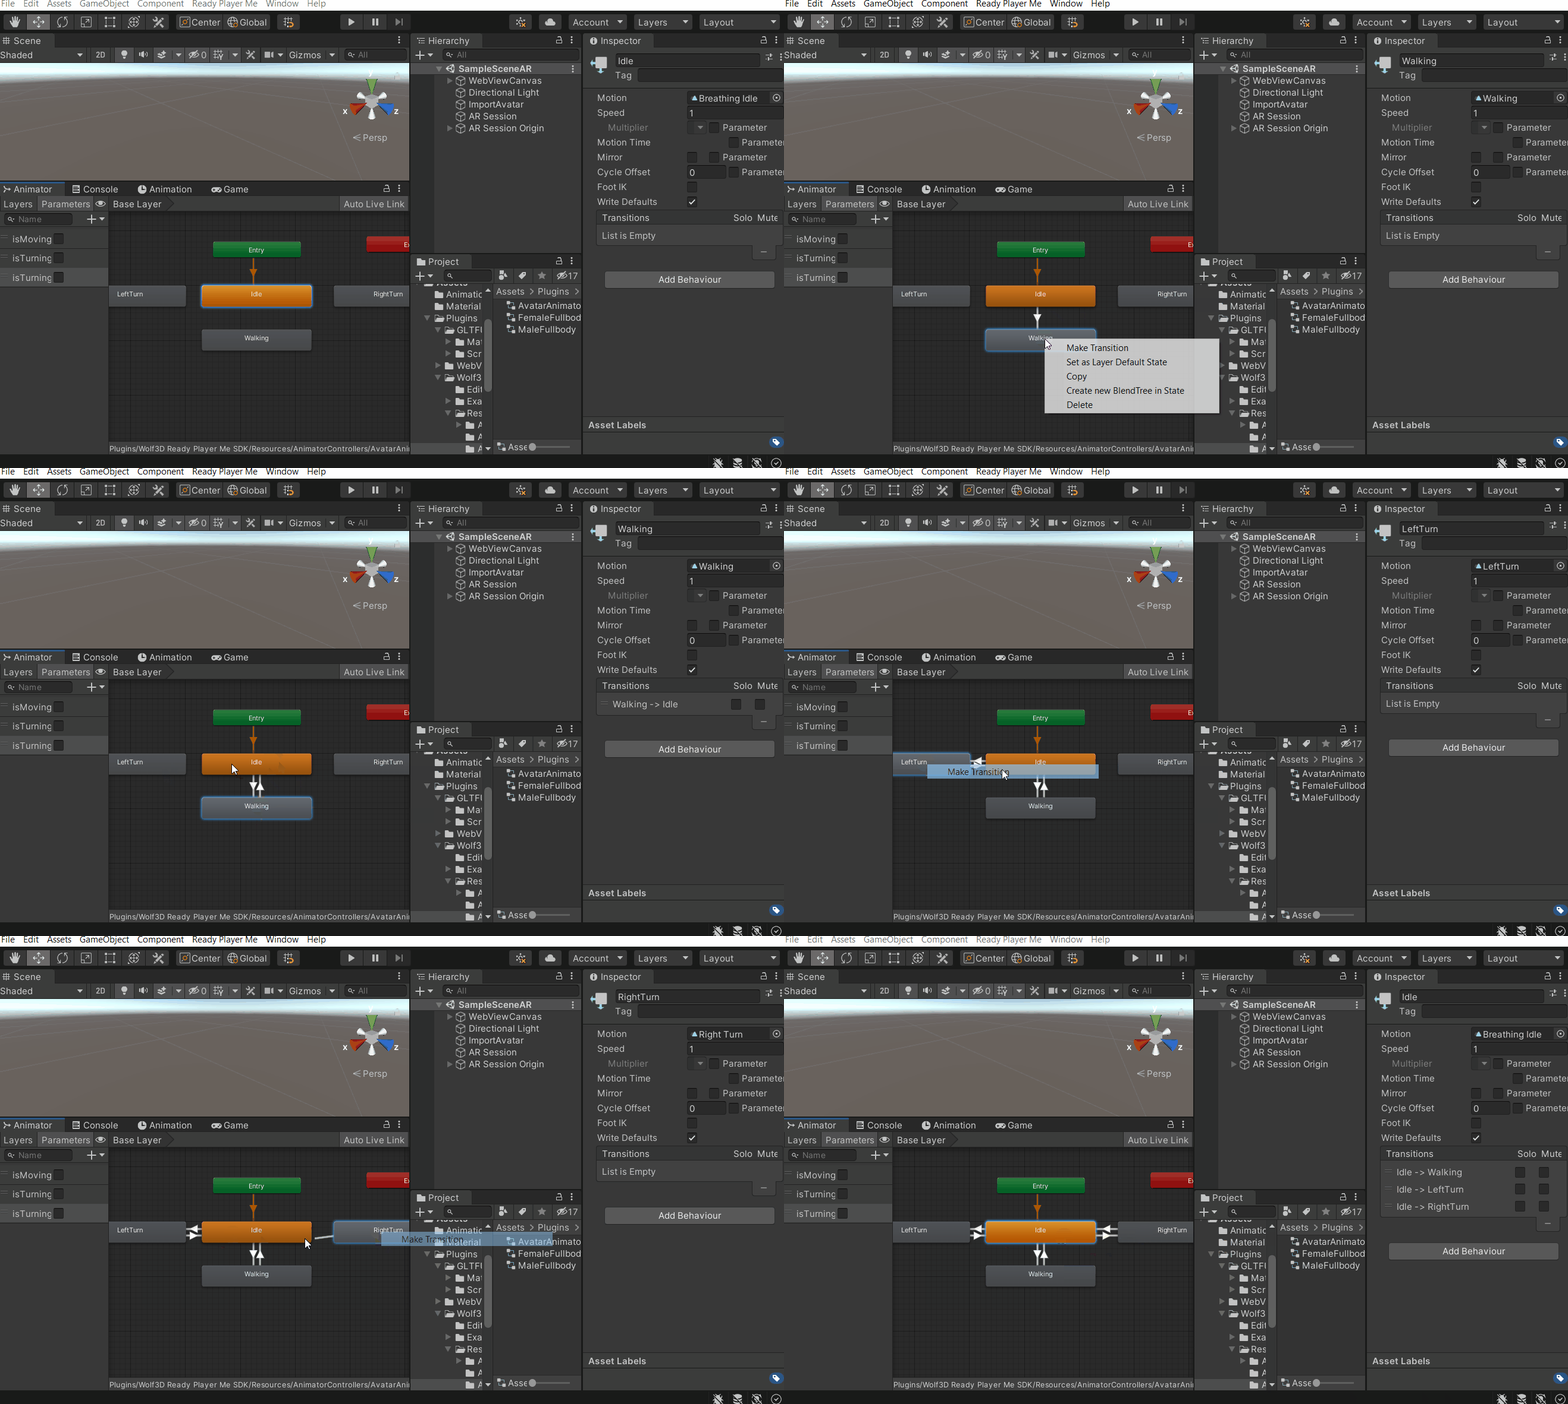
- Right-click on the Idle state → select
Make Transitionand then click on Walking state. Next, right-click on the Walking state, click onMake Transitionand then click on Idle state. - Similarly, make the transitions between Idle state and LeftTurn state, and also between Idle state and RightTurn state
- Right-click on the Idle state → select
- Let’s add the parameter which will define the condition as to when the transition should happen :
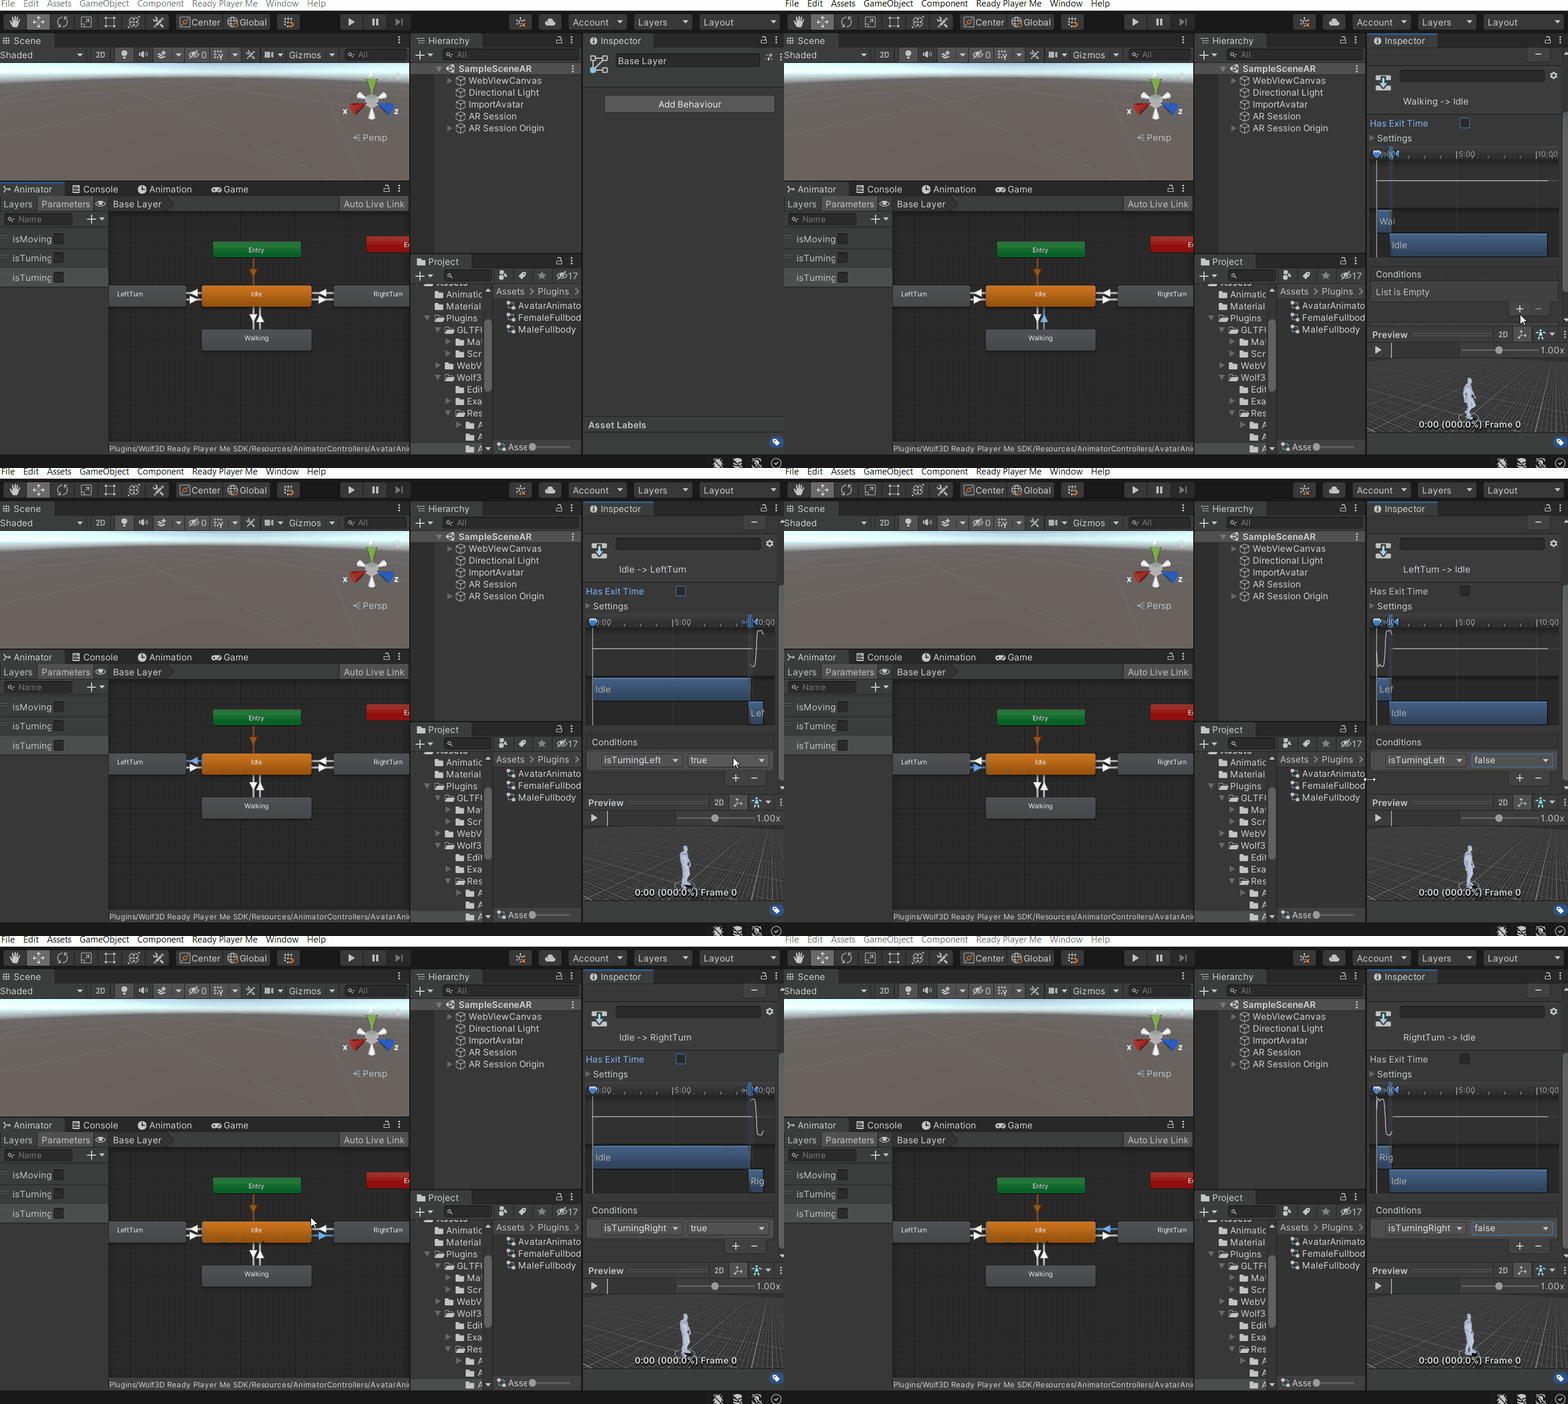
- Click on the transition arrow from Idle to Walking state → in the Inspector window, uncheck
Has Exit Timebox → click on thePlusbutton ➕ under Condition and make sure the parameter chosen isisMovingand the value istrue. Next, click on the transition arrow from Walking to Idle state → uncheckHas Exit Timebox → click on thePlusbutton+and make sure the parameter chosen isisMovingand the value isfalse. - Click on the transition arrow from Idle to LeftTurn state → in the Inspector window, uncheck
Has Exit Timebox → click on thePlusbutton ➕ under Condition and make sure the parameter chosen isisTurningLeftand the value istrue. Next, click on the transition arrow from LeftTurn to Idle state → uncheckHas Exit Timebox → click on thePlusbutton+and make sure the parameter chosen isisTurningLeftand the value isfalse. - Click on the transition arrow from Idle to RightTurn state → in the Inspector window, uncheck
Has Exit Timebox → click on thePlusbutton ➕ under Condition and make sure the parameter chosen isisTurningRightand the value istrue. Next, click on the transition arrow from RightTurn to Idle state → uncheckHas Exit Timebox → click on thePlusbutton+and make sure the parameter chosen isisTurningRightand the value isfalse.
- Click on the transition arrow from Idle to Walking state → in the Inspector window, uncheck
5. Scripting
5.1 Updating Avatar Importer
- Open Avatar Importer script and add the following code above the Start method:
- Modify the ImportAvatar and StoreAvatar methods as follows:
- In the ImportAvatar method, the reason for writing the LoadAvatar API with a different overload is because earlier we used to receive the avatar GameObject when it was imported but we need the avatar when it's loaded.
- In the StoreAvatar method, we are shrinking the size to 2/10th its original size so that It can be easily seen In AR. You can scale it as per your choice.
- We’ll also be invoking an event when the avatar gets stored.
5.2 AR Plane Detection
Create a new script named ARPlaneDetection and copy the following code. The code will make a list of all the planes ARPlaneManager has detected, filter out the 1st plane that has an area of more than 0.5 units i.e 0.5m square.
Once that plane is found,
- The tag “Floor” will be assigned to the found plane
- The AR Plane Manager component will be disabled so that further planes are not detected.
- The already detected planes will be disabled.
- Finally, this component will be disabled as well to unsubscribe from the events.
5.3 Tap To Place:
5.4 Avatar Animator Controller:
5.5 Movement Controller :
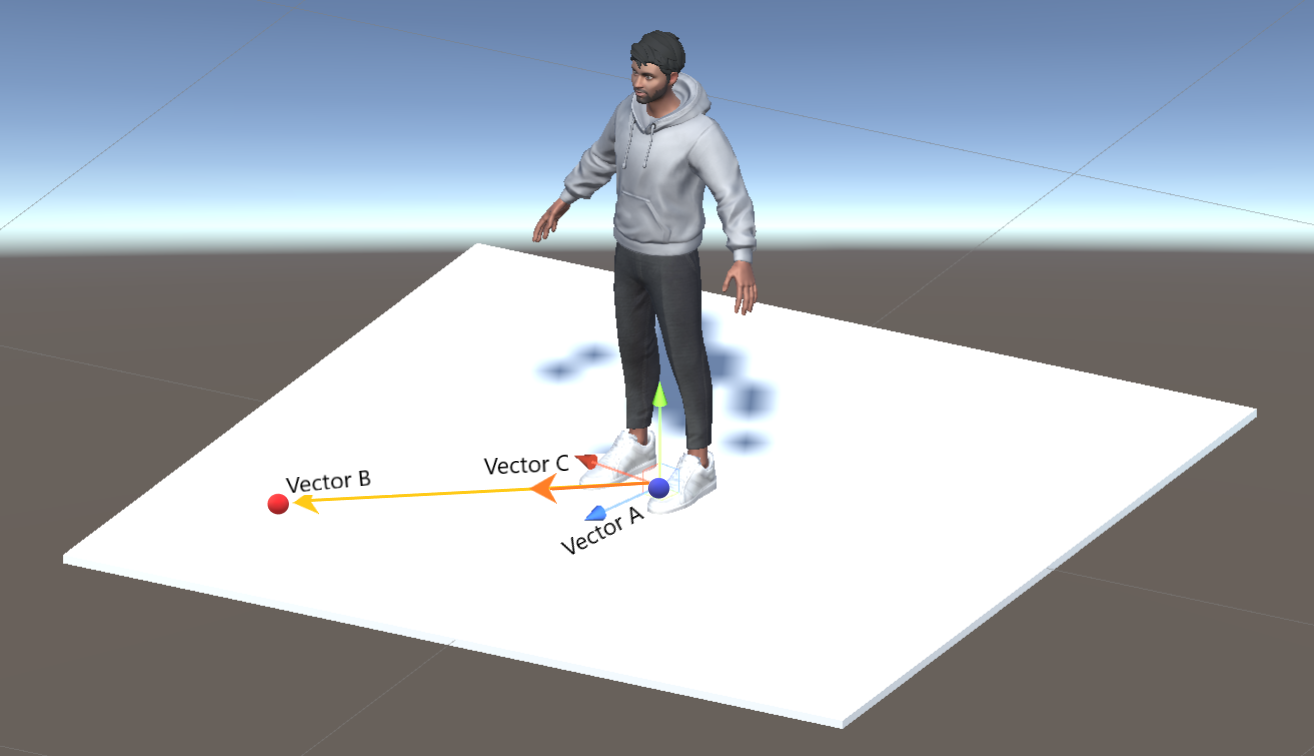
Angle calculation Explained:
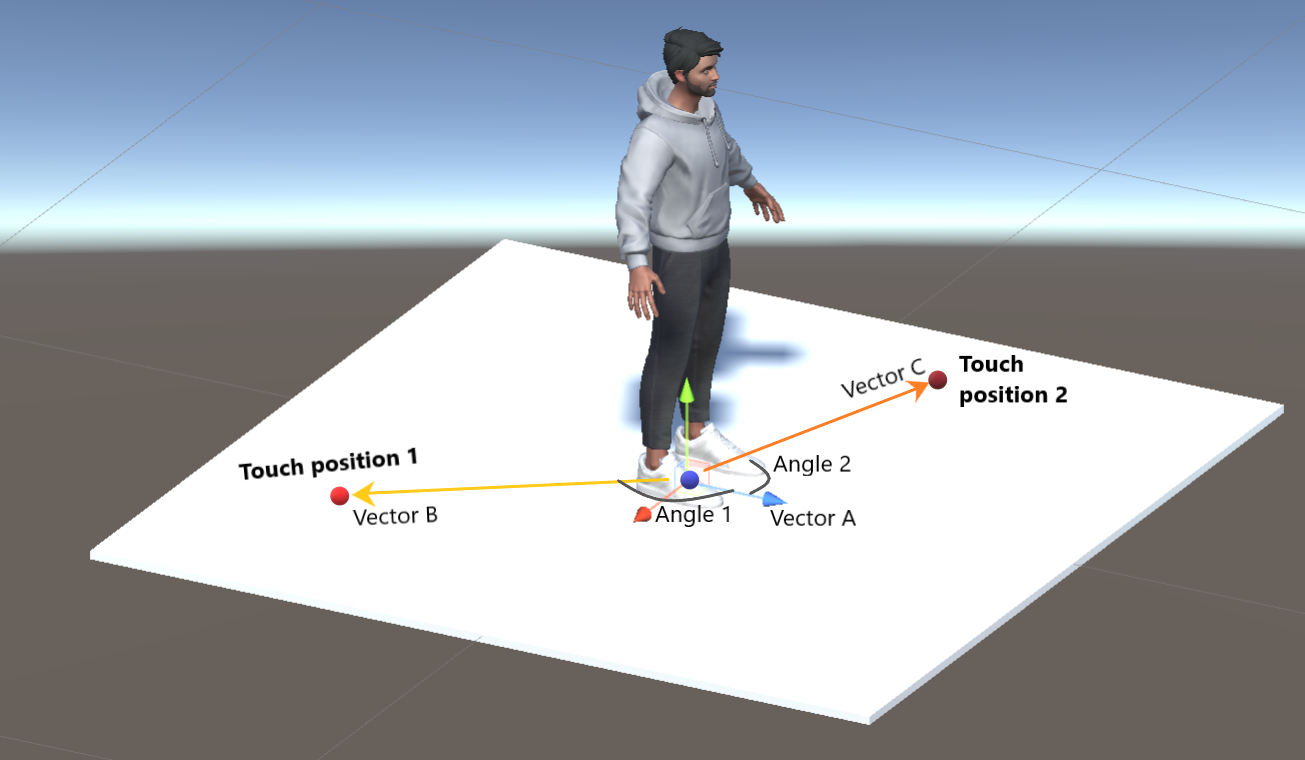
- The API SignedAngle will return the smaller of the two possible angles between the two vectors, therefore the result will never be greater than 180 degrees or smaller than -180 degrees.
- The SignedAngle method requires 2 vectors to calculate the angular difference and a third vector around which the other vectors are rotated.
- Legend for the image below :
- Vector A is Avatar's forward vector
- Vector B is the vector joining Avatar’s position to Touch position 1
- Vector C is the vector joining Avatar’s position to Touch position 2.
Case 1: Considering touch position 1 For this case, the angle will be calculated between Vector A and Vector B in a clockwise direction as that’s the shortest path. So the returned value will be positive between 0 and +180.
Case2: For this case, the angle will be calculated between Vector A and Vector C in a clockwise direction as that’s the shortest path. So the returned value will be positive between 0 and -180.
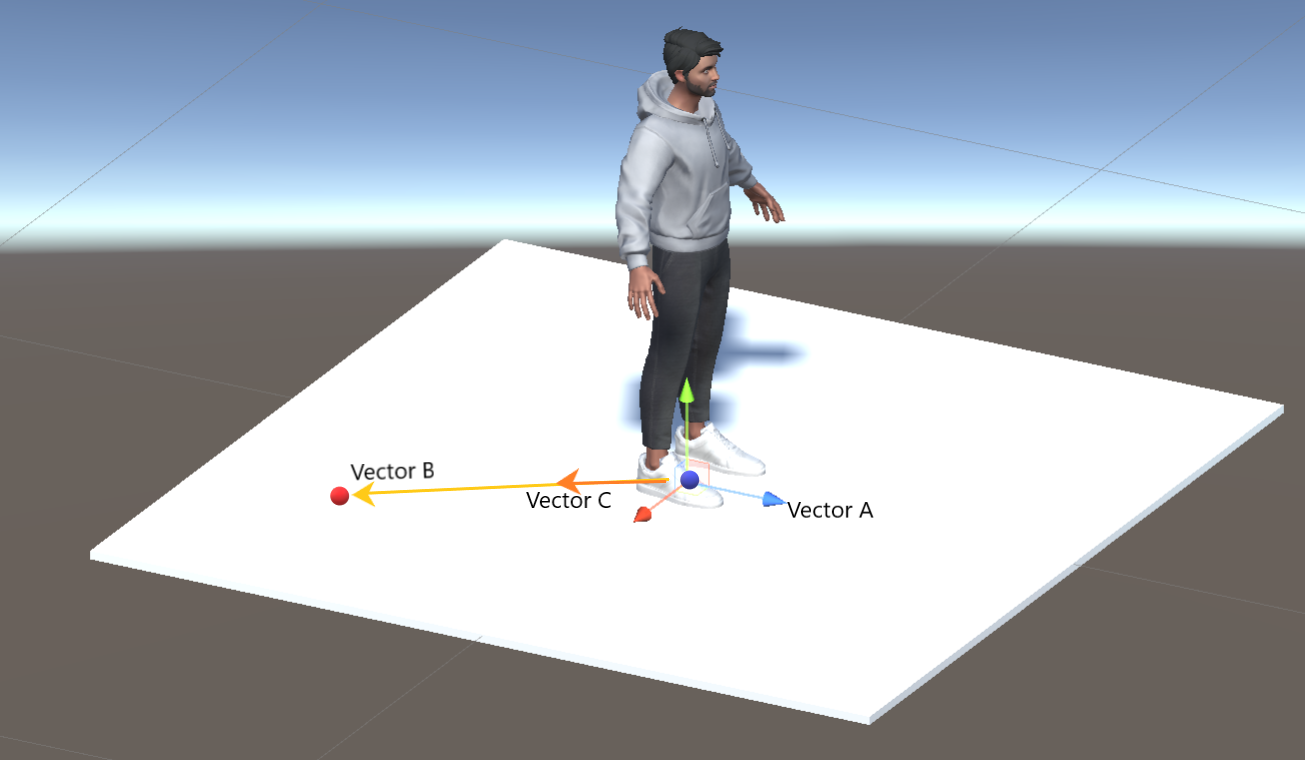
Dot product for rotation explained
- When the rotation animation gets played the whole avatar rotates and so does its local transform.
- If the dot product of two normalized vectors is:
- 1 then, the vectors are in the same direction.
- -1 then, the vectors are in opposite direction.
- 0 then, the vectors are 90deg to each other.
- Legend for the image below :
- Vector A is Avatar's forward vector
- Vector B is the vector joining Avatar’s position to Touch position.
- Vector C is the Normalized vector joining Avatar’s position to Touch position.
- As the avatar rotates, the avatar’s forward vector changes and so does the dot product.
6. Adding Components
Let’s now add the components we have created to get the desired result.
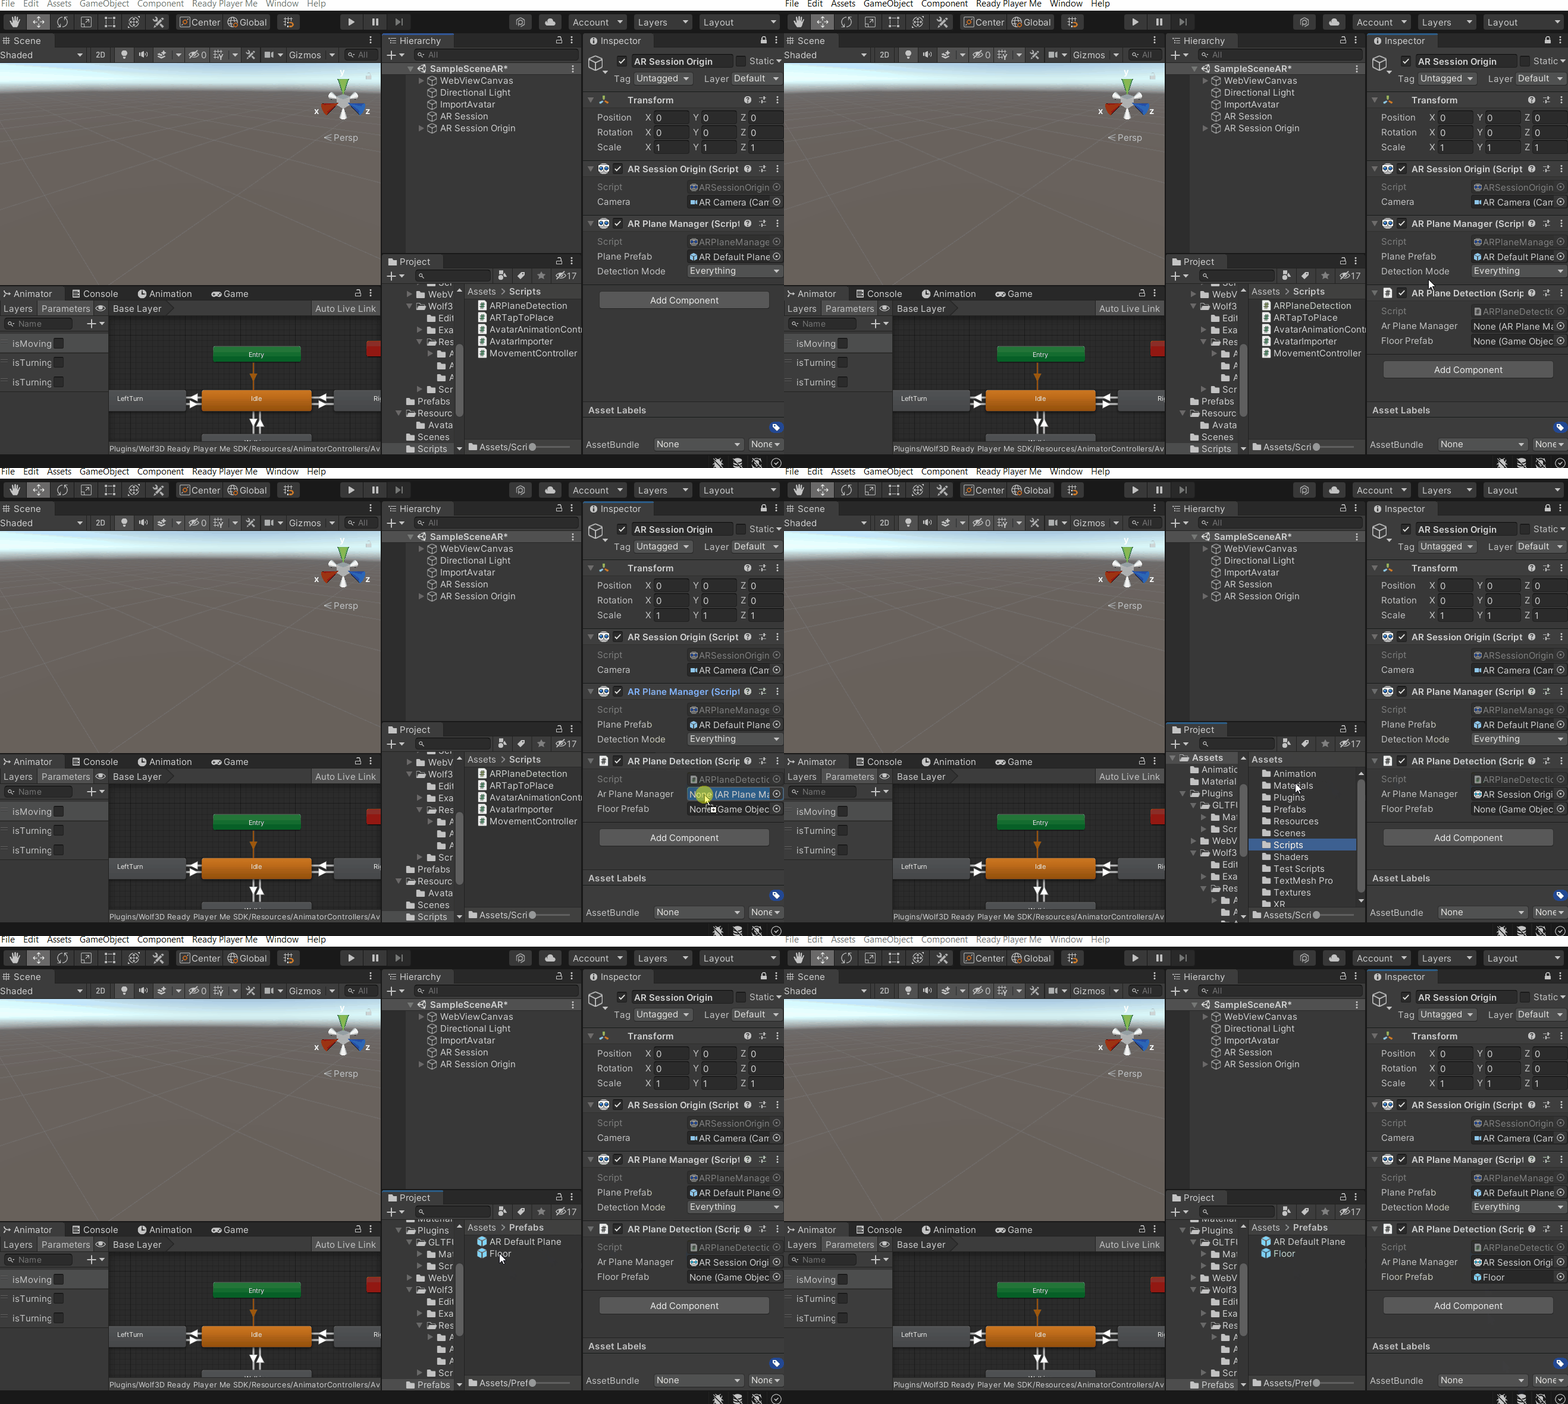
- Add the ARPlaneDetection component to the AR Session origin GameObject→ drag and drop the required fields i.e the AR Plane Manager and the Floor prefab.
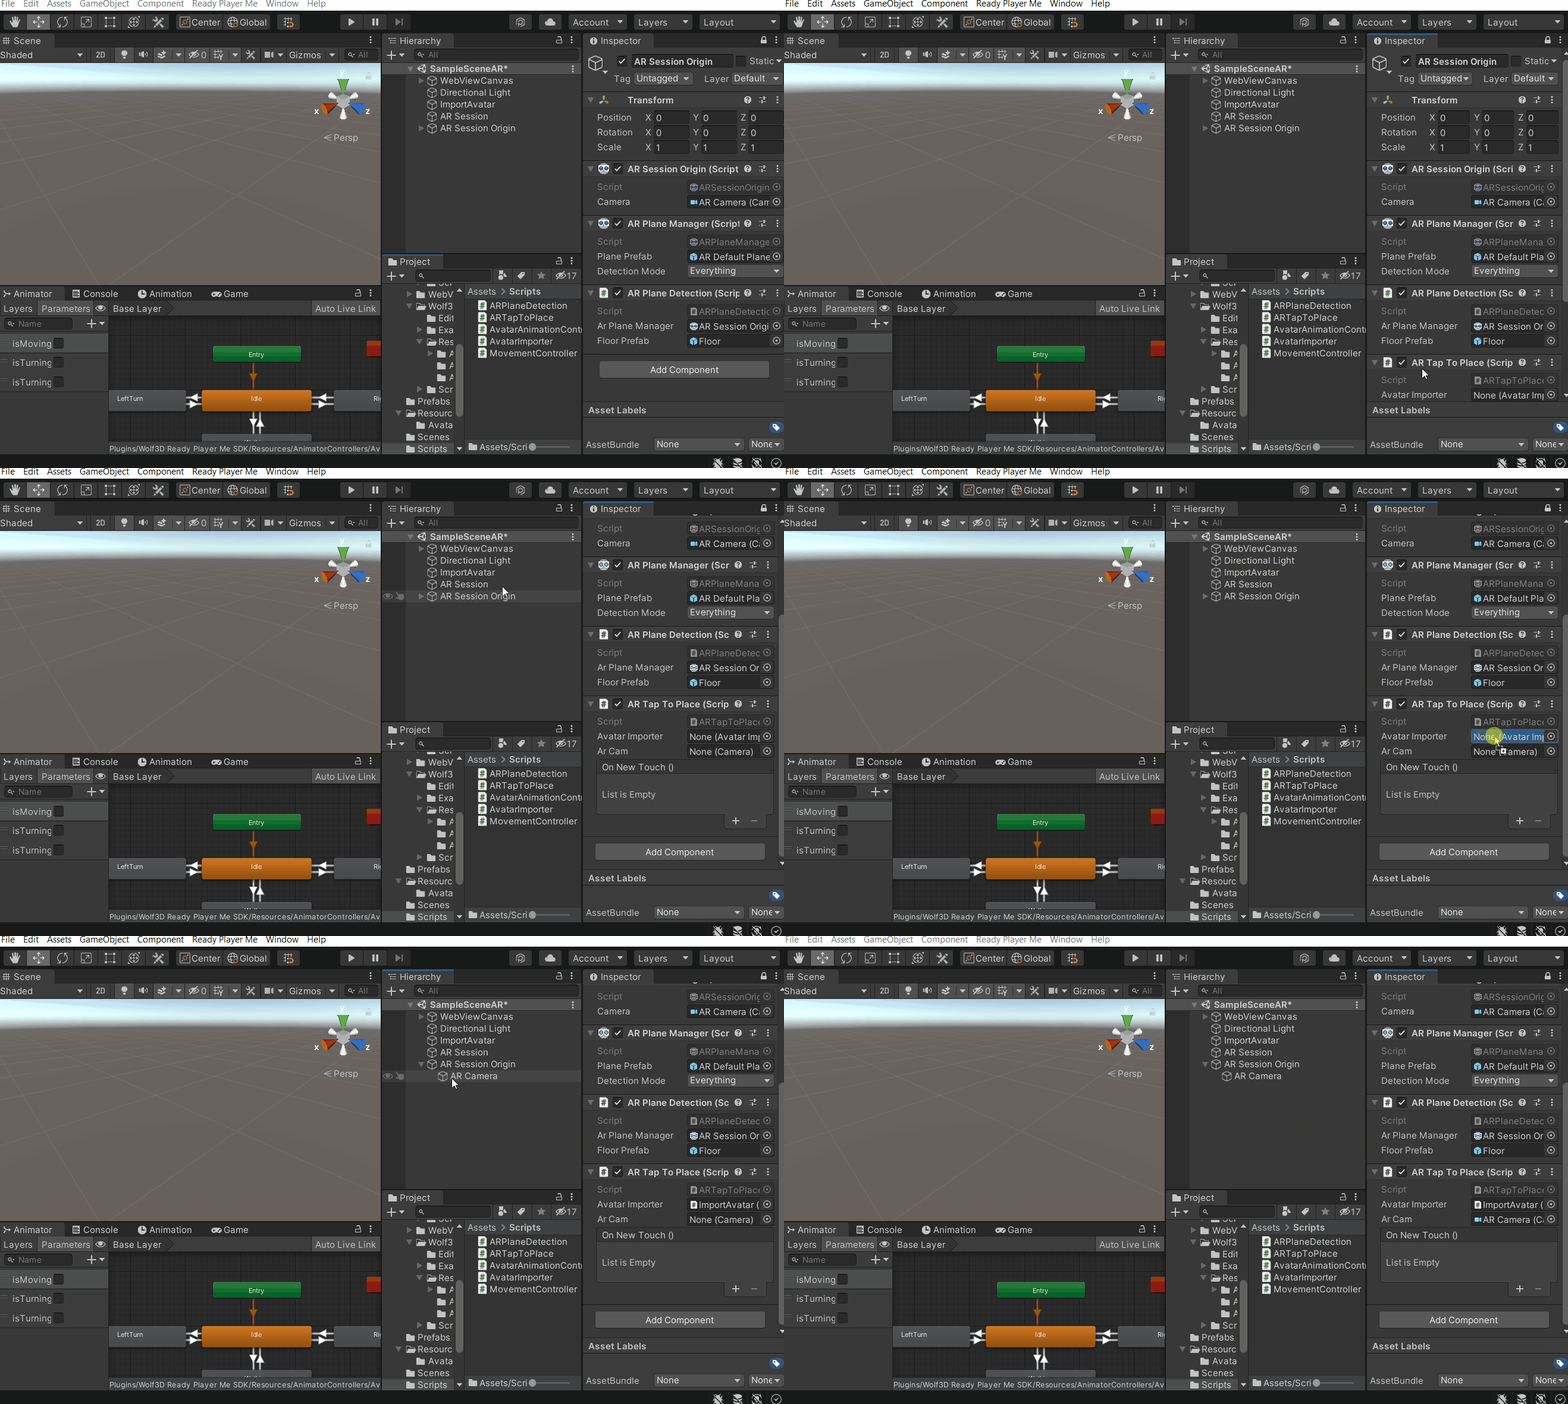
- Add the ARTapToPlace component to the AR Session origin GameObject → drag and drop the ImportAvatar and the AR Camera components in the respective fields.
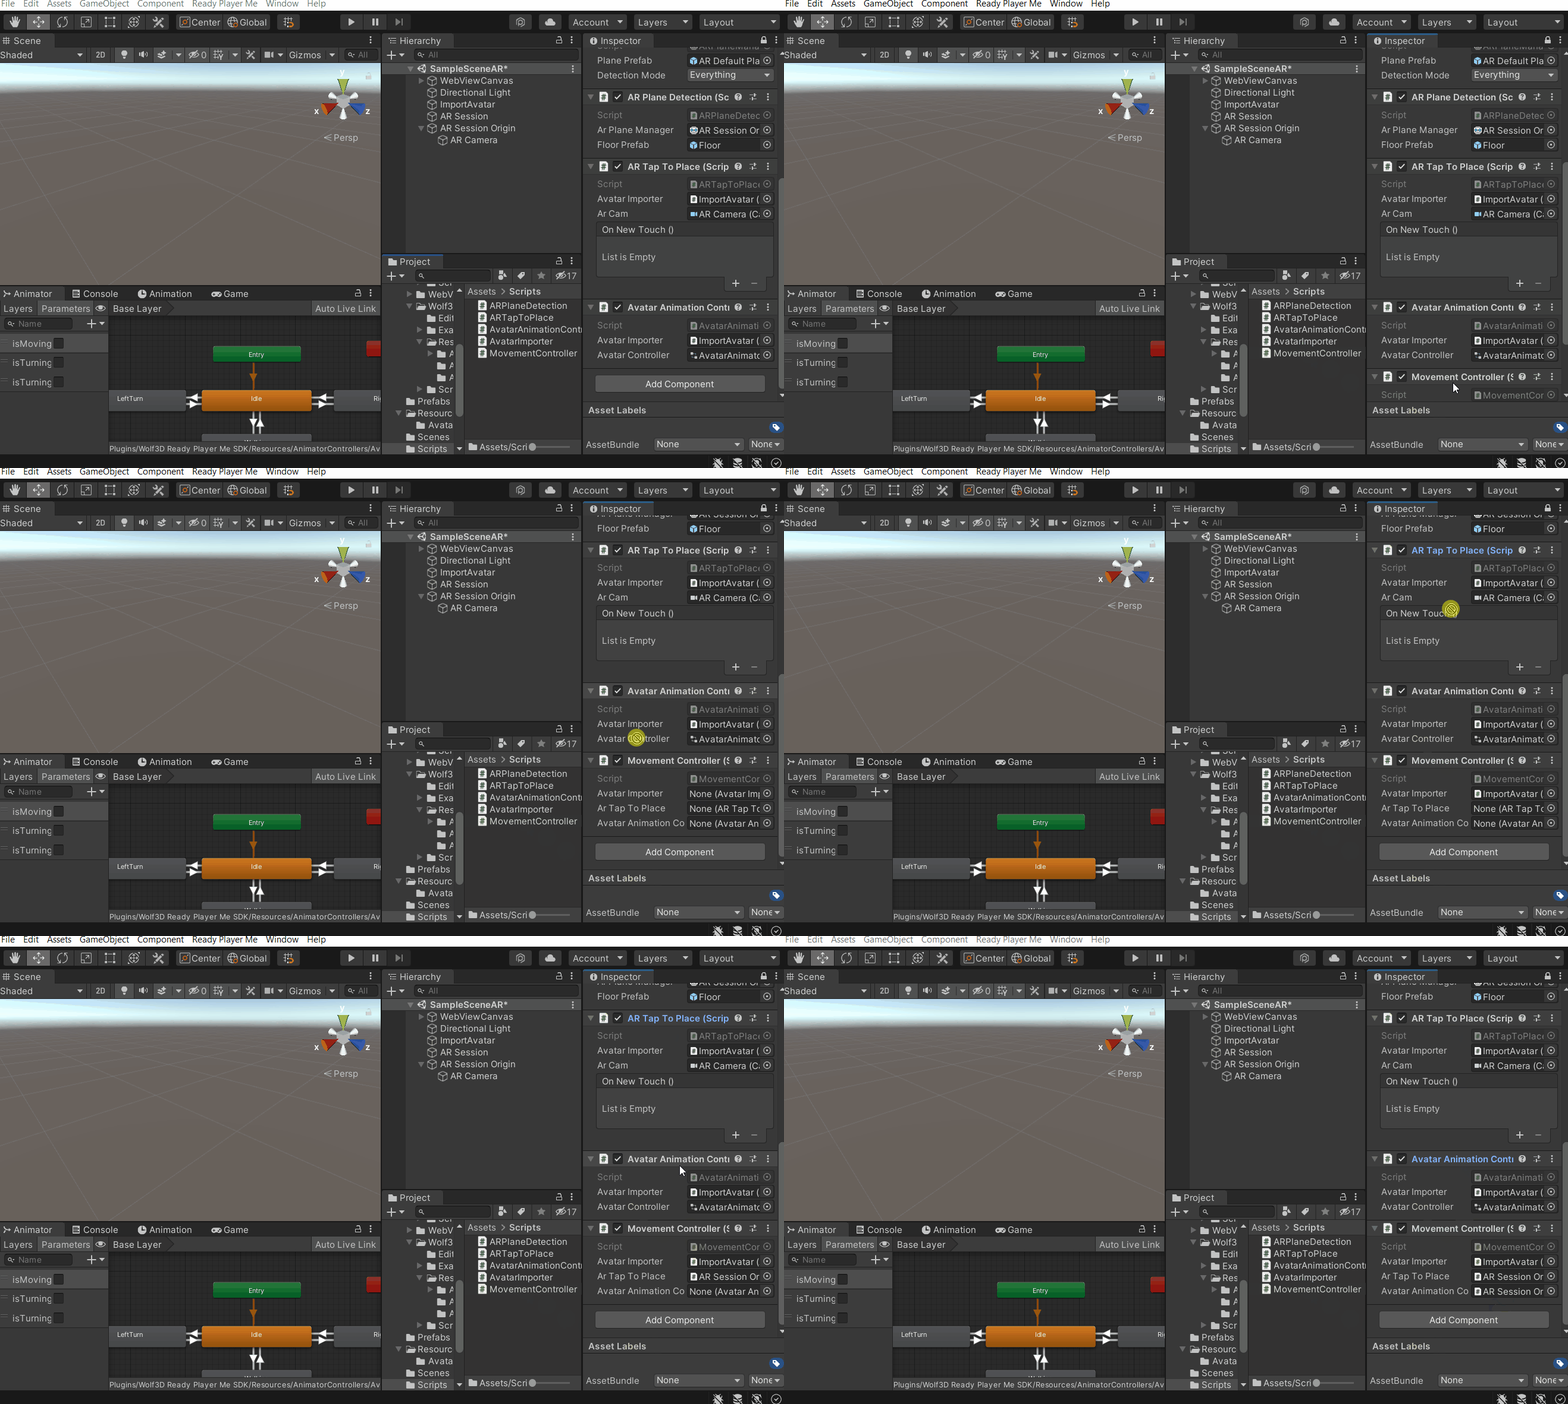
- Add the AvatarAnimationController component to the AR Session origin GameObject → drag and drop the required fields i.e the ImportAvatar and the AvatarController we had created earlier
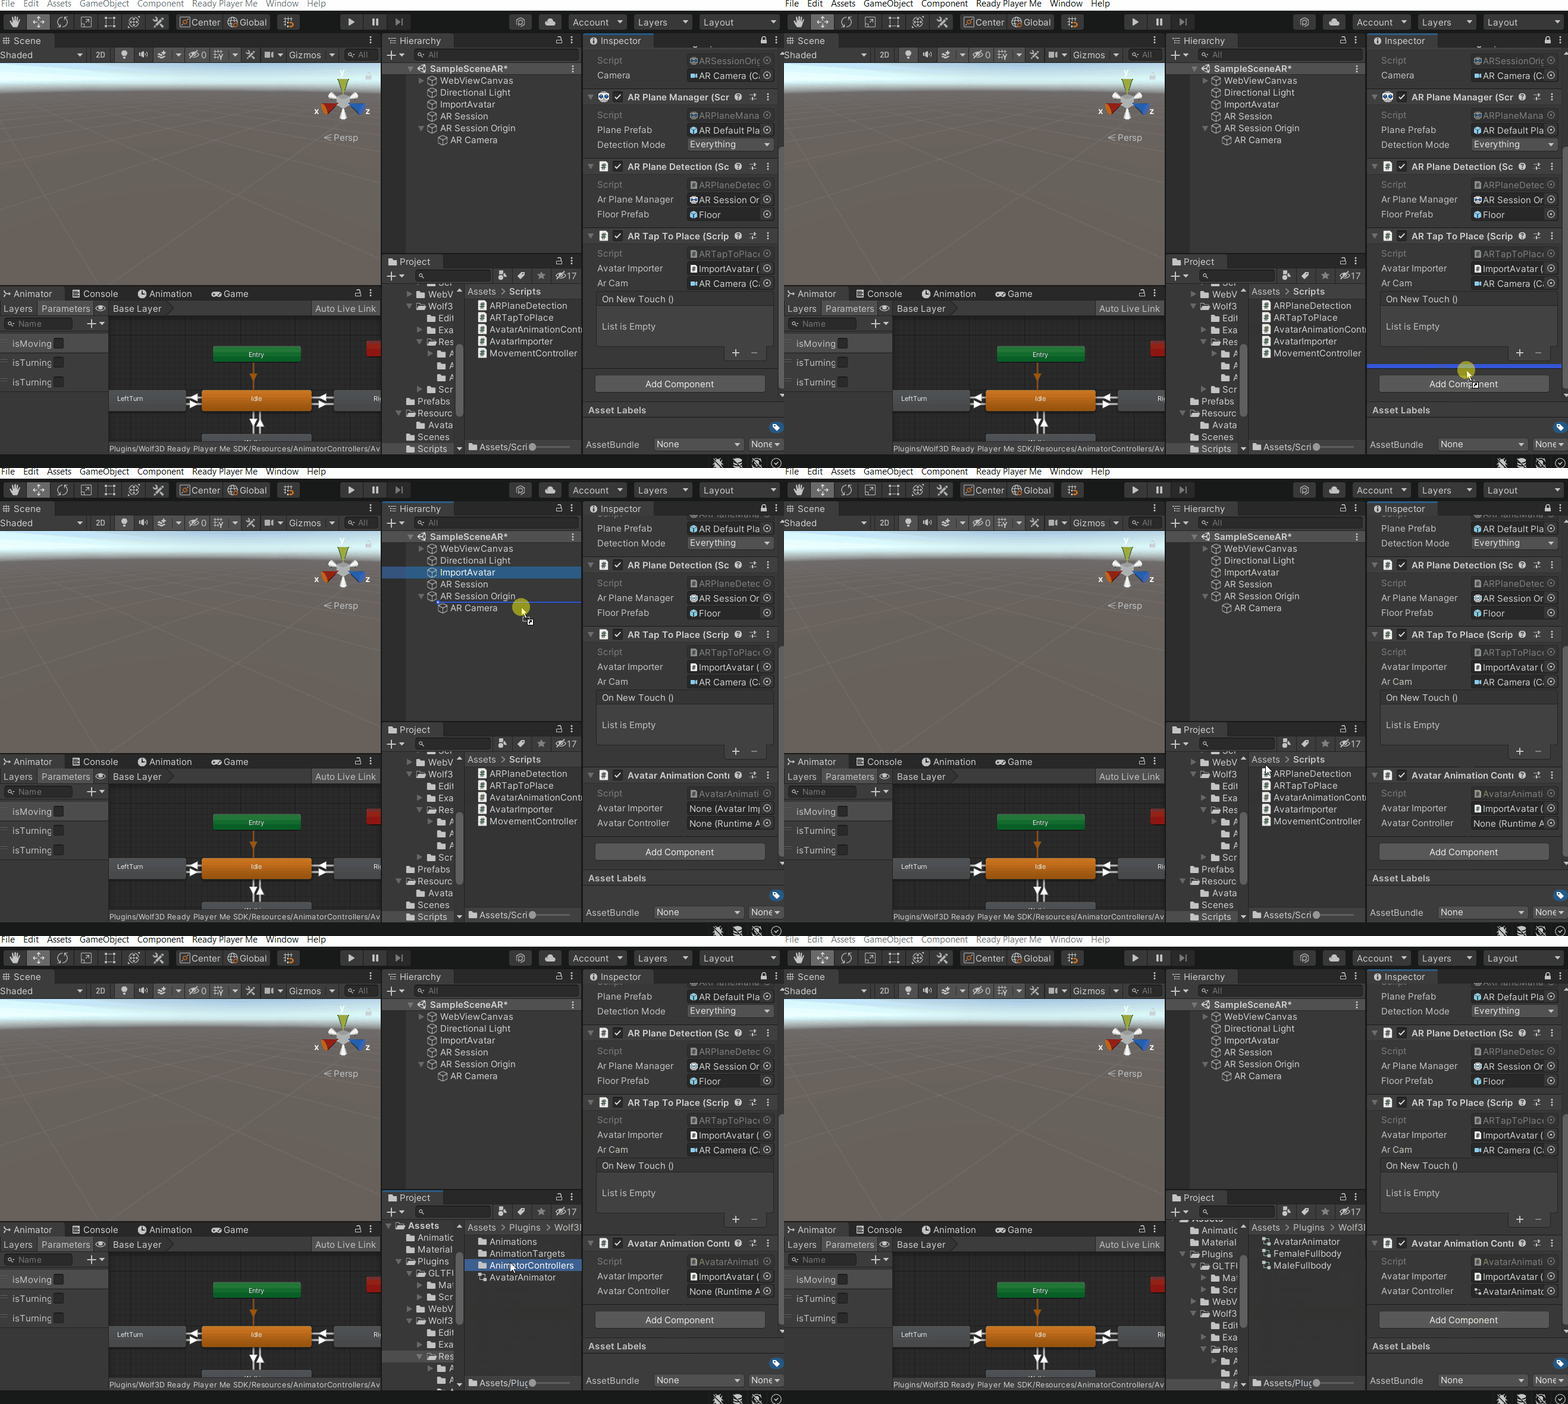
- Finally, add the MovementController component to the AR Session origin GameObject → drag and drop the ImportAvatar, the ARTapToPlace and the AvatarAnimationController into the respective fields.
7. Testing
To test the app,
- Connect your phone to your laptop/ PC. Also, make sure USB Debugging is enabled on your phone.
- Navigate to
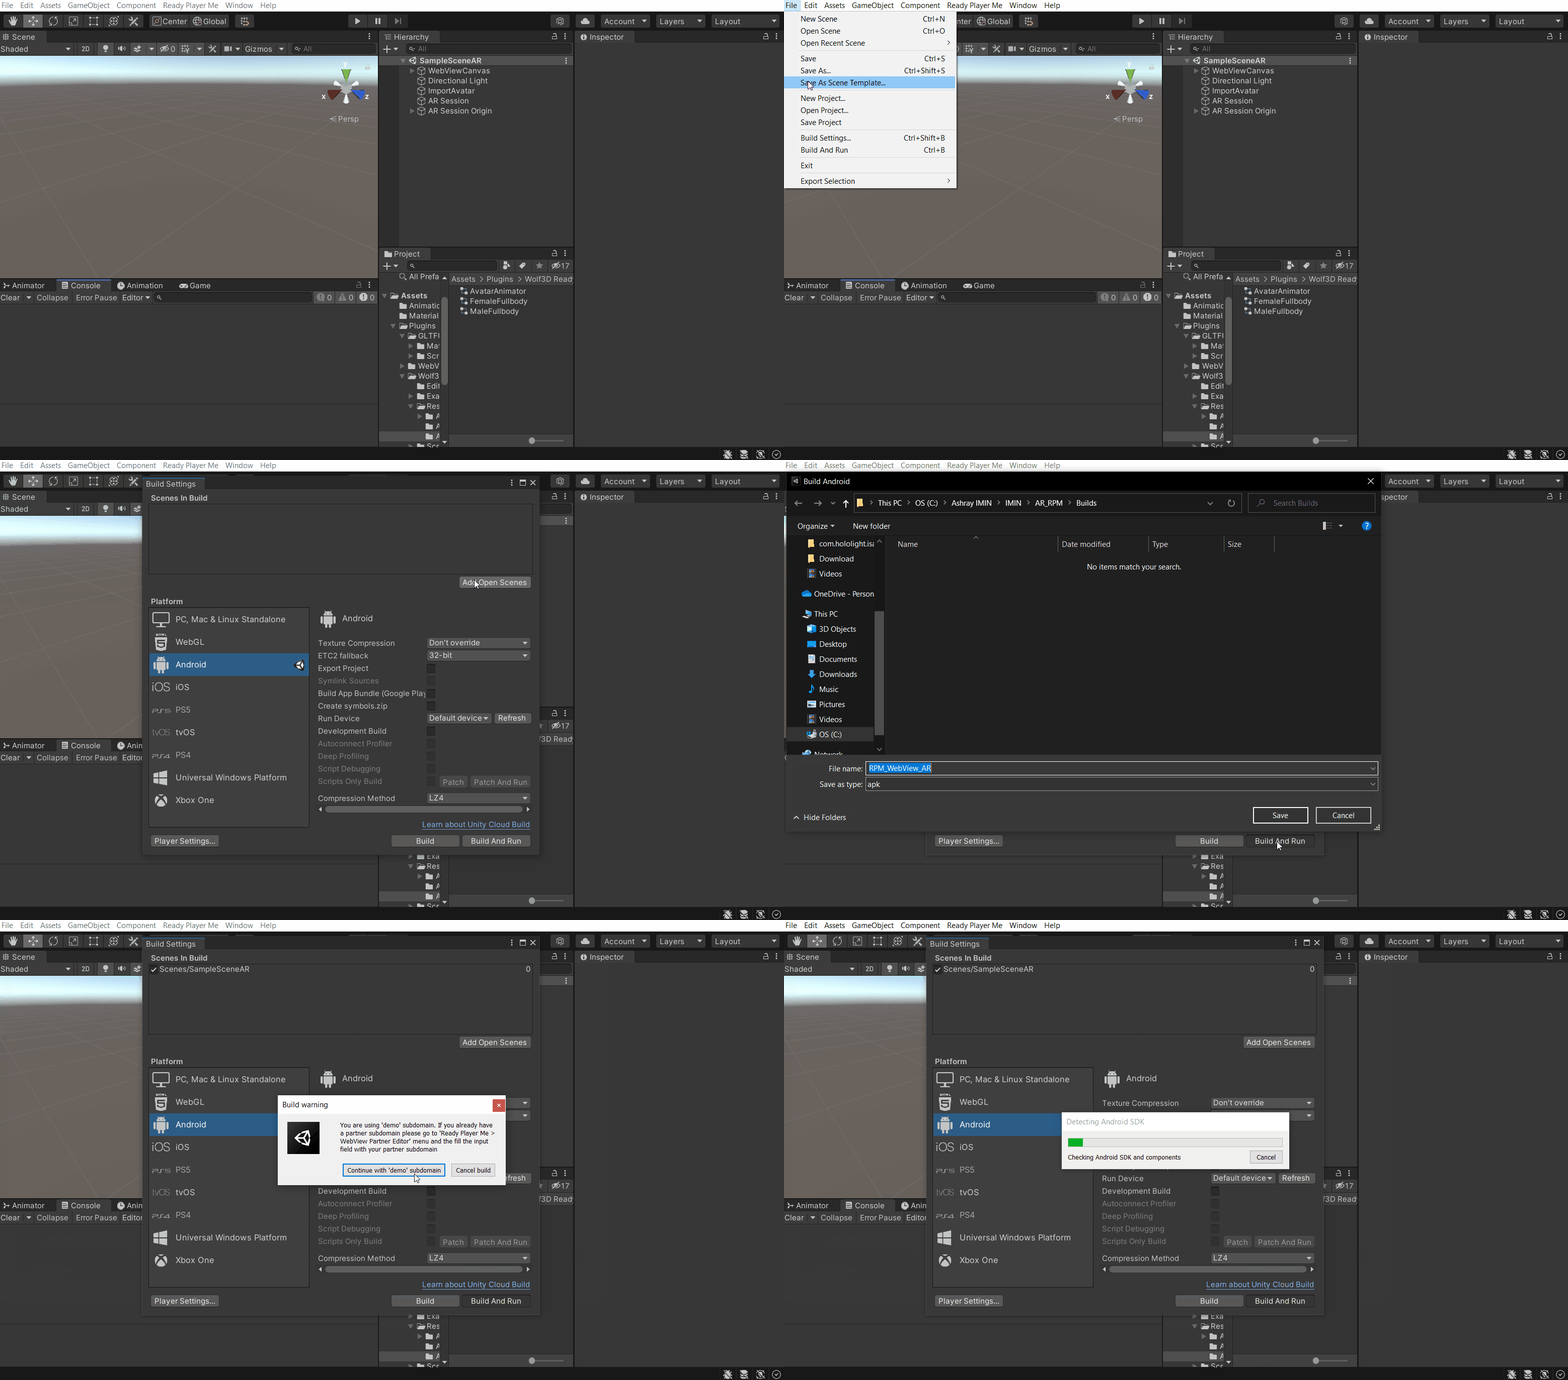
File→Build Settings→ click onAdd Open Scenes→ click onBuild and Run.
