Dec 29 • Ashray Pai

Overlaying BIM Models onto Your Physical World with VPS

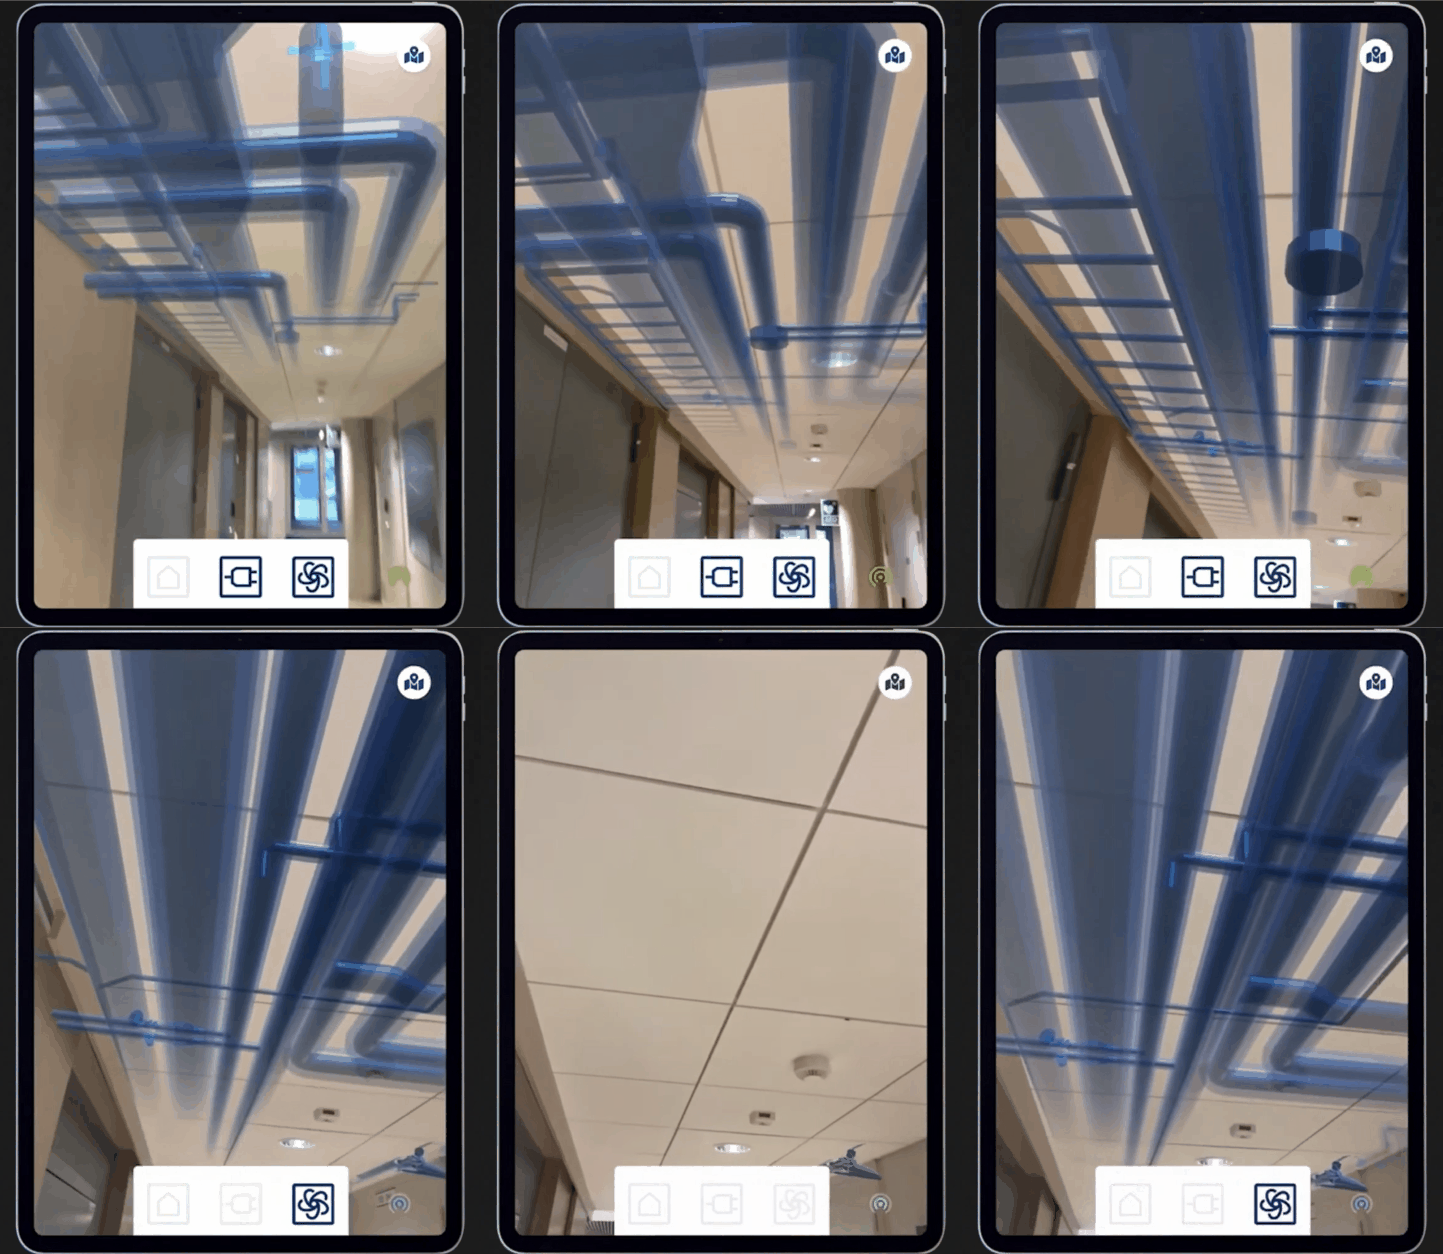
In this blog, you'll learn how to create an application that uses a Visual Positioning System (VPS) to overlay BIM (Building Information Modeling) models onto your physical environment. This has real-world applications such as:

  • Pre-construction validation: Contractors can augment BIM models onto physical sites, ensuring perfect alignment and avoiding costly errors.

  • Maintenance: Visualize hidden systems like plumbing, electrical wiring, or HVAC systems to guide technicians precisely to the areas that need repairs or upgrades.

We’ll leverage the Immersal SDK for this application. Immersal provides tools like spatial mapping and VPS to enable developers to create advanced AR experiences. A special thanks to Immersal for sponsoring this tutorial!

YouTube

Want to watch the video instead?

Prerequisites

Before diving in, make sure you’ve completed these three steps:

1. Developer Account Setup

  • Create a free developer account on the Immersal website. It’s straightforward, and the link can be found here.


2. Map Your Environment

  • Download the Immersal Mapper App from the Play Store or App Store.
  • Capture and upload photos of your environment. Immersal’s backend processes these images to identify feature points for spatial mapping.


3. Unity Project with Immersal SDK

  • Open Unity and navigate to Window > Package Manager.
  • Click the "+" icon, select Add Package from Git URL, and paste the Immersal SDK URL (https://github.com/immersal/imdk-unity). Click "Add."
  • Switch your platform to Android in File > Build Settings and resolve any project validation issues in the popup window.

Setting Up the Scene


1. Initial Setup

  • Delete the default Main Camera.
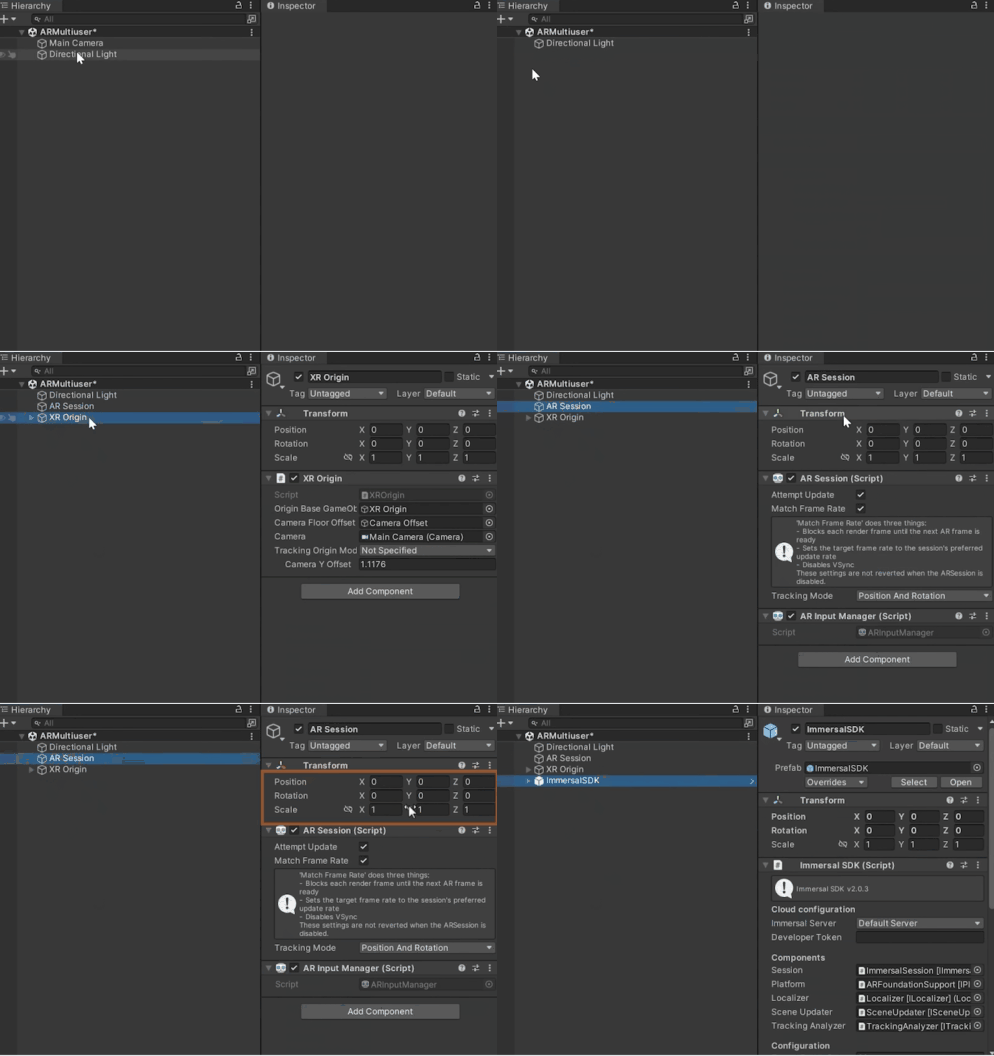
  • Add AR Session and XR Origin from Hierarchy -> XR.
  • Reset the transforms of both objects.


2. Add Immersal SDK Prefab

  • Search for the Immersal prefab in the Project Window (make sure the search includes all folders).
  • Drag and drop the prefab into your scene.
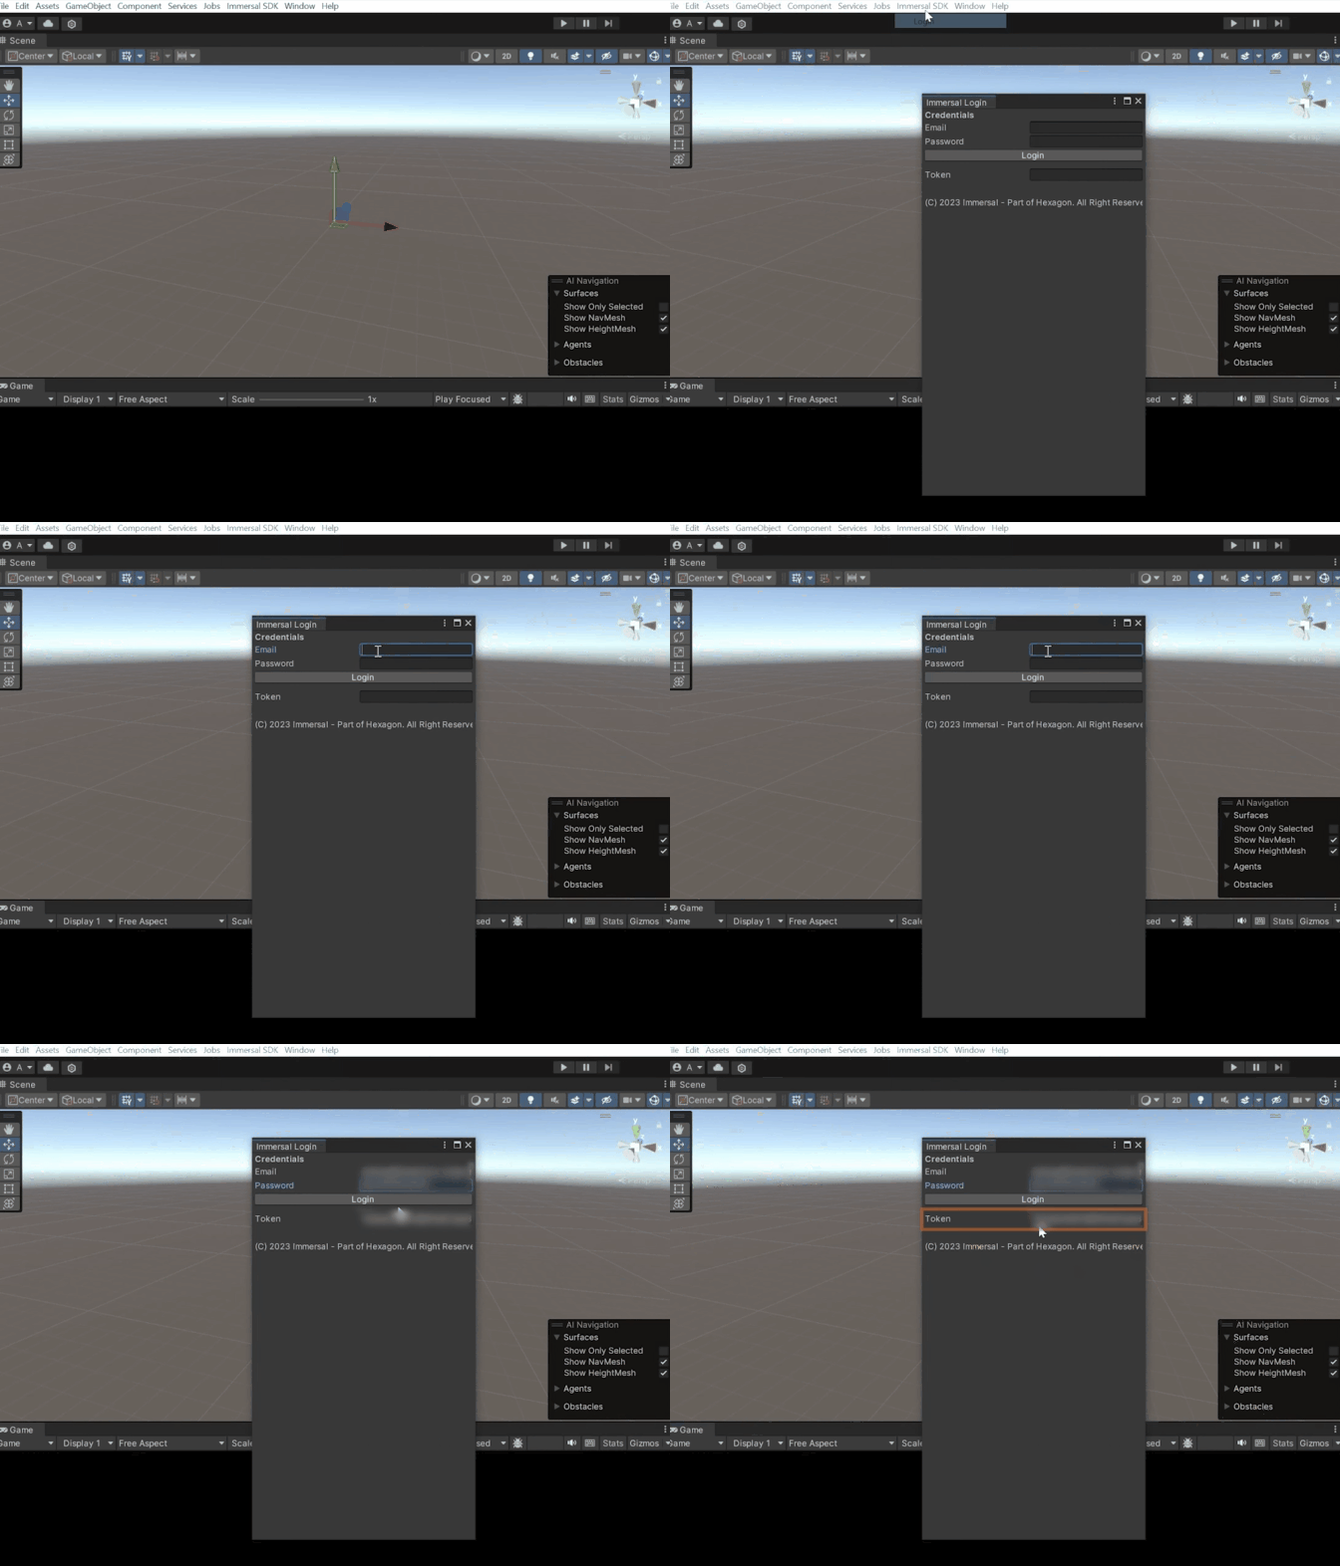
  • Log in to your Immersal developer account and retrieve the developer token

3. Configure XR Space

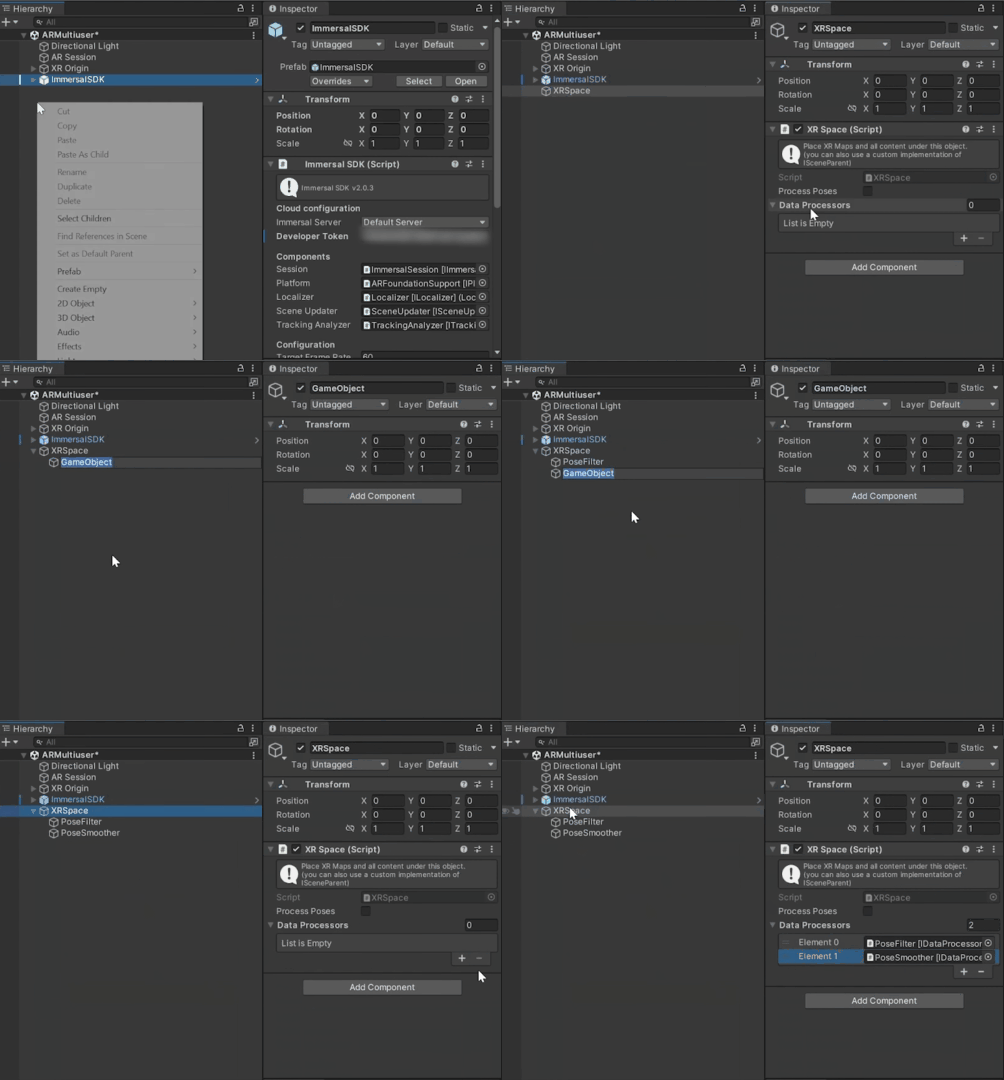
  • Create an empty object named XR Space and attach the XR Space component.
  • Add two child objects named Pose Smoother and Pose Filter, then attach their respective components.
  • In XR Space, add Pose Smoother and Pose Filter to the data processors list.

4. Map Integration

  • Create an empty object named XR Map and attach the XR Map component.
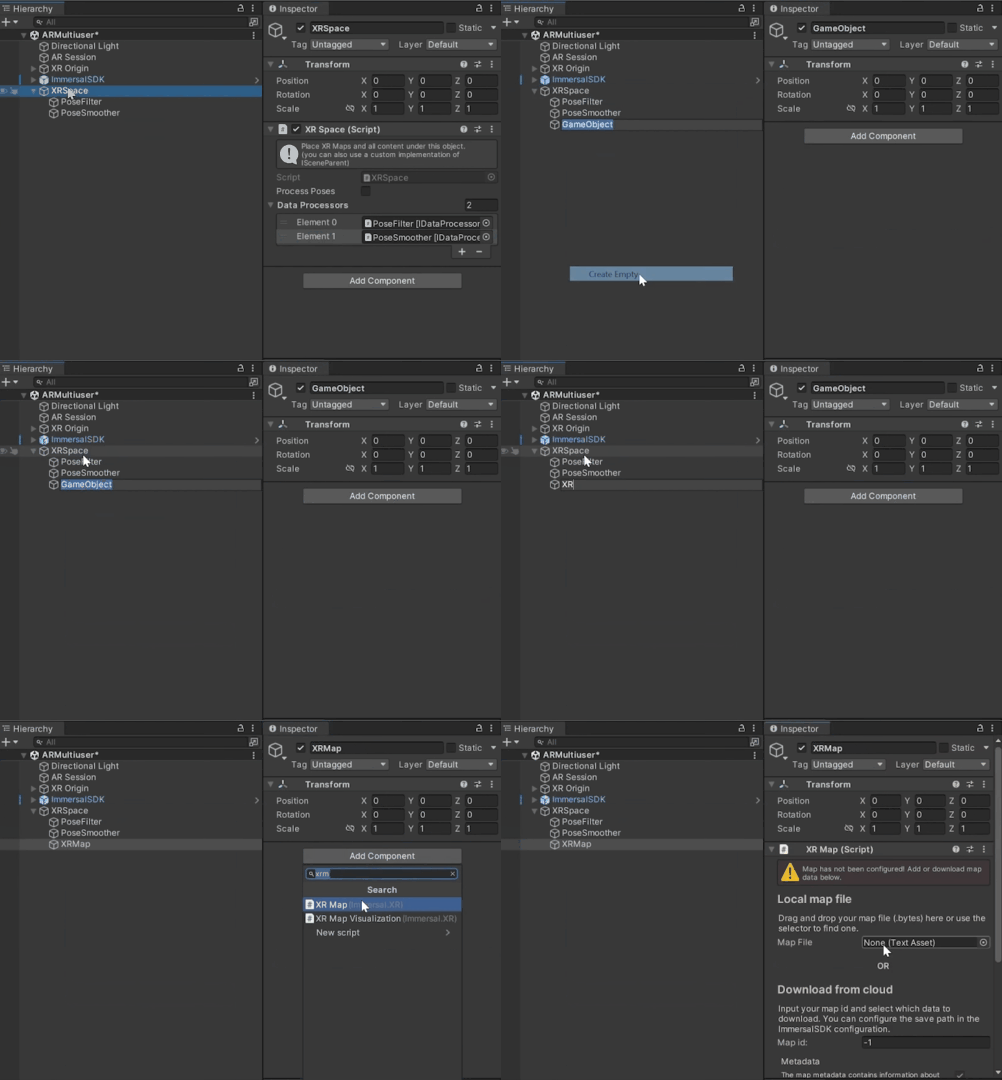
  • Retrieve your Map ID from the Immersal developer portal and paste it into the XR Map component

  • Enable Map File and Visualization options, then click "Download."
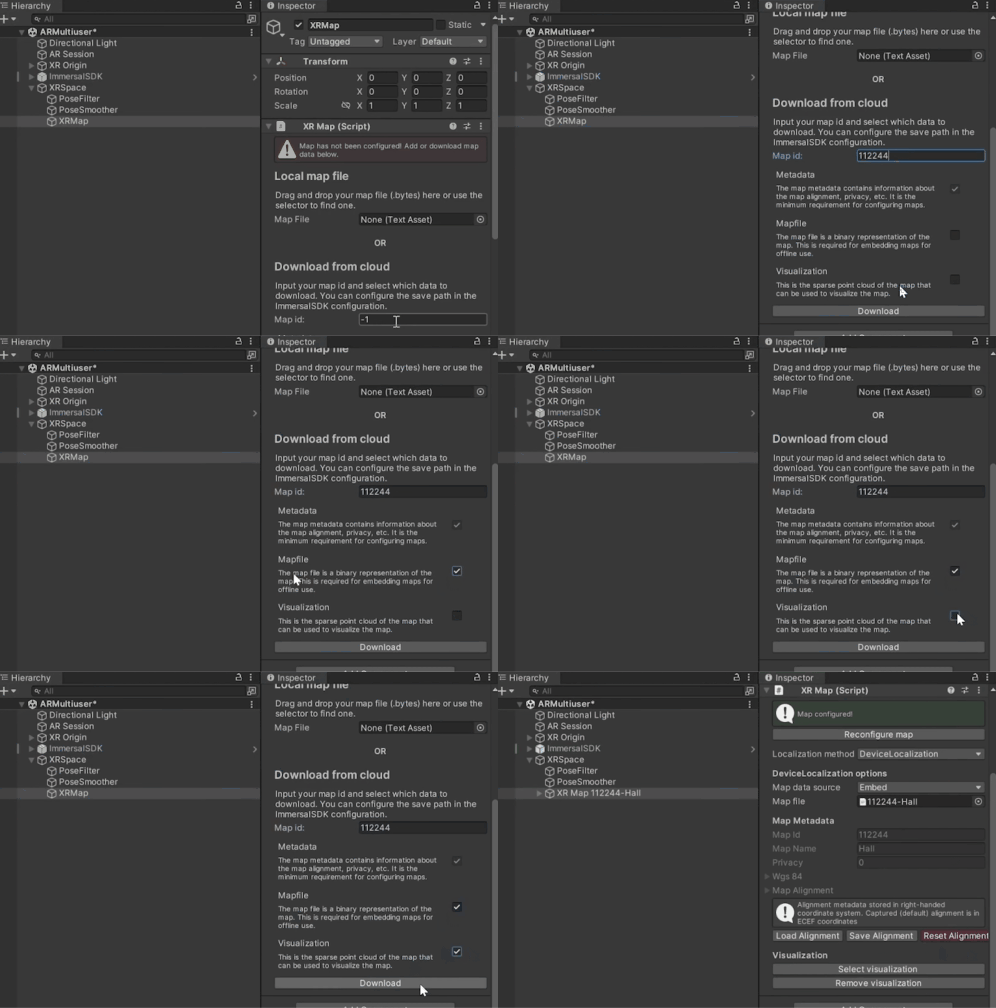
  • You should now see a point cloud representing your environment’s feature points.
Importing BIM Models

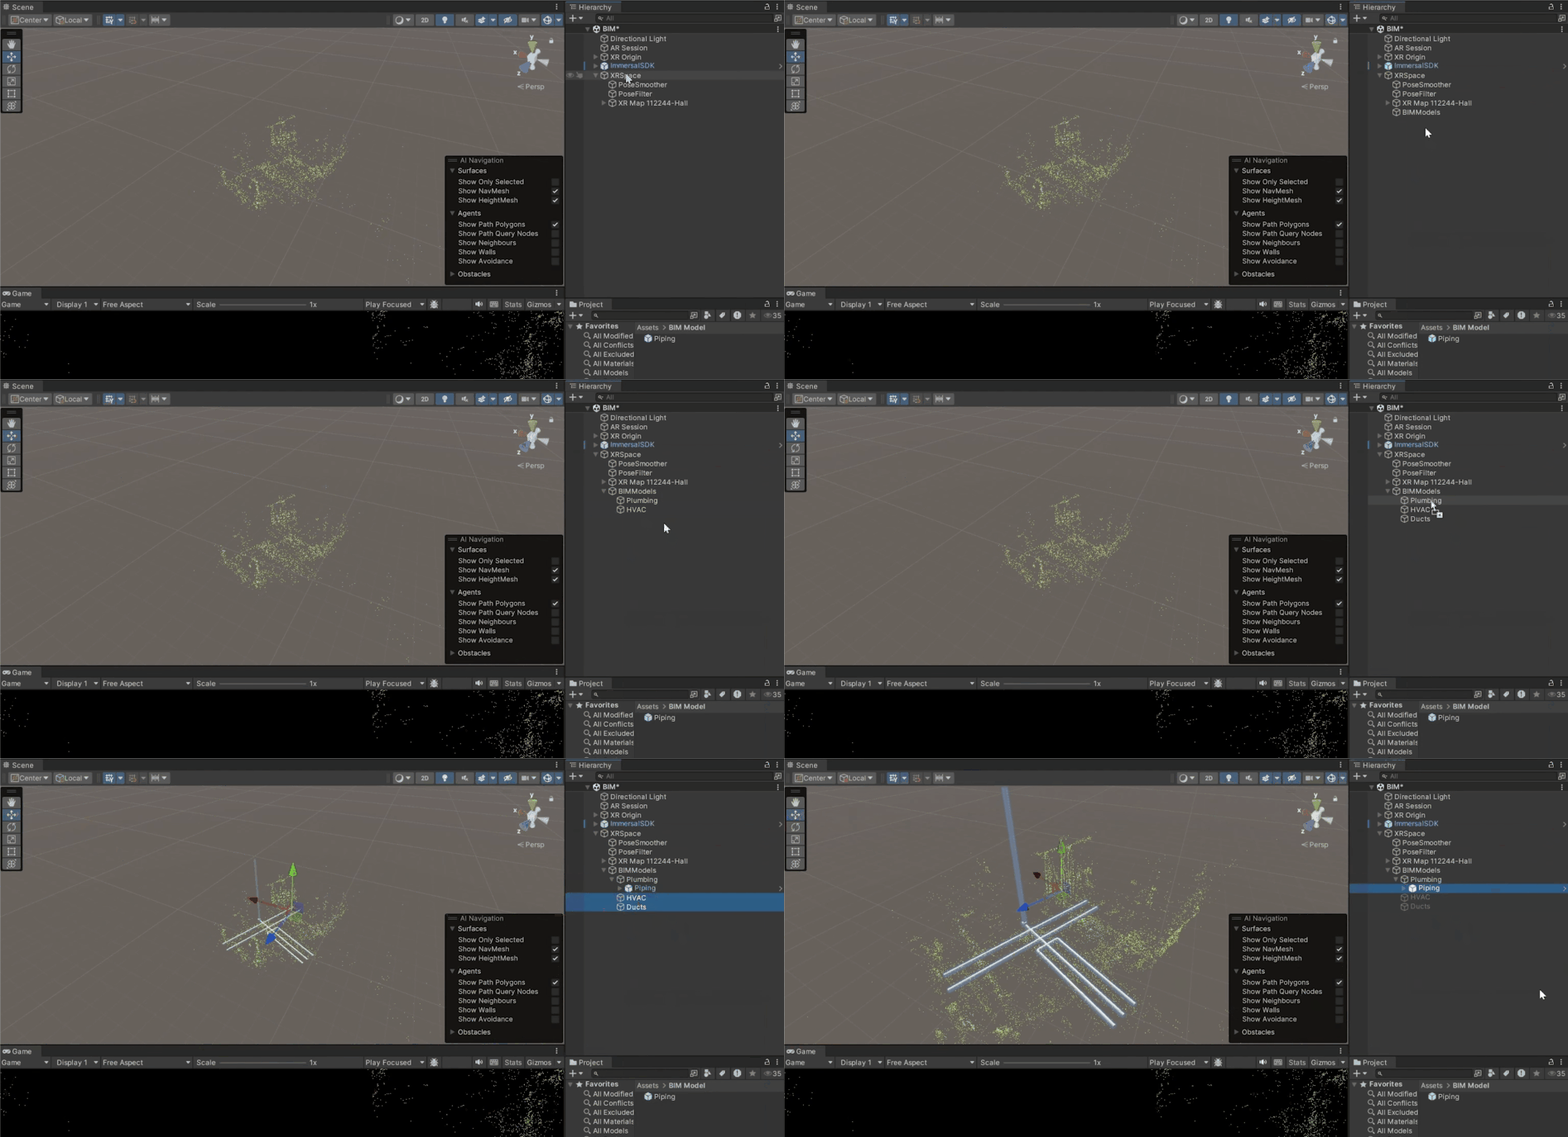
  1. Import BIM models (e.g., plumbing, HVAC, ducts) into Unity.
  2. Align the models with your spatial map. For this example, we’ll focus on plumbing:
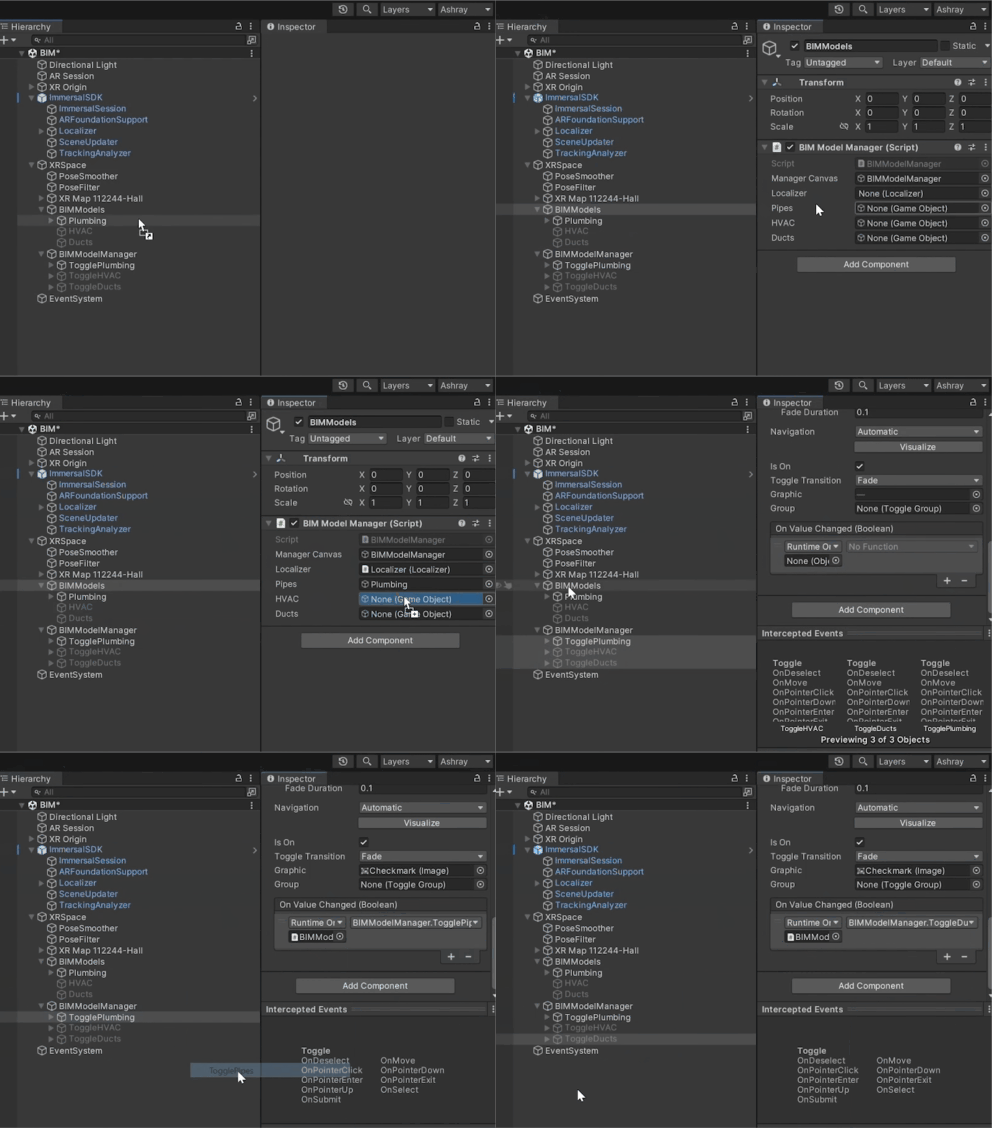
    • Create an empty object named BIM Models under XR Space.
    • Add child objects for each system (e.g., Plumbing, HVAC, Ducts).
    • Assign corresponding models to these objects.
    • Align the model with the spatial map.

Adding UI Controls

  1. Create a canvas named BIM Model Manager under XR Space.
  2. Adjust the Canvas Scaler:
    • Set UI Scale Mode to "Scale with Screen Size."
    • Reference resolution: 1080 x 1920.
  3. Add toggle buttons for each system (e.g., Plumbing, HVAC, Ducts). Arrange and label them appropriately.

Adding Functionality with Scripts

Download the BIM Model Manager script here. This script enables toggling visibility for each system based on user input.


Script Overview

  • References: Manager Canvas, Immersal Localizer, and GameObjects for each system.
  • Initialization: Hides all models and listens for successful localization events.
  • Update Method: Checks tracking quality to manage session pausing and resuming.
  • Toggle Functions: Show or hide specific systems based on toggle inputs.


Assigning Script Parameters

  1. Drag and drop the script onto the BIM Models object.
  2. Assign parameters:
    • Manager Canvas: Drag the BIM Model Manager canvas.
    • Localizer: Drag the Immersal prefab’s localizer.
    • GameObjects: Assign systems like Plumbing, HVAC, and Ducts.
  3. Link toggle buttons to their respective toggle functions in the script.

Final Steps

Before building and testing the application, there is one last steps and that is to Add Localization and Pose Indicators.

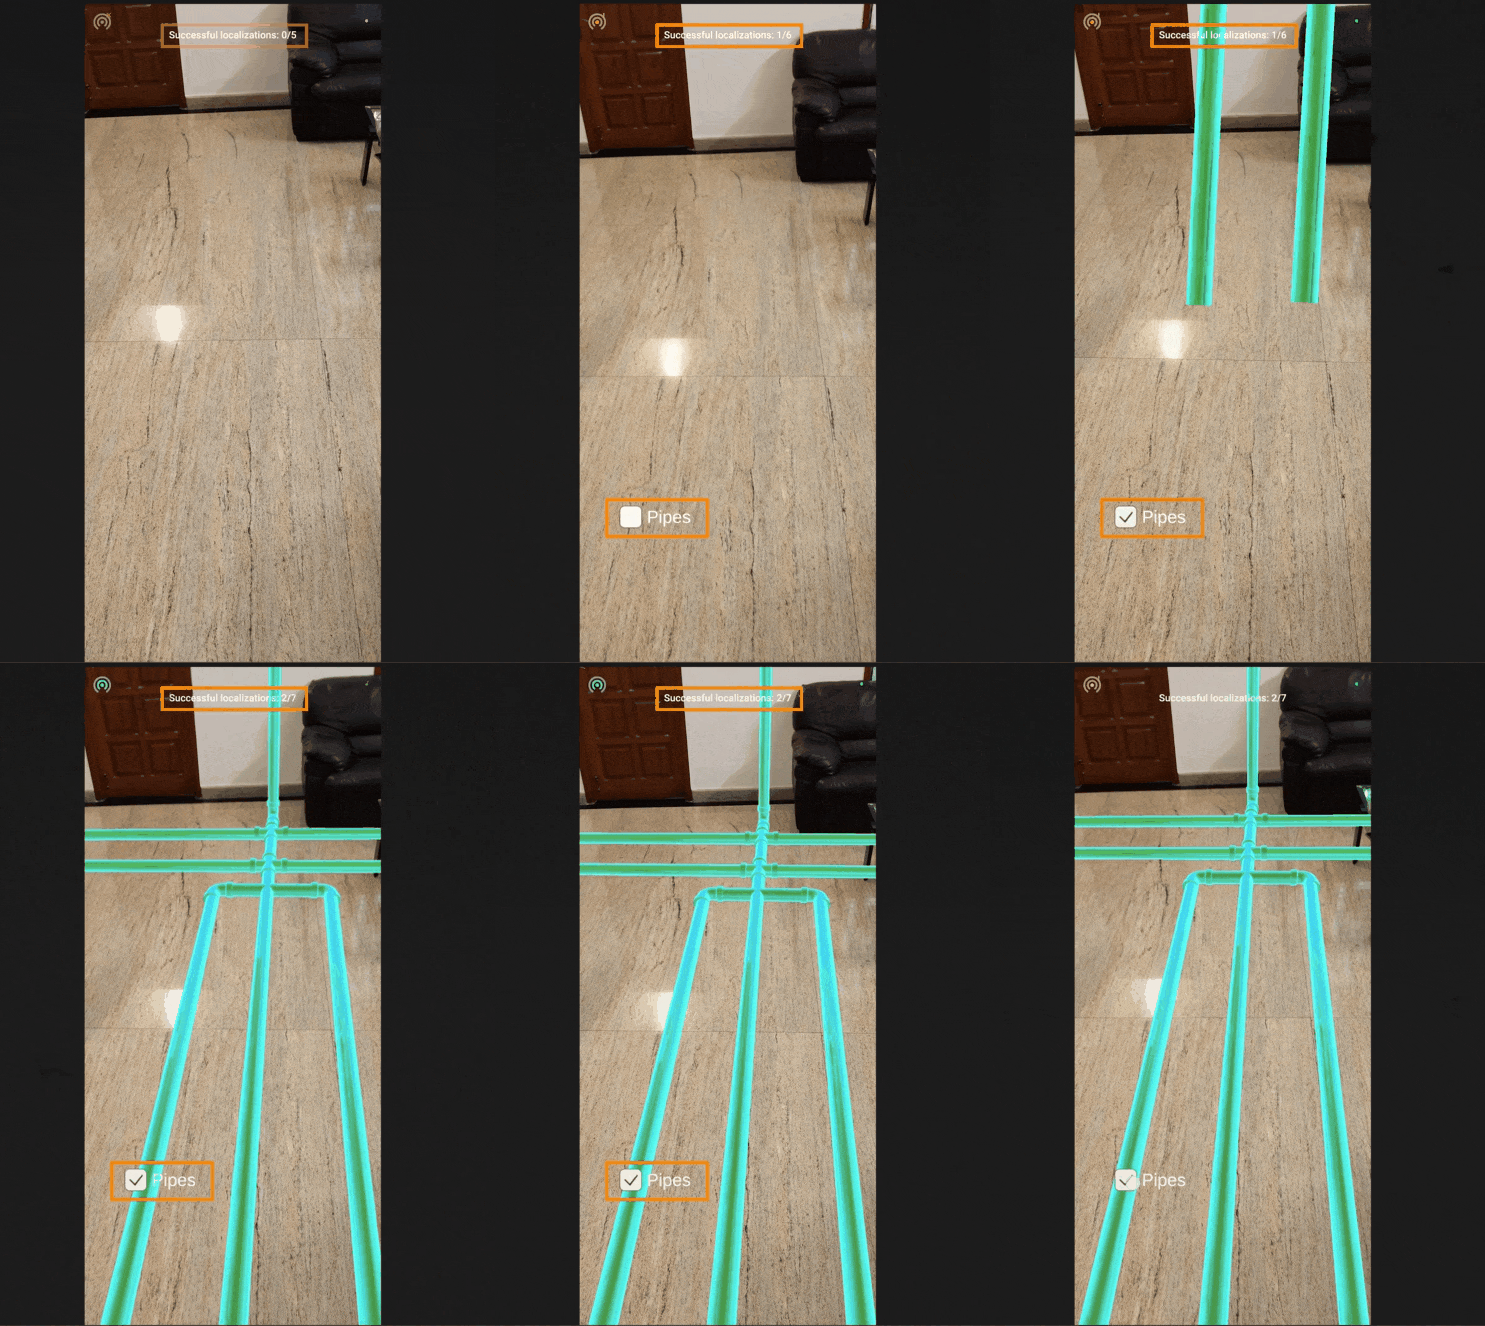
Create a UI canvas and add the Localization Status and Pose Indicator prefabs to it. These will let the user know how well the device is tracking.

Testing and Deployment


Build and run the project:

  • Connect your device to your computer.
  • Navigate to File > Build Settings, add the open scene, and click Build and Run.


The Final Experience

After successful localization, the BIM Model Manager canvas appears with toggle buttons for each system. Users can interact with these toggles to visualize hidden systems like plumbing in their environment. This application is a game-changer for construction validation and maintenance tasks, enabling accurate and efficient workflows.


Conclusion

You can try this at different locations like office spaces and other homes and it is really helpful to visualize these hidden systems especially when there is a requirement for maintenance or repairs.


All right so now you know how to Overlay BIM Models on top of your physical world now this was was just one of the examples of how we can use the Immersal SDK in the next couple of blogs we'll see how to build an AR application for indoor navigation, for local multiplayer and even create a web XR experience


Thanks for reading this blog post 🧡

If you've enjoyed the insights shared here, why not spread the word? Share the post with your friends and colleagues who might also find it valuable.
Your support means the world to us and helps us create more content you'll love.