Bringing "Draw Physics Lines" to Life in 3D XR
Have you heard of the game "Draw Physics Lines"? It was a game from 2017, where the goal was to push a ball into a cup by drawing lines. I thought, why not remake this in 3D? It would be such a cool mechanic to try out in XR, right? Imagine spawning a ball on your table or bed, placing a cup on the floor, and drawing lines in 3D space to push the ball into the cup. Sounds exciting, doesn't it?
Want to watch the video instead?
In this blog, I'll guide you through using your hands, to draw in 3D space. And later, we'll add some physics to make it even more fun. Let's dive in!
1. Unity Project Setup
First things first:
1. Create a new Unity Project
2. Open Window → Package Manager → Install the latest version of Meta All In One SDK
3. Configure all the player settings.
You can get this preconfigured project from here .
However if you want to how to set it up from scratch then check out this video

2. Scene Setup
To set up a scene:
1. Search for "large room" in the project window
2. Set the search to "all”
3. Select the prefab, and add it to your scene.
4. Next, search for "Skybox" in your project folder, select the Skybox gradient material, and add it to your scene as well.
To adding Camera Rig and Hand Tracking:
1. Navigate to Meta → Tools → Building Blocks.
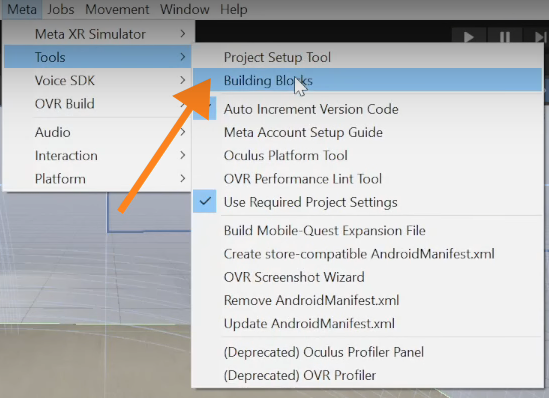
2. From this window, add the Camera Rig block, the Hand Tracking block, and scroll down to add the Virtual Hands block.
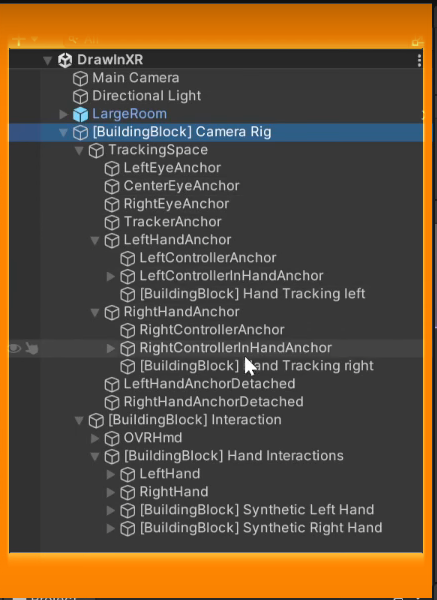
Once done, you'll see that the building blocks have created a [BuildingBlock] Camera Rig game object with a tracking space to track your headset, left and right controller, and hands.
3. Drawing Lines in 3D
To draw lines in XR without jittering, we can use the tube mesh script from Mathias and combined it with a drawing logic script from Dilmer. You can download the modified scripts for our implementation here.

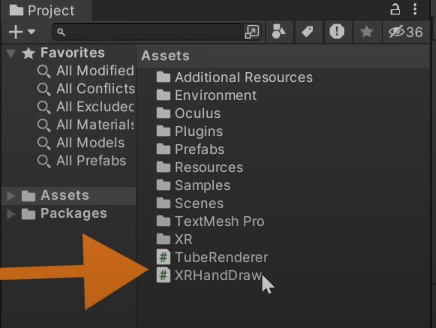
Once you have the files downloaded, Import the Tube Renderer and XR Hand Draw scripts into Unity.
Now if you understand how the script work you can skip to the next section.
3.1 Tube Renderer script explained.
Lets break down the code part by part:
3.1.1 Variables and Properties
These fields define the tube's properties such as vertex positions, number of sides, radii, booleans for world space usage and collider behavior.
The ColliderTrigger property manages whether the tube's mesh collider acts as a trigger.
3.1.2. Initial Setup
The Awake method initializes essential components like MeshFilter, MeshRenderer, and MeshCollider when the script first loads. Also, adding them if necessary.
3.1.3 Visibility Control
OnEnable and OnDisable manage the tube's visibility by enabling or disabling the mesh renderer.
3.1.4. Validation
OnValidate ensures that the number of sides is always at least three to form a closed shape.
3.1.5. Setting Positions
This method assigns positions to the tube's vertices and initiates the mesh generation process.
3.1.6. Mesh Generation
This function constructs the tube's mesh by calculating vertices, updating UVs for texturing, and setting up the mesh collider. It recalculates normals and bounds for proper mesh formation.
3.1.7. UV Generation
Generates UV coordinates for the mesh, essential for mapping 2D textures onto the 3D mesh by assigning a UV coordinate to each vertex.
3.1.8. Index Generation
Creates the indices for the mesh's triangles, instructing Unity on how to draw the triangles that form the tube's surface.
3.1.9. Circle Calculation
Calculates the circle of vertices around a given position on the tube, determining the orientation and size of the circle based on the tube's direction and radius.
3.1.10. Enabling Physics
Adds a Rigidbody component to the GameObject, allowing it to be affected by physics, such as gravity, within the Unity environment.
3.2 Hand Draw Script explained
The Hand Draw script references various parameters. On start, it gets the OVR Hand and OVR Skeleton based on the tracking hand provided and creates a new Tube Renderer.
This is the entire code
Now here's a breakdown of the XRHandDraw class, presented in numbered sections with code snippets and explanations:
3.2.1. Variables and Initialization
These fields define the properties and state of the drawing system, including the hand being tracked, pinch strength thresholds, tube dimensions, and rendering materials.
Lists are used to manage points and tube renderers, while other variables track the current state of pinching and hand components.
3.2.2. Start Method
The Start method initializes the OVRHand and OVRSkeleton components from the trackingHand GameObject and sets up the first TubeRenderer for drawing.
3.2.3. Update Method
The Update method continuously checks the position of the index finger tip and updates the pinch state to determine if drawing should occur.
3.2.4. Adding a New Tube Renderer
This method creates a new TubeRenderer GameObject, sets its material, and initializes its properties. It clears the current points list and prepares the renderer for new drawing input.
3.2.5. Checking Pinch State
This function checks the state of the index finger pinch.
If pinching is detected with sufficient strength, it updates the tube.
When the pinch is released, it finalizes the current tube and prepares a new one if gravity is enabled.
3.2.6. Updating the Tube
This method updates the tube by adding new points if the index finger has moved a sufficient distance from the last recorded point.
3.2.7. Adding Points
Adds a new point to the current list of points and updates the TubeRenderer to reflect the new geometry.
3.2.8. Updating Line Properties
These methods allow for dynamic updates to the line's width, color, and minimum distance between points, enabling real-time customization of the drawing properties.
4. Implementing Hand Draw in Unity
Back in Unity:
1. Right-click to create an empty game object and call it "XR Hand Draw."
2. Add the *XR Hand Draw* component to it.
3. For referencing the tracking parameter, go inside the *Camera Rig* → *Tracking Space* → *Right Hand Anchor* → Select Right Hand Tracking and drag it into the component.
To create a material for the default line:
1. Right-clicking in your project window, select Create → Material.
2. Name it "Line Material”
3. Choose a color.
4. Drag it into the *Default Line Material* parameter of XR Hand Draw component.
Now to test your scene, save it, connect your headset using Link or Air Link, and press play.
You'll see a new game object called Tube Renderer with the necessary components.
Pinch your hand and move in 3D space to see the tube render position update and create a mesh.
Release the pinch to prepare for the next one.
5. Adding Physics to Your Drawings
To add physics to the rendered tubes, simply check the box to enable gravity.
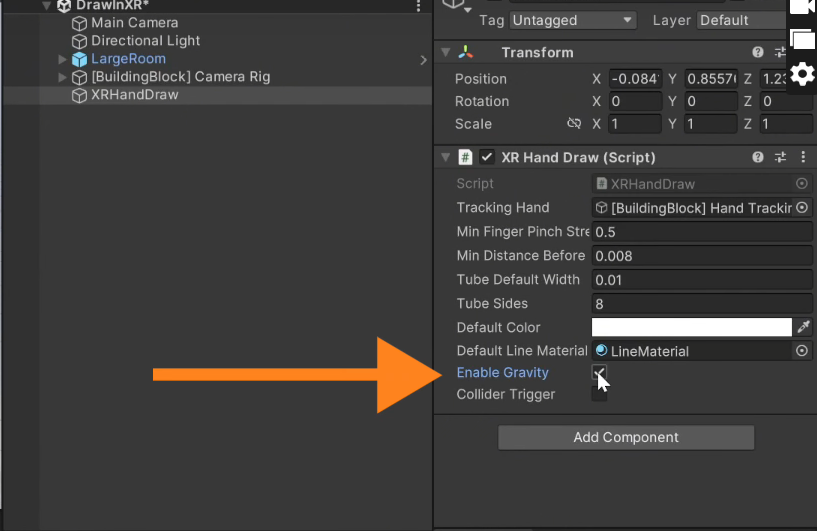
Now, when you press play and test it, you'll be able to draw lines that create 3D objects following physics rules. Super cool, right?

Created with