Meta's latest SDK has revolutionized the landscape of mixed reality, making it more accessible than ever. In this comprehensive guide, we'll take you through each step of creating a mixed reality experience using Meta's SDK, from setting up your Unity project to incorporating advanced features like scene understanding and depth sensing. Are you ready? Let’s GO!
Want to watch the video instead?
Prerequisite
What are some of the prerequisites of creating a Mixed reality experience?
First, we need a Quest 3 headset! However, if you have a Quest 2, you can still follow this blog but the only drawback is that you’ll not be able to use Depth API.
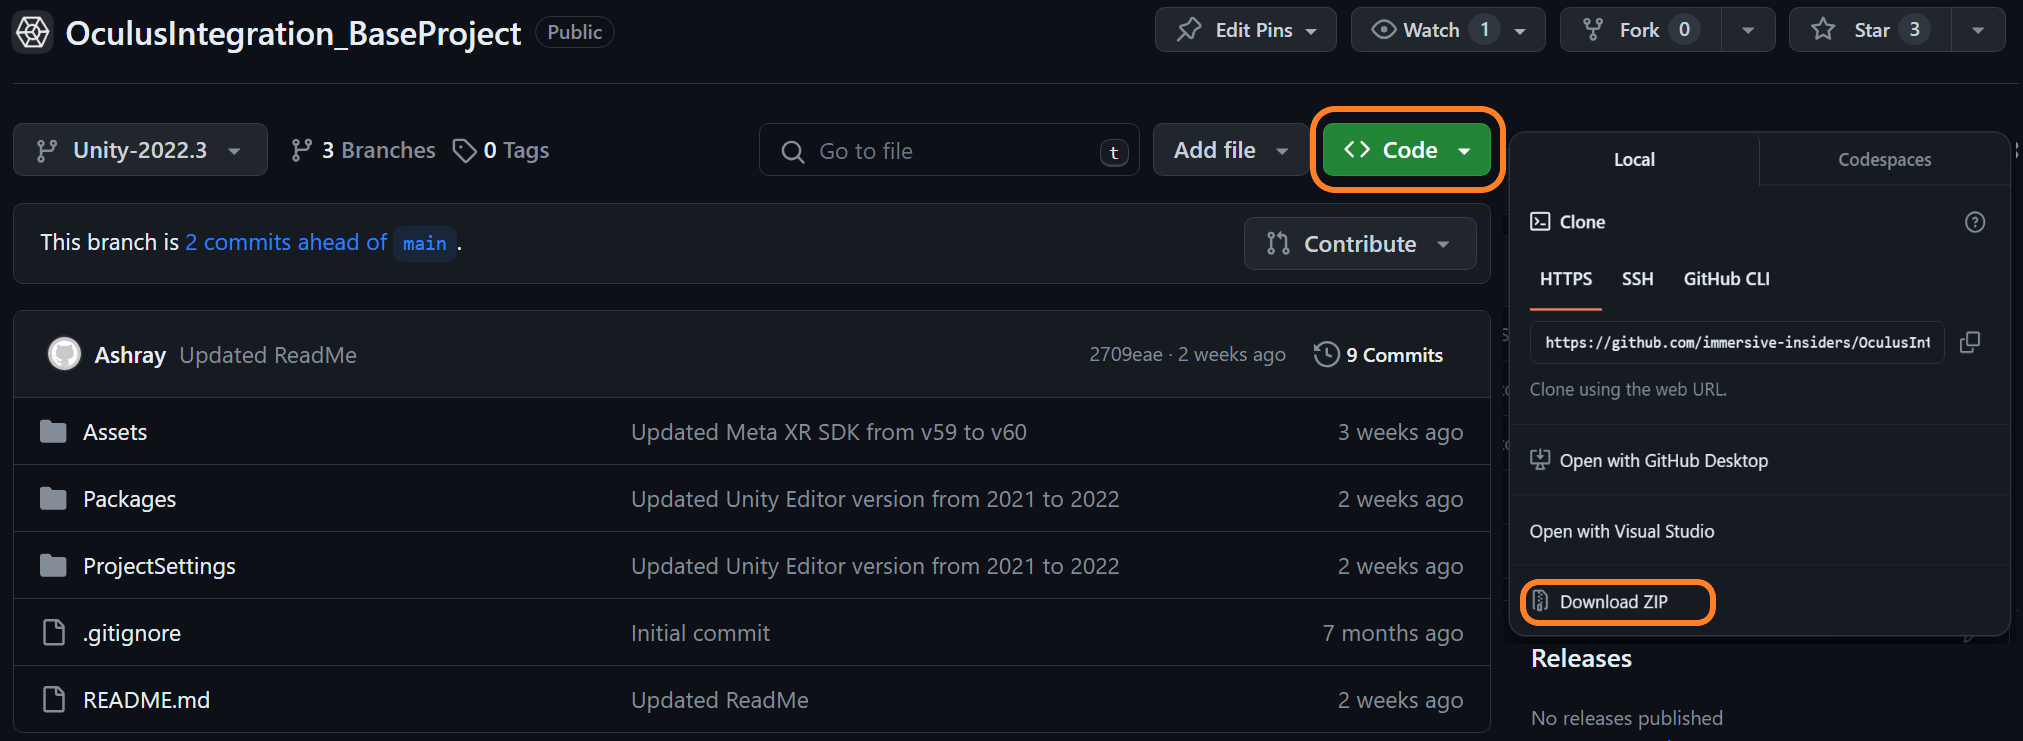
Next, you need a Unity Project setup with the latest Meta SDK which is v60 as of now. Don’t worry we’ve got you covered! You can download the Base project, which has been pre-configured with Meta's latest SDK (version 60) along with all the other player settings.
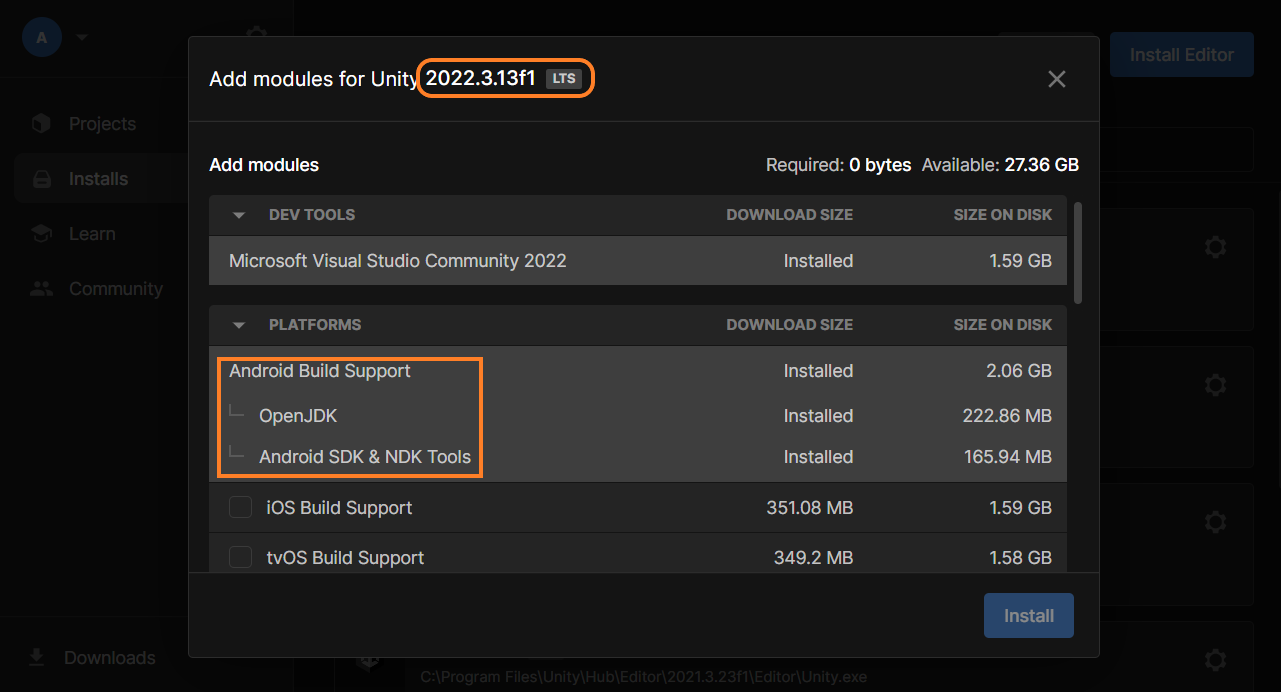
Then, you need to ensure you have the Unity Editor version 2022.3.1 LTS or above and the Android Build Support modules installed.
Note: For this experience, I’ll be using Editor version 2022.3.13.
Also, make sure you have your room set up on your Headset.
Step 1: Initializing Your Unity Project
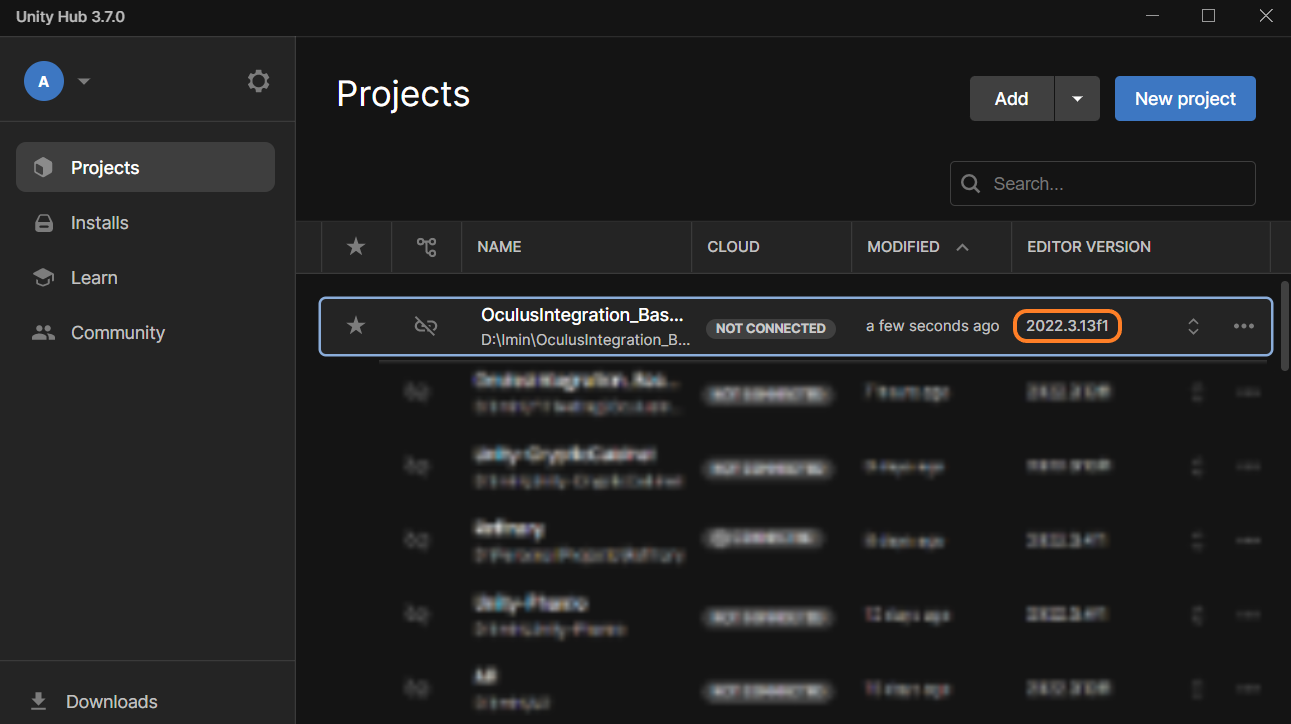
Alright! Once you have the project downloaded,
- Add it to the Unity Hub and confirm that the editor version is 2022.3.1 LTS or above.
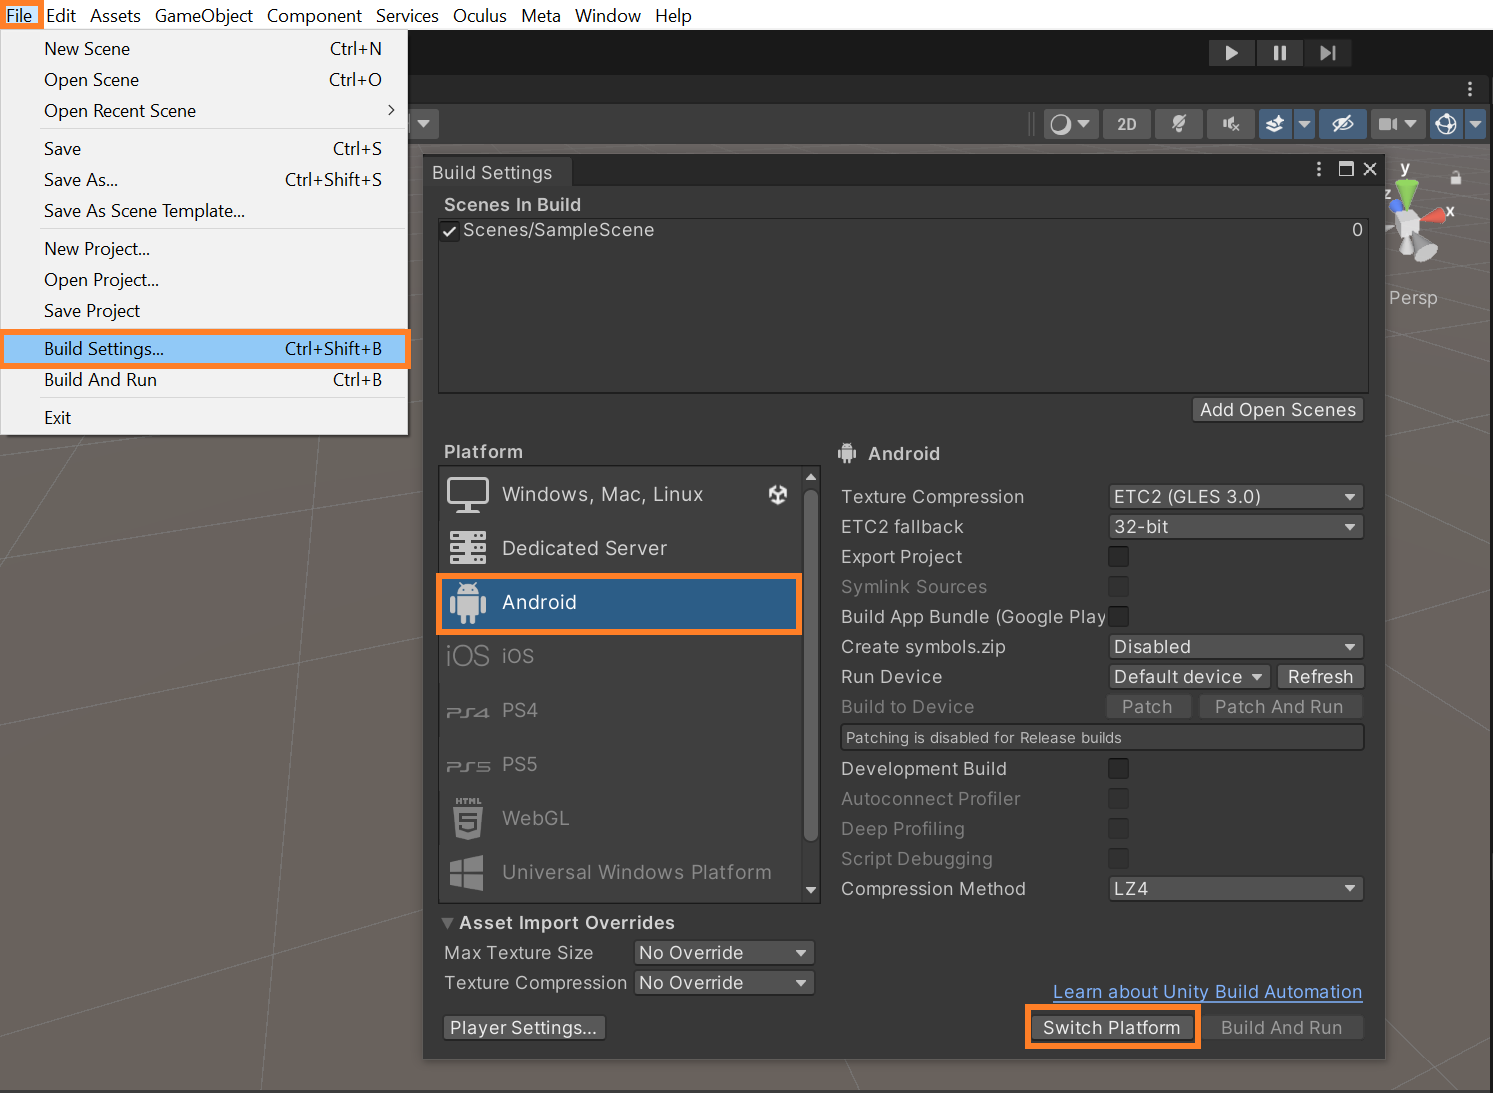
- Open the project and switch the platform to Android in the Build Settings.
- In your Project window, create a new scene named "Mixed Reality Experience" and open it.
Step 2: Harnessing the Power of Building Blocks
Building Blocks is a new tool that comes along with Meta SDK V68, which helps us add features of Presence Platform like Passthrough, Scene Understanding, Spatial Anchors, and much more in a single click.
So to open this tool, click on Oculus → Tools → Building Blocks. This will open a new window, which you can dock anywhere you prefer.
2.1 Setting Up Camera Rig
To set up our scene:
- Delete the Main Camera.
- In the building block window, look for Camera Rig and click on the button at the bottom right corner.
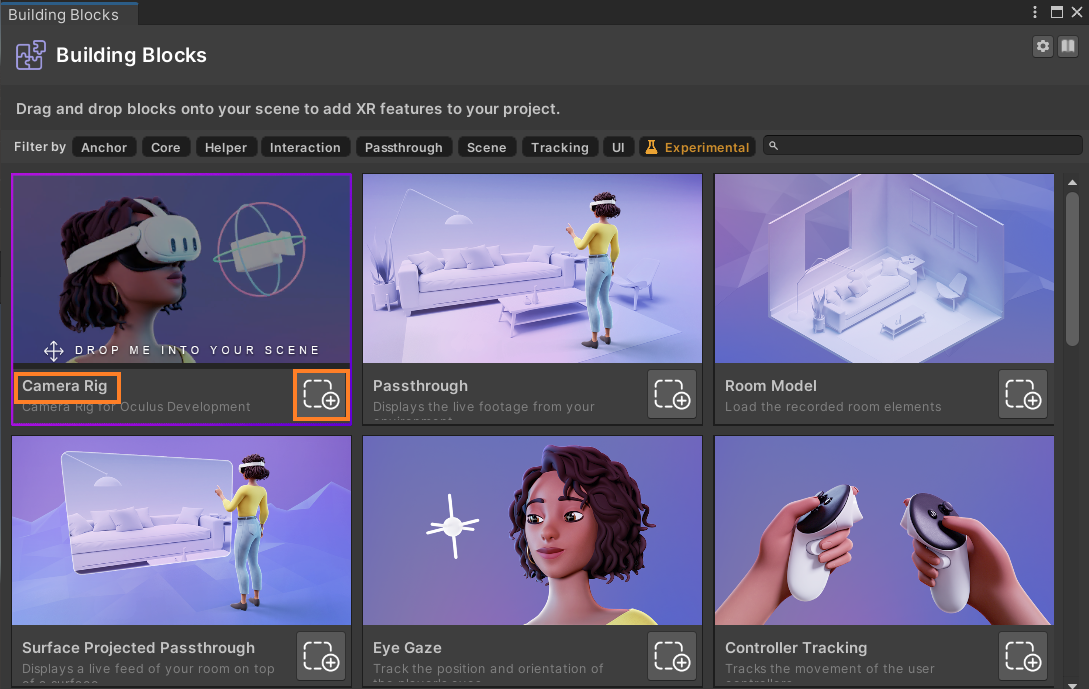
- This adds a Camera Rig GameObject to your scene with all the components required for VR development.
At this point, if you connect your headset to your laptop using a link or air link and press the play button you’ll be able to see your default environment. Although your hands are tracked you'll not be able to see them because we haven't added any visuals to it right now but we'll be doing that later on.
2.2 Enabling Passthrough
At this point, if you connect your headset to your laptop using a link or air link and press the play button you’ll be able to see your default environment. Although your hands are tracked you'll not be able to see them because we haven't added any visuals to it right now but we'll be doing that later on.
- In the building block window, look for Passthrough and click on the button at the bottom right corner.
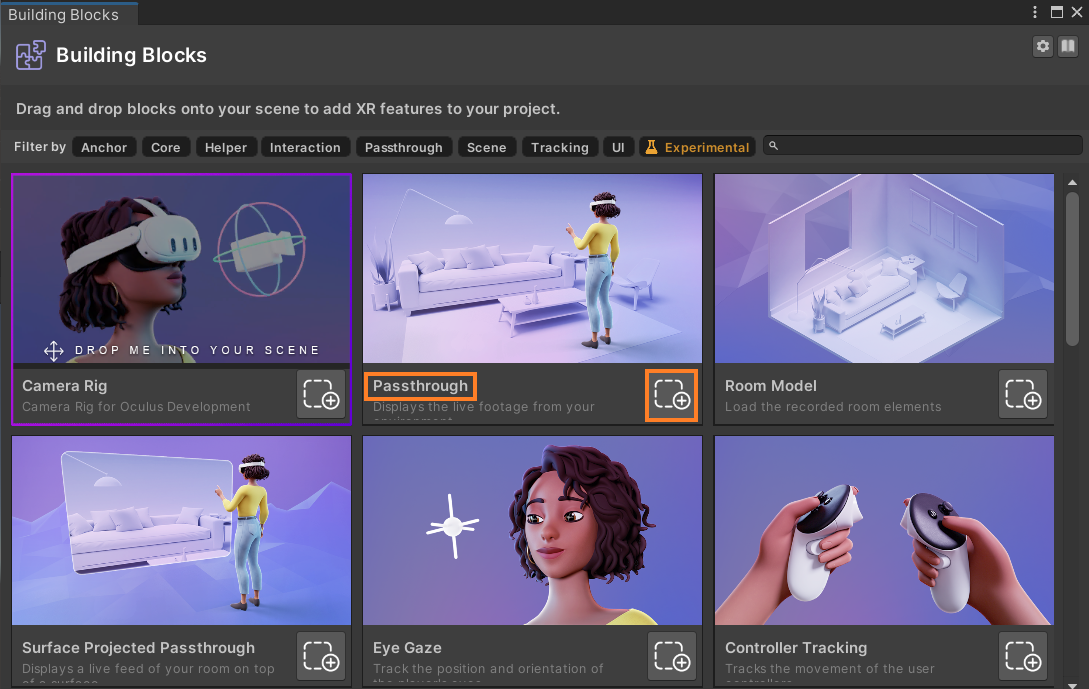
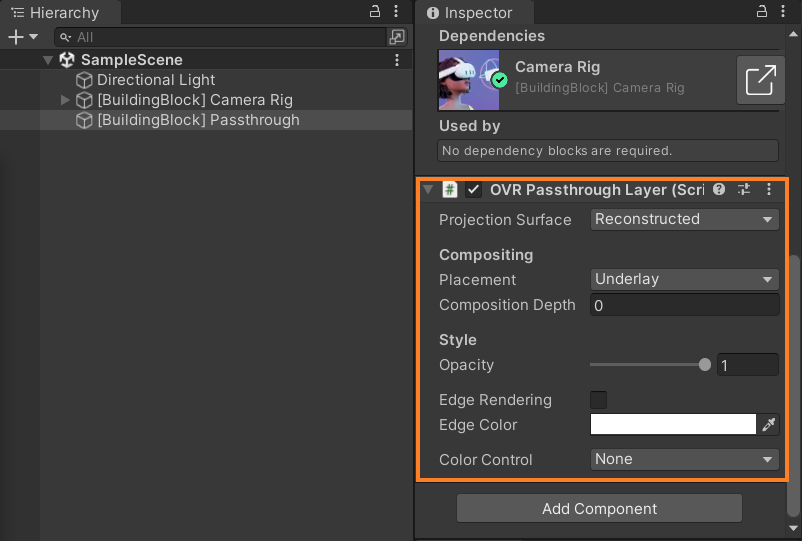
- This does two things:
- First, it adds an OVR Passthrough Layer component so that users can see their physical world.
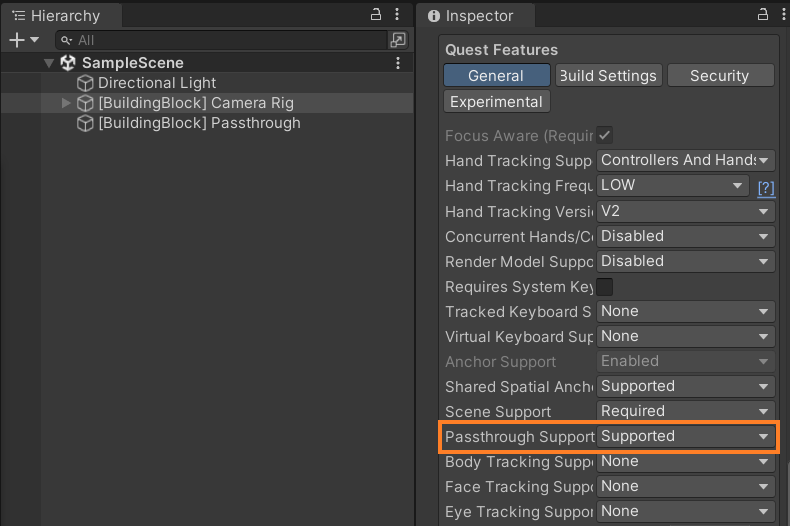
2. Second it changes the OVR Manager settings of the “Passthrough Support” parameter from None to Supported, so that this application can use the passthrough functionalities.
Now if you press play and test it, this time you'll be able to see your physical world!
2.3 Enabling Scene Understanding
The next step is to enable Scene Understanding so that the application can access the data of the user’s physical world.
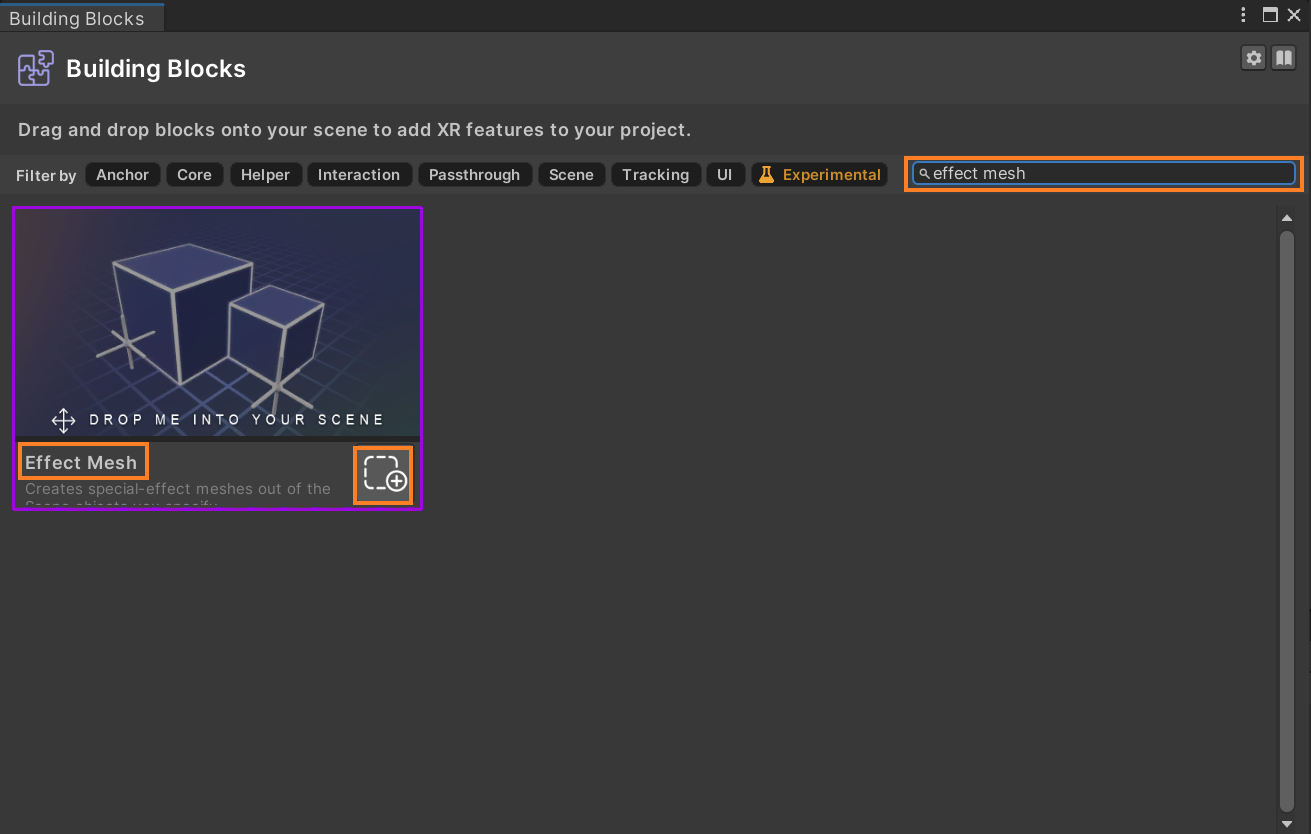
- In the building block window, search for Effect Mesh and click on the button at the bottom right corner.
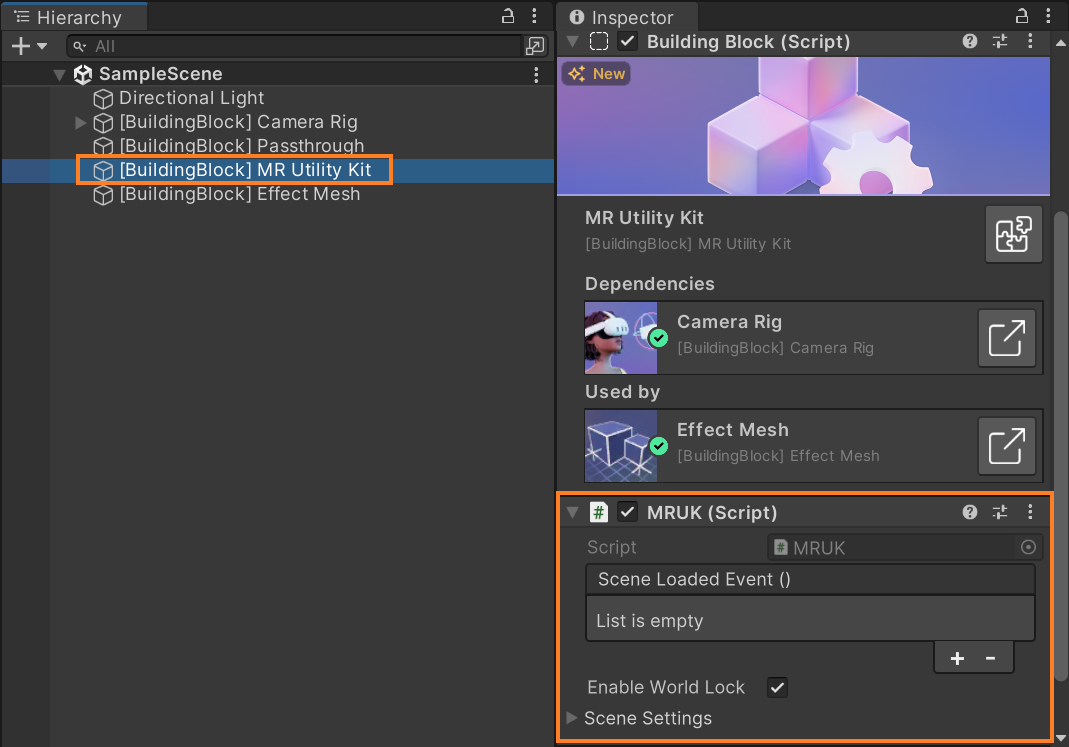
- This adds two things:
1. First is the MR Utility Kit GameObject with the MRUK script.
This script can be used to query your scene, for example, you can find the number of Walls and their positions, the position of tables, sofas, or any other object that has been mapped in a room.
2. Second is the Effect Mesh GameObject, with the MRUK Start and the Effect Mesh scripts.
These scripts are responsible for initializing and creating/visualizing mesh on top of our real world respectively.
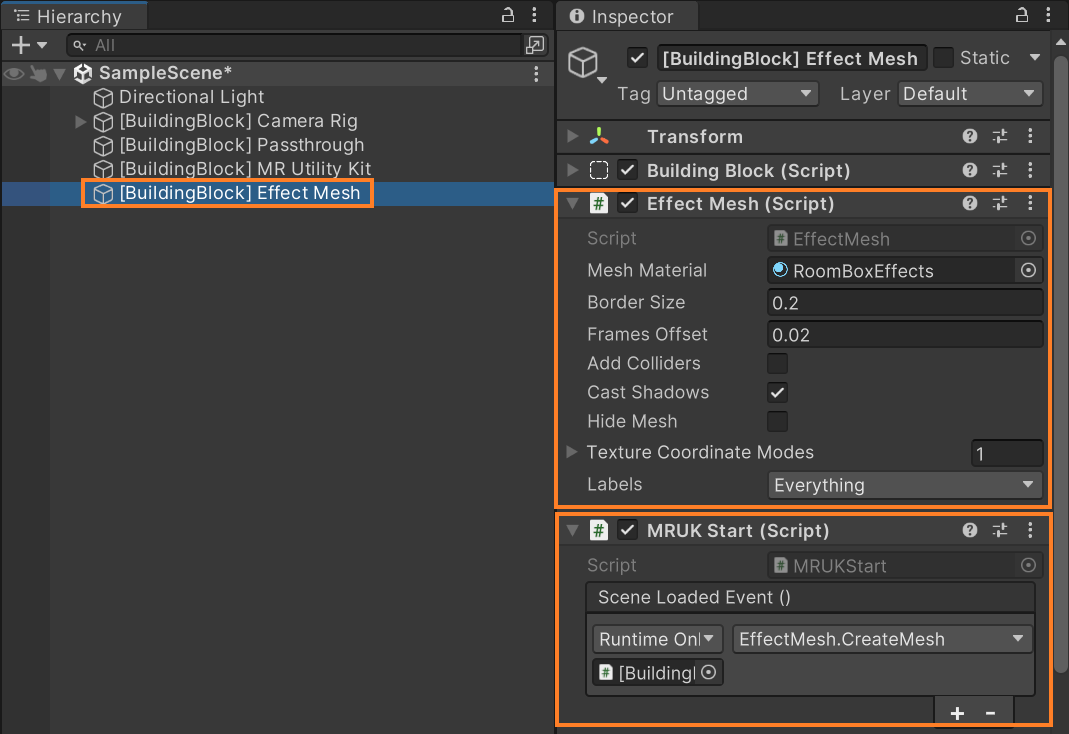
- The Effect Mesh component has various parameters but the ones that we need are:
1. Mesh Material: The material to apply to the constructed mesh.
2. Add Colliders: When true, collision is made for the Effect Mesh primitives.
3. Hide Mesh: Hide the effect mesh.
4. Labels: Which scene objects are to be included in the EffectMesh. Like walls, floor, etc
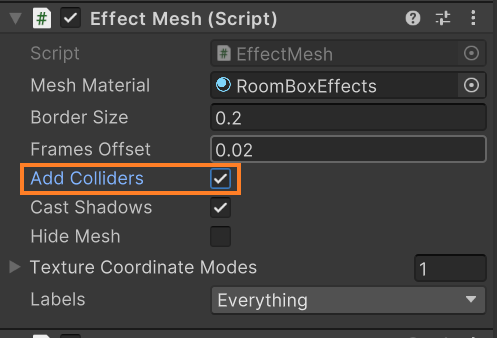
- Set the “Add Collider” parameter to True ✅, so that virtual objects can interact with our physical world.
- Next, select the Camera Rig GameObject, scroll down till you find the “Scene Support” parameter and change it from None to Supported.
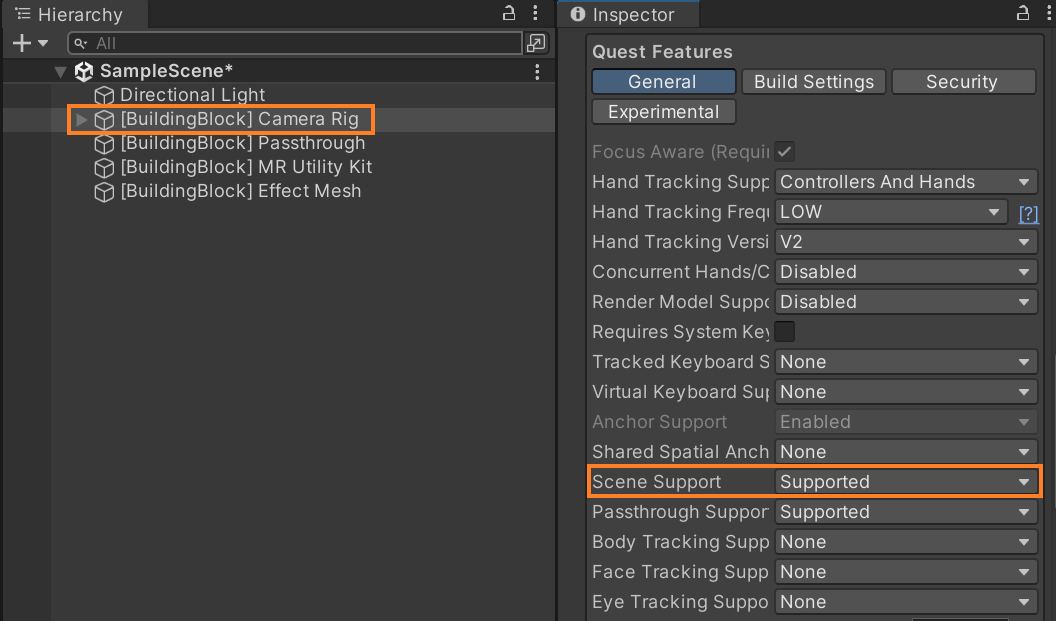
All right so now if you save your scene and press play you'll be able to see that the application has created a mesh with material for all the objects you had mapped in your room.
BONUS!!
If you want to have different materials for different scene objects, that’s possible as well. For example, if you want the floor to be of a different material then
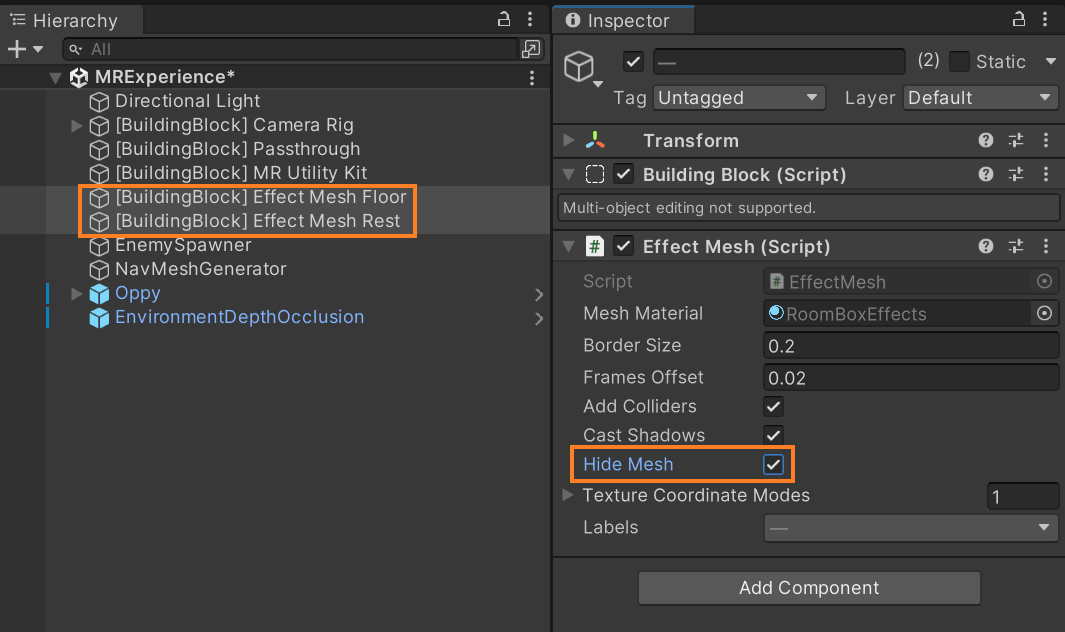
- Duplicate the Effect Mesh GameObject → name one as Effect Mesh Floor and the other as Effect Mesh Rest
- Select the Effect Mesh Floor GameObject → change the material → in the “Labels” parameter, select just the FLOOR.
- Select the Effect Mesh Rest GameObject → in the “Labels” parameter, unselect the FLOOR.
- Since we have duplicated the Effect Mesh GameObject, it will have two separate MRUK Start components and the meshes will get instantiated separately. So,
1. Select both the Effect Mesh GameObjects → remove the MRUK Start components.
2. Select the MR Utility Kit GameObject → in the MRUK component add two events.
3. Drag and drop Effect Mesh Floor GameObject inside the first event → from the drop down select Effect Mesh → Create Mesh.
4. Drag and drop Effect Mesh Rest GameObject inside the second event → from the drop down select Effect Mesh → Create Mesh.
If you play the scene you’ll see that the floor is of another material

Step 3: Enabling Interactions and Virtual Objects
In this step, we’ll be adding Controllers and Hand Tracking to our scene so that we can add interactions to our virtual objects.
- In the building blocks window, search for “Tracking”, and add Controller Tracking and Hand Tracking by clicking the respective buttons.
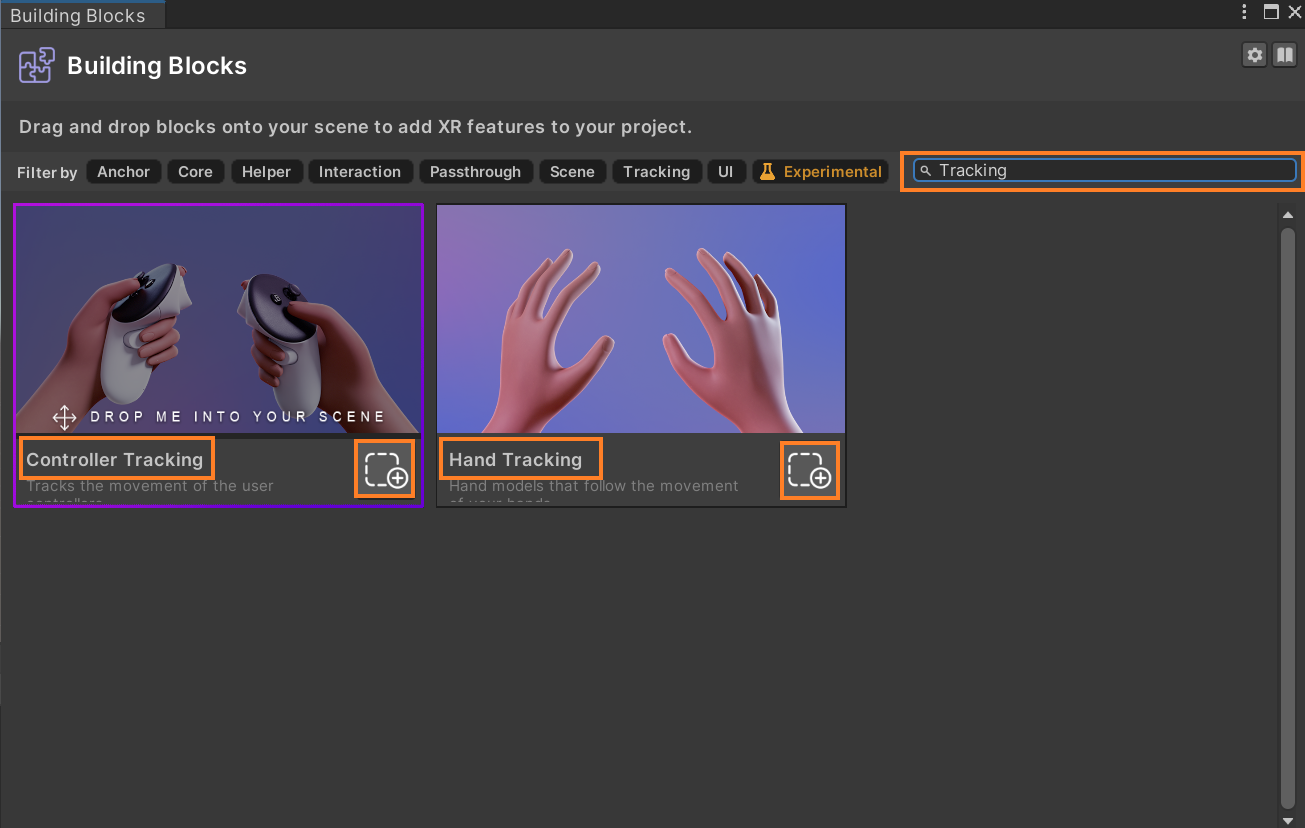
- This will have added a left controller, left-hand tracking, right controller, and right-hand tracking to your hierarchy.
Now you can press play and test it, you’ll be able to see that your hands are getting tracked and if you grab a controller is going to automatically switch to the controller as well which is pretty cool!

To interact with the virtual objects we also need a hand-grab interactor, so:
- In the building block window, look for Grabbable Item and click on its button.
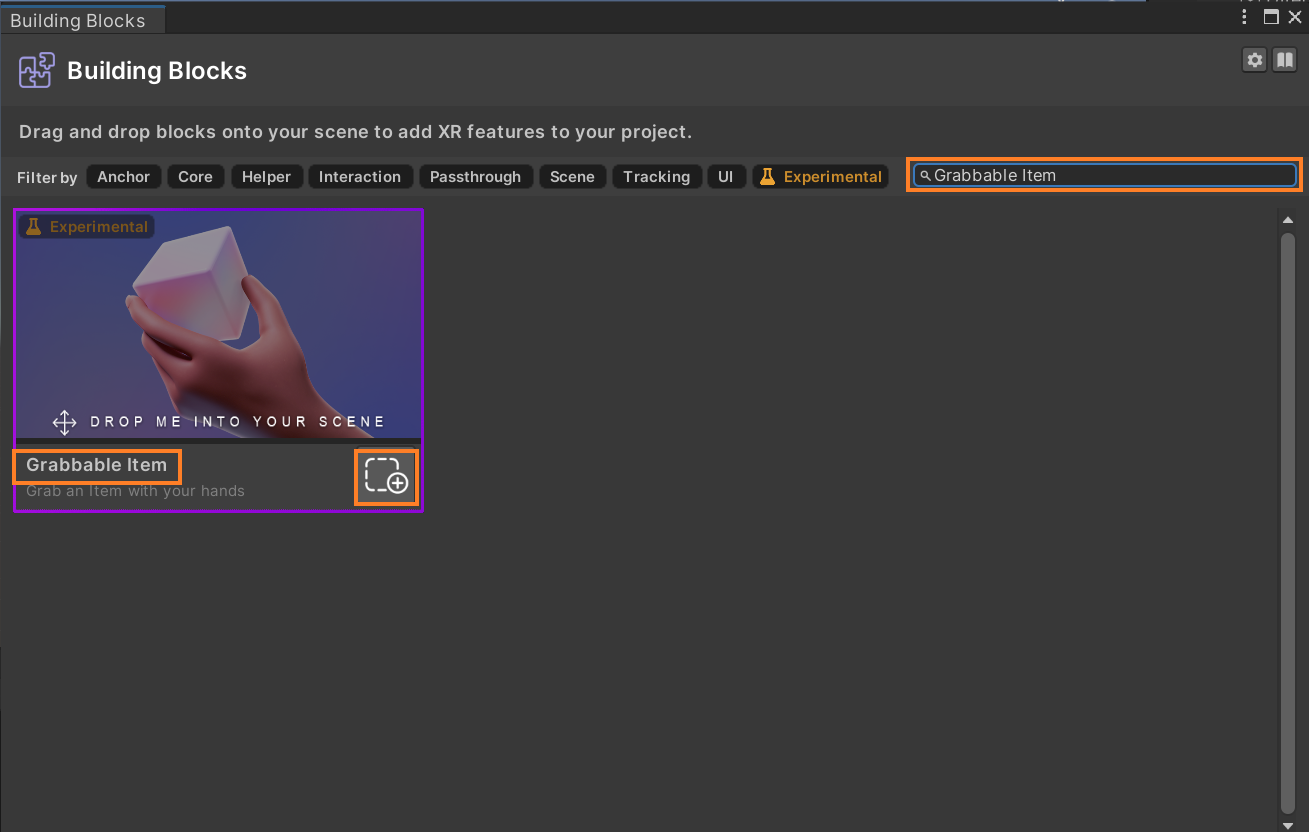
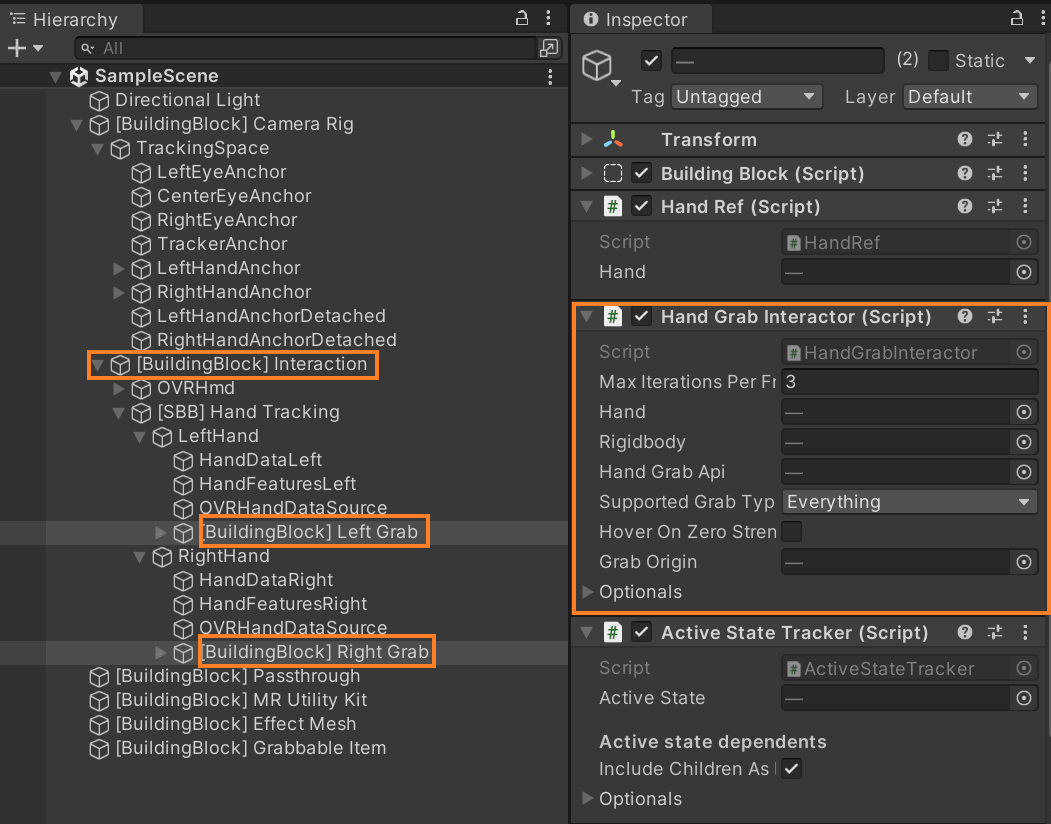
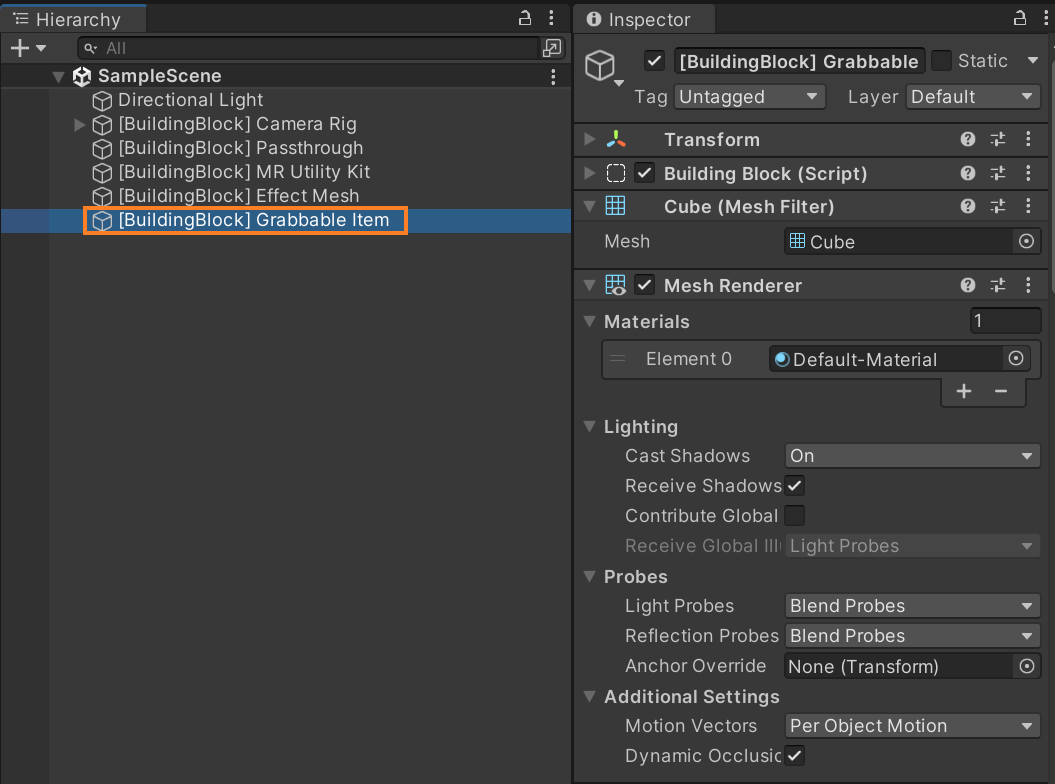
- This does two things:
1. It creates an Interactions GameObject which if you open, you can see that it has Left Grab and Right Grab GameObjects both with Hand Grab Interactor components.
2. It adds a Grabbable Item GameObject which we'll not be using, so, delete it.
Moving on to add virtual objects to your scene go ahead and download this Unity package and import it into Unity. This package has all the visual effects, prefabs, scripts, and audio that you will need to create this experience.
Now to set up our Mixed Reality experience,
- Create an empty GameObject and name it EnemySpawner → add a component called Find EnemySpawnLocation.
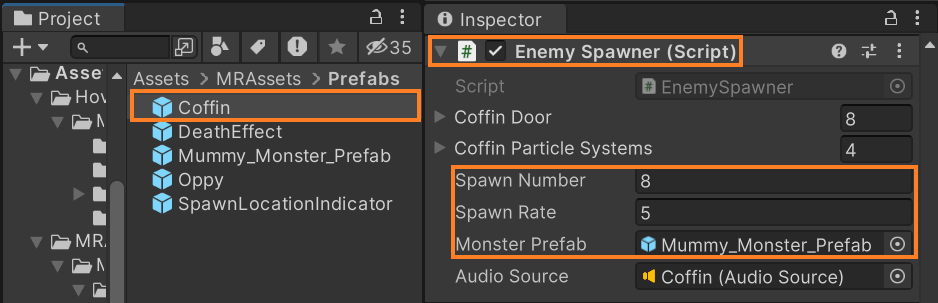
1. Navigate inside MR → Assets → Prefab. Select the Coffin prefab, drag and drop it inside the “Spawn Object” parameter.
2. Set the “Spawn Amount” parameter to `1` to spawn a single Coffin prefab.
3. Set the “Spawn Locations” parameter to `On Top Of Surface`.
4. Set the “Lables” parameter to `FLOOR`.
5. Drag and drop the SpawnLocationIndicator prefab inside the “Spawn Location Indicator” parameter
6. Set the “Spawn Timer” to `7` seconds.
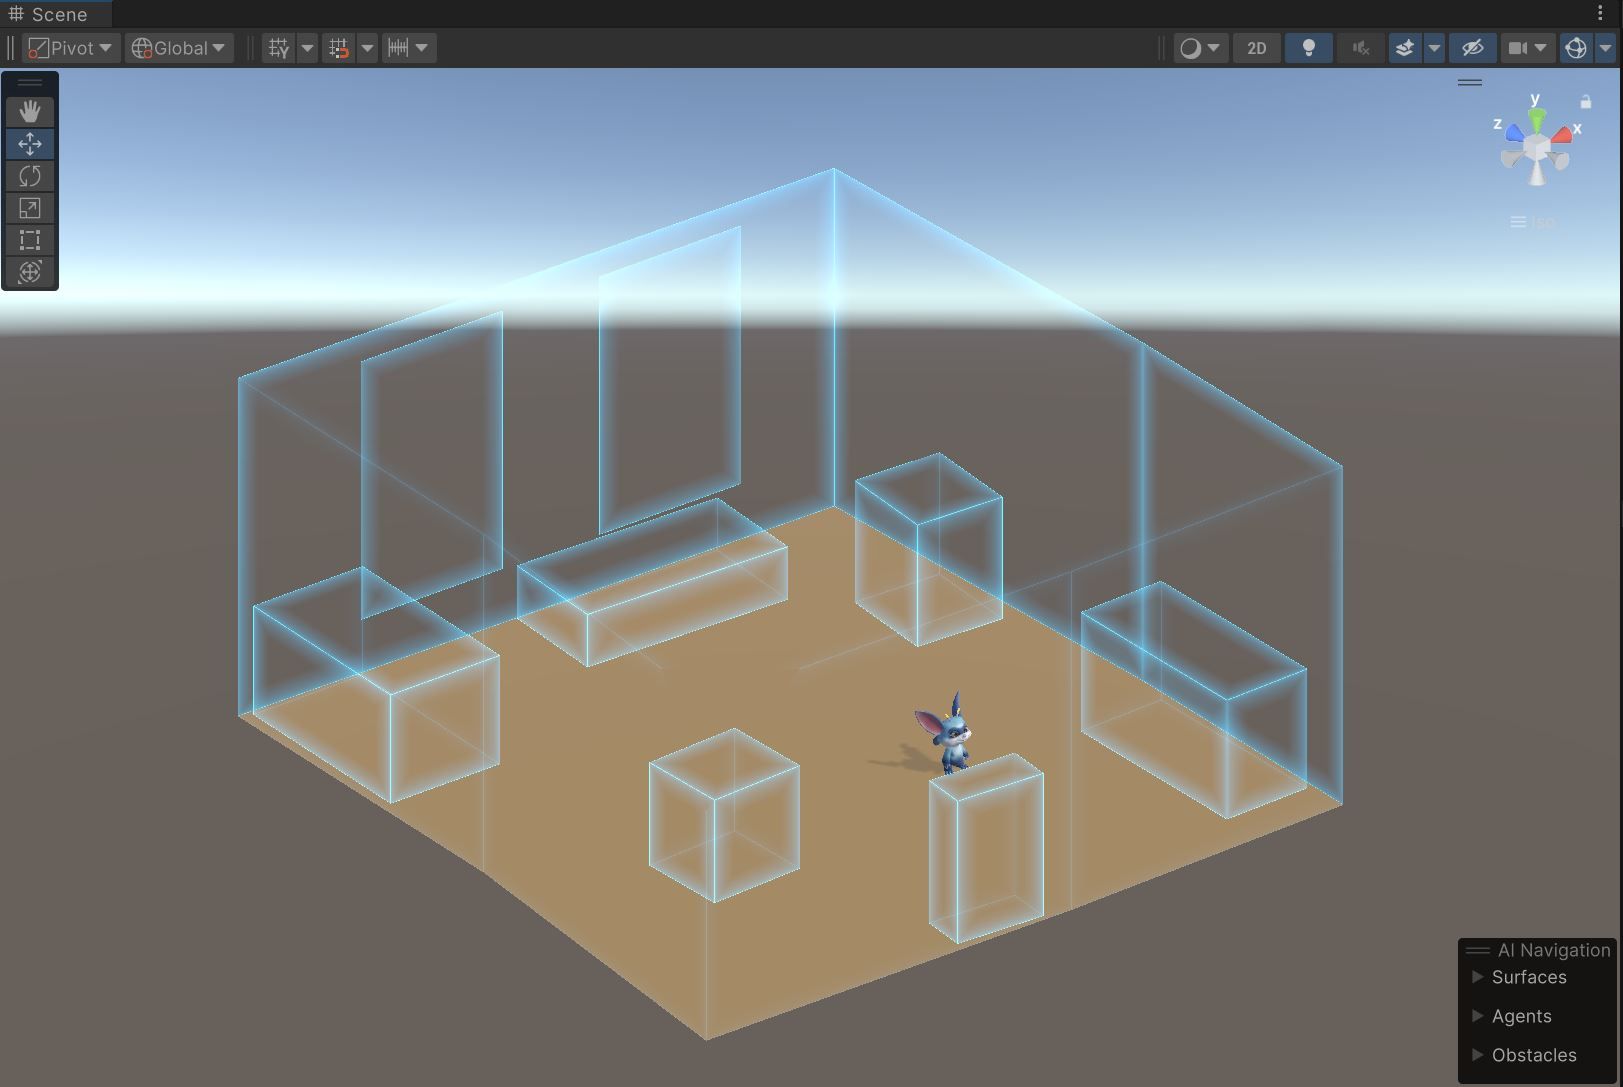
- Create another GameObject in your scene and name it NavMeshGenerator → add a component called GenerateNavMesh. Since each user's room is different we have to generate the NavMesh during runtime and this component does exactly that.
1. This adds the NavMeshSurface component automatically.
2. Click on the “Agent Type” parameter dropdown → select Open Agent Settings → click on the plus symbol ➕→ name the agent as Mummy → set the radius as 0.13, height as 0.58, step height as 0.08.
3. From the “Agent Type” parameter drop-down select Mummy.
4. Change the “Use Geometry” parameter to use Physics Colliders.
5. Set the “Minimum Region Area” parameter as 0.5.
- We want to generate the Nav Mesh only after the room has been initialized. So:
1. Select the MR Utility Kit GameObject → add an event inside the MRUK script → drag and drop the NavMeshGenerator GameObject.
2. From the drop-down, select GenerateNavMesh → InitializeBounds.
- Once the Nav Mesh has been generated, we want to spawn the enemies. So:
1. Select NavMeshGenerator GameObject → add an event inside the Generate Nav Mesh script → drag and drop Enemy Spawner GameObject.
2. From the drop-down, select FindEnemySpawnLocation → SpawnCoffinPoint.
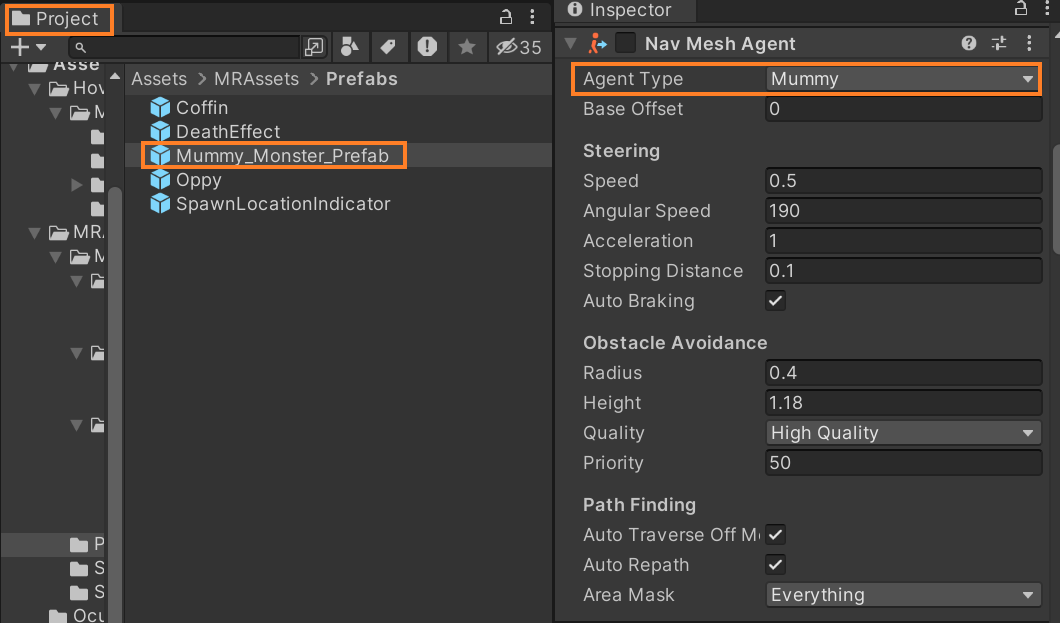
- Then, select the Mummy_Monster_Prefab in your Project window and set the “Agent Type” parameter to Mummy.
With that we have our MR experience set up but to give you a better understanding, here’s what is happening in our scene:
- When the application loads for the first time, the MRUK Script is going to initialize the room → it's going to create a Mesh for all the scene objects that have been mapped → it's going to generate a NavMesh.
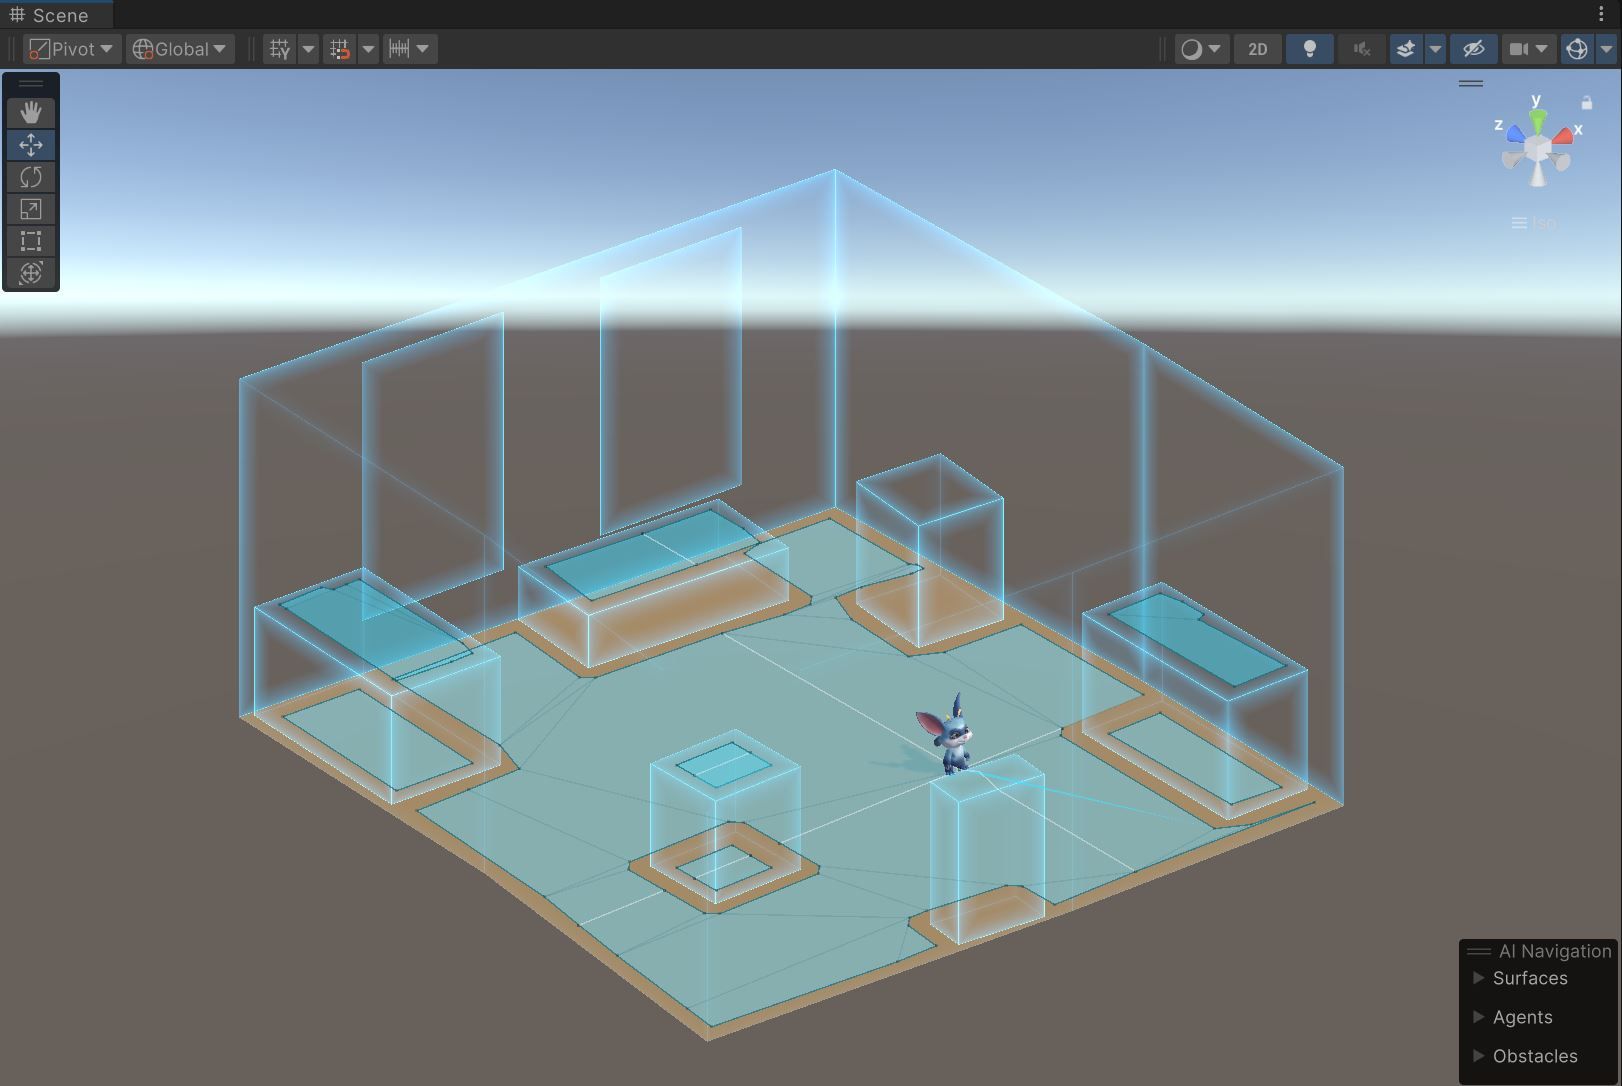
- Once we have the NavMesh generated, it's going to find a random location on the floor → enemy spawner script is going to instantiate the Spawn Location Indicator prefab at that point → the prefab indicates the location where the Coffin prefab will spawn along with the countdown timer.
- When the timer ends, the Coffin prefab gets spawned at the chosen location but it gets spawned at the user’s eye level. It then falls onto the floor and the door breaks open.
- The Coffin prefab then starts spawning the Mummy_Monster prefab. The “Spawn Number” and the “Spawn Rate” parameters of the Enemy Spawner component attached to this prefab determines the total number of Mummy_Monster to be spawned and the delay between each of them.
- The Mummy_Monster prefab has various components like an Animator, NavMesh Agent, Box Collider, Rigidbody, Grabbable components, and a custom Monster Controller which are responsible for the overall behavior of the Monster like, its ability to walk on the floor, its ability to be grabbed and others characteristics.
- Once the Monsters start spawning, the task is to kill them by making the Oppy character jump on top of them. Oppy prefab also has a custom controller that can be used to move the character around in your room and make it jump on top of tables, sofas, or any other scene objects.
Now you can save your scene and press play. You’ll see that the Coffin prefab gets instantiated, falls down and the monsters start to appear. Then, you can start killing them by jumping on top of them. This is super fun!!
Step 4: Implementing Depth API for Realism
Previously while testing, you might have noticed that you can see the character even though it's behind physical objects and this breaks the experience.
This can be fixed by implementing Depth API. So,
- To import the Depth API package, visit this Git Repo → copy the Git URL.
- Go back into Unity → click on Windows → Package Manager → click on the plus symbol ➕→ click on add package from git URL → paste the URL and click on Add.
NOTE: If you are using Universal Render Pipeline then copy the second git URL as well and add it to your project.
- In your project window, search for Environment Depth Occlusion prefab and add it to your scene. This comes with an Environment Depth Occlusion Controller component where we need to set the “Occlusion Type” parameter to Soft Occlusion.
- If you are wondering what’s the difference between Hard and Soft occlusion? Well, as per the documentation:
1. Hard occlusion is cheaper to compute but has a jagged edge and more visible temporal instability.
2. Soft occlusion is visually more appealing but requires more GPU.
2. Soft occlusion is visually more appealing but requires more GPU.
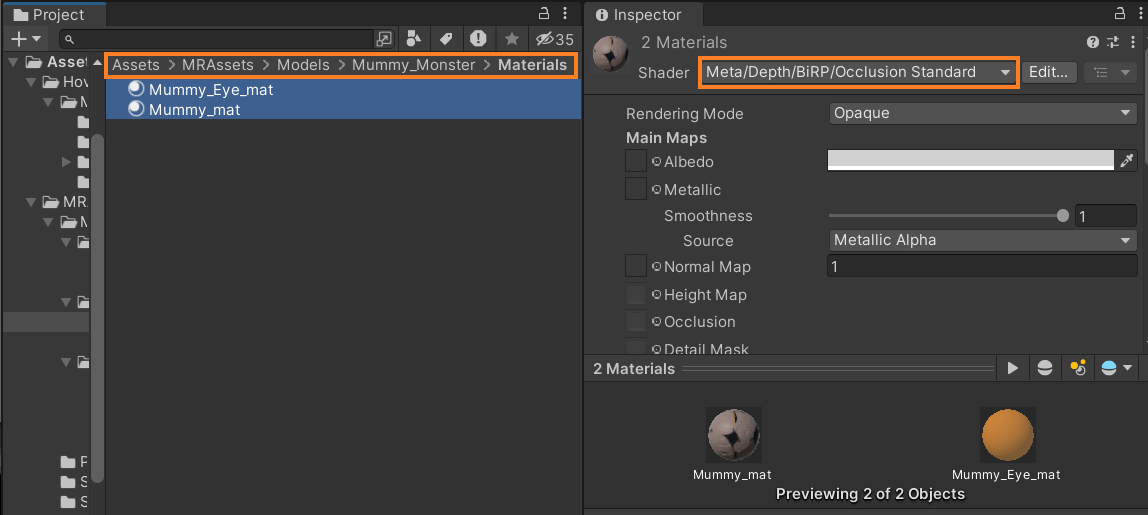
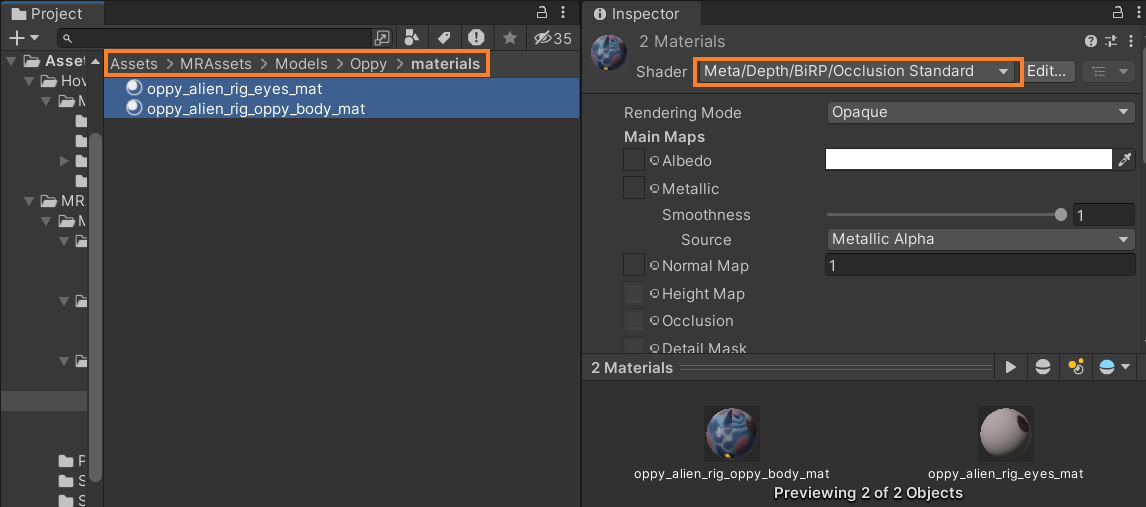
- Next, we need to select all the materials of all the virtual objects that would be present in a scene and change its Shader. So,
1. In the Project window, navigate inside MR Assets → Models → Coffin → Textures. Select the select the CoffinMaterial and from the Shader drop down select Meta → Depth → BiRP → Occlusion Standard.
2. Navigate inside MR Assets → Models → Mummy_Monster→ Materials. Select both the materials and follow the same procedure of selecting Occlusion Standard Shader.
3. Navigate inside MR Assets → Models → Oppy → Materials. Select both the materials and once again follow the same procedure of selecting Occlusion Standard Shader.
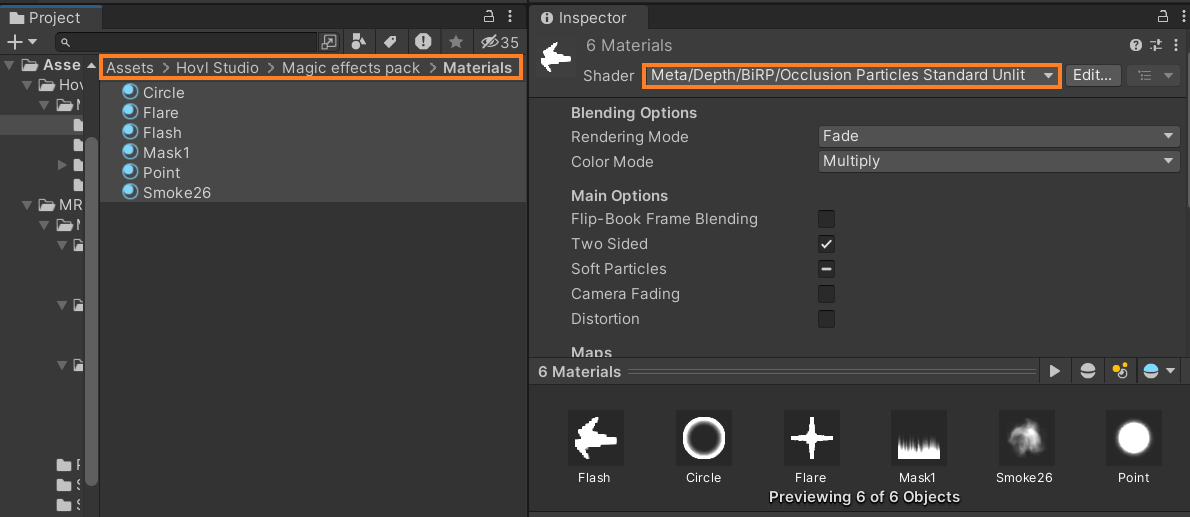
4. For the last time, navigate inside Hovl Studio → Magic effects pack → Materials. Select all the materials, but this time from the Shader drop-down select Meta → Depth → BiRP → Occlusion Particales Standard. This is different because all these materials are used for particle effects.
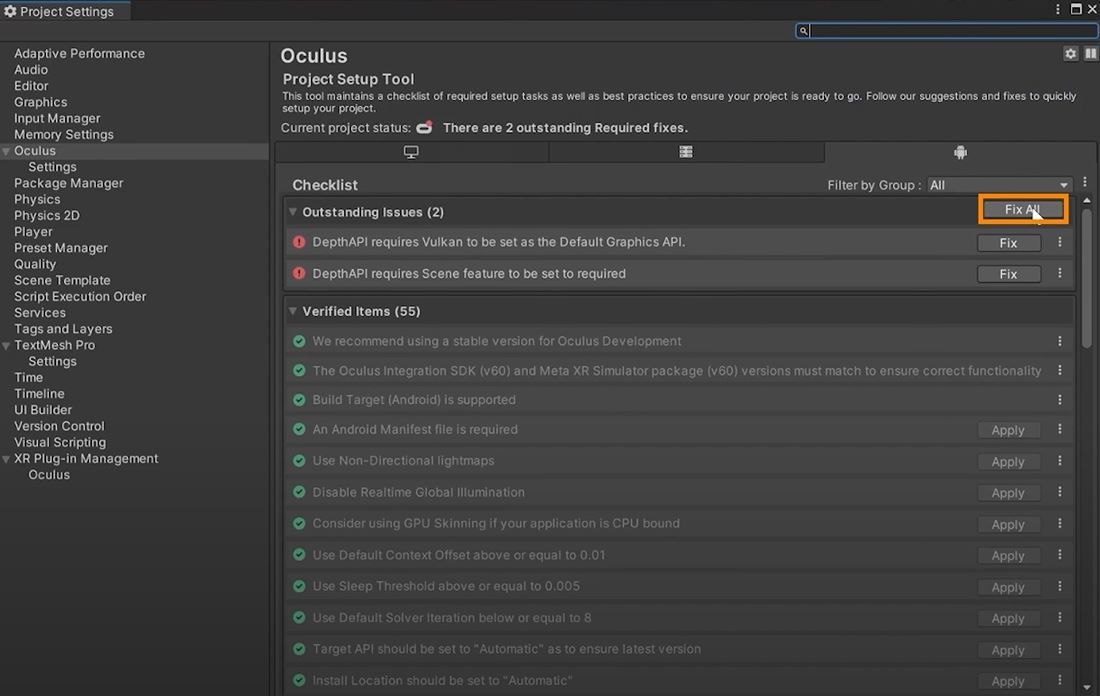
- The Depth API has project setup requirements listed here, and all of them can be set within a few clicks
1. On the bottom right corner of the Unity editor, find the Oculus icon and click on it → select the Project Setup Tool.
Here, it will show you all the setup that has to be done. Click on Fix All and it will set up everything for you.
- The last step is to select both the Effect Mesh GameObjects and hide the mesh by setting the “Hide Mesh” parameter to true.
Now save your scene and press play and test it. If you grab an enemy and place it behind an object, it completely disappears which is so cool!
Step 5: Finalizing and Building
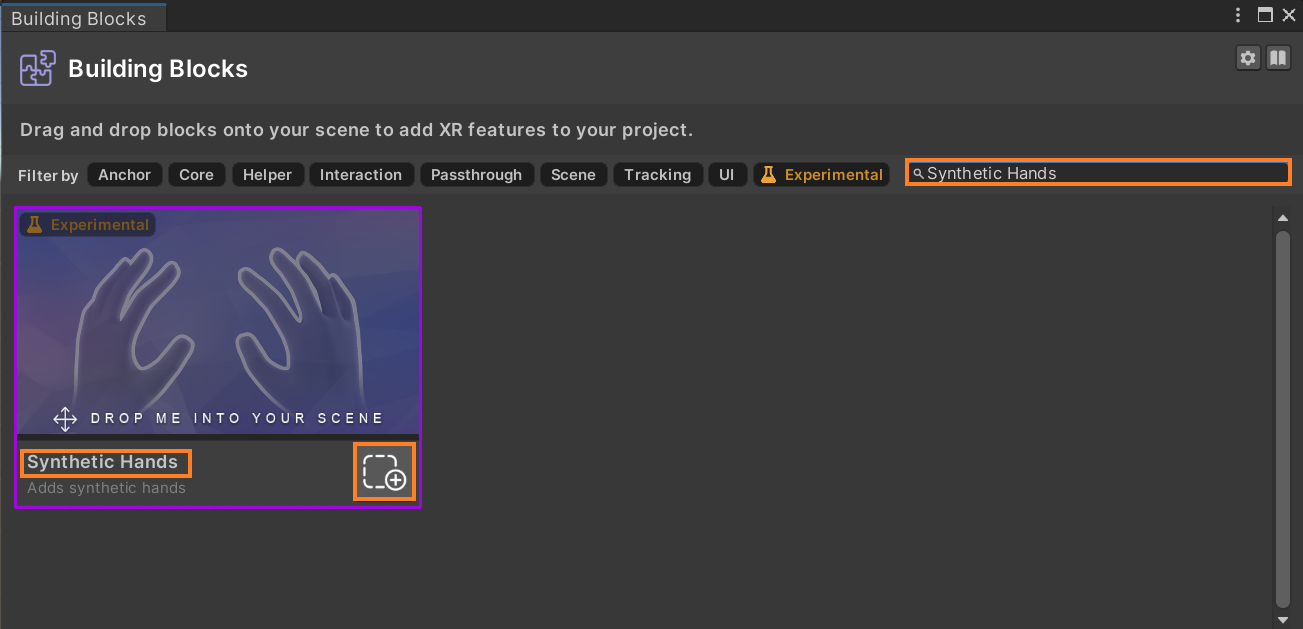
While testing I noticed two errors saying that the hand grab visuals were not referenced so to reference it:
- In the Building Blocks window, search for Synthetic Hand and click on its button.
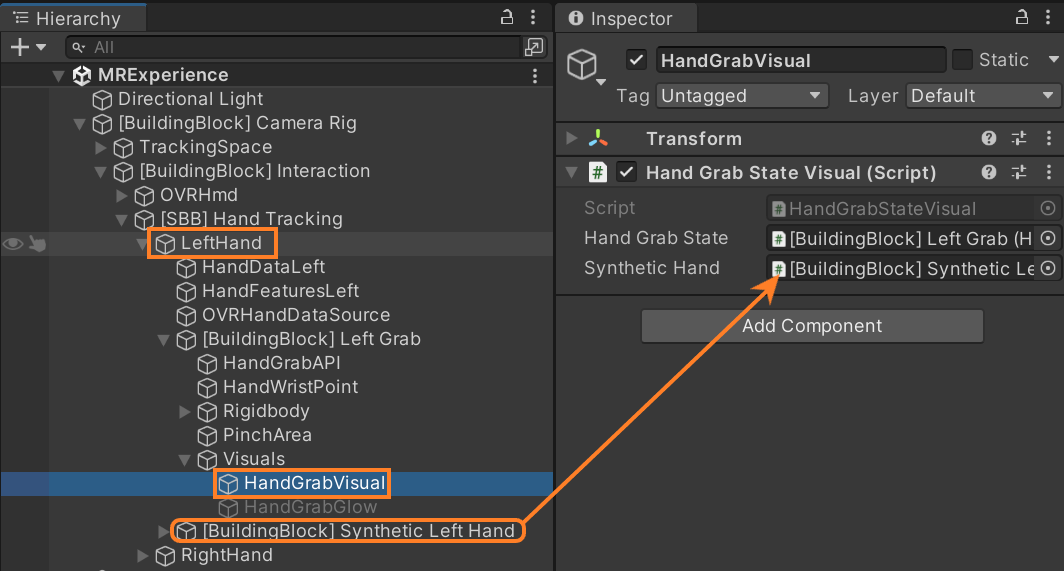
- Select the HandGrabVisual under the Left Hand GameObject → drag and drop the Synthetic Left Hand GameObject inside the “Synthetic Hand” parameter.
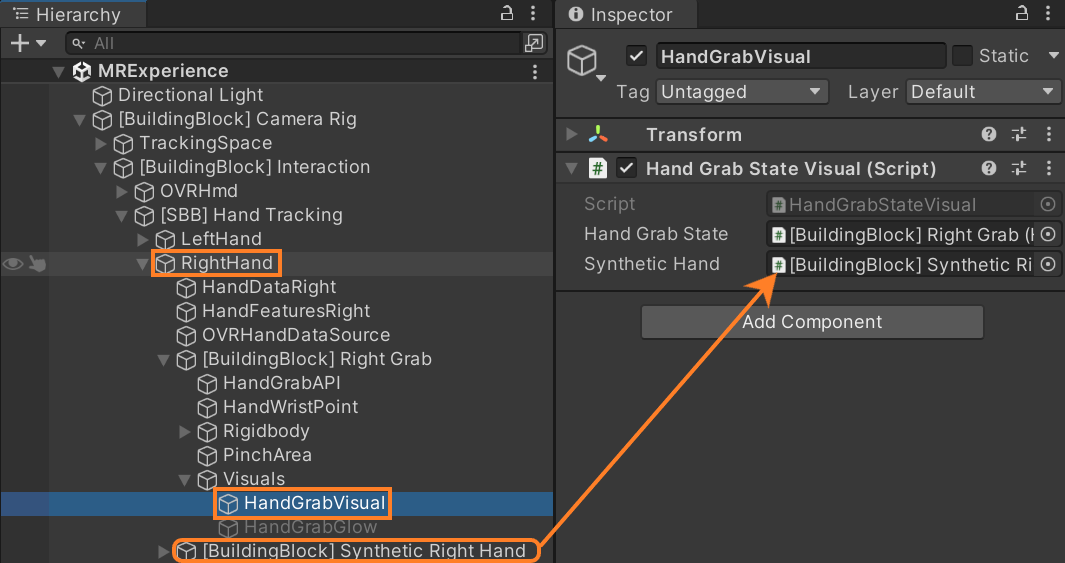
- Select the HandGrabVisual under the Right Hand GameObject → drag and drop the Synthetic Right Hand GameObject inside the “Synthetic Hand” parameter.
Now to build our application:
- Go to `File` → `Build Settings` → click on `Add Open Scene`.
- Make sure you have connected your headset using the cable.
- Click on `Build And Run`→ create a new folder called ‘Builds’ → name the application and click on `Save`.
This will build the application on your headset and once that's done you can have fun controlling Oppy. You can make the character interact with your physical world and jump on top of enemies to kill them. You’ll also be able to see how well the depth API can hide virtual objects behind physical world objects
Conclusion
So was that not easy?
In conclusion, Meta's SDK has simplified the complex task of building mixed reality experiences. I've been using Meta SDK since the time it was called Oculus SDK and trust me Metas Presence Platform capabilities have made our life so much easier.
Generally, it would have taken us a few days to build an MR experience but with this SDK and Presence Platform, I was able to build this in a couple of hours and you can do it too!
So what are the next steps? You can go through the scripts and try to understand how it’s working. You can build on top of this existing experience and make a complete Game cycle. If you manage to do that you'll be one of the top 1% of developers would have created a Mixed Reality game.
And don't forget to share it with us on LinkedIn and Discord.
And don't forget to share it with us on LinkedIn and Discord.

Created with