Previously we learned how we could create our own Avatar on the Ready Player Me website, import it into Unity and animate the upper body with the help of inverse kinematics. If you haven’t checked out the first part of this series, we highly recommend checking it out, since the skills and knowledge from it are required here as well.
Want to watch the video instead?
In this blog post, we’ll learn how the lower body can be animated. The VR hands are tracked using the two controllers, to animate the legs using real-time tracking, you would need additional trackers. But, since most people (like me) don’t have them we would like to propose a different solution: Downloading or creating animation for the lower body and playing them whenever the user moves. 💃🕺
1. Animating the leg
Generally, to animate the legs we need to download the animation separately and add it to the avatar. But, the Ready Player Me avatar comes along with walking animation.
- In the Project window, navigate to Assets → Plugin → Wolf3D Ready Player Me SDK → Resources → Animations → you can choose Male or Female → select the MaleAnimationTargetV2@Walking model or FemaleAnimationTargetV2@Walking model as per your choice.
- Open the model to view its children → from the Hierarchy select the Avatar GameObject → drag and drop the Walking animation in the inspector window.
- In the Animator component of the Avatar GameObject, select MaleAnimationTargetV2Avatar or FemaleAnimationTargetV2Avatar as the parameter for the variable Avatar.
Now if you hit Play and observe what happens, you will notice that:
- The upper body still has IK and works with the controller.
- Legs get animated.
- The upper body moves a lot more than required.
- The Legs pass through the ground.
So, we need to correct two defects here. One is to stop the walking animation from affecting the upper body and the other is to stop the leg from passing through, which we will address in the next section.
Now, to stop the animation from affecting the upper body:
Now, to stop the animation from affecting the upper body:
- In the Project window, right-click and select Create → Avatar Mask.
- You can rename it as UpperBodyAvatarMask → select the Humanoid drop-down and deselect the upper body by clicking on it.
- Next, open the Animator component by double-clicking on the Animator Controller → click on the layer setting button ⚙️ of the Base Layer and select the mask we just created.
Now when you click Play ▶ you will notice that the animation looks a lot better.
2. Procedural Animation
To solve the second issue which is the leg passing through the floor, we need to animate the legs procedurally to make sure the legs bend when the upper body is crouching and pass through the floor. For that, we’ll write some code that makes use of the API methods of the Animator component like GetIKPosition, SetIKPosition, SetIKRotation, etc to procedurally animate the legs.
2.1 Code
In the Project window, create a new C# script, name it as AvatarFootController and copy the following script. In the next section we have the breakdown of the code as well, so don't worry if you are not able to understand the math behind the code immediately.
2.2 Code Breakdown
This section will help you understand the code, feel free to skip to the next section if you understood the code already.
Declarations
| Variable Name | Type | Use |
| animator | Animator | To assign the Animator component and use its properties. |
| leftFootPosWeight | float | To store the value between 0 and 1. The value will determine the influence the left foot IK position will have on the animation. |
| rightFootPosWeight | float | To store the value between 0 and 1. The value will determine the influence animation will have on the right foot IK position. |
| leftFootRotWeight | float | To store the value between 0 and 1. The value will determine the influence animation will have on the left foot IK rotation. |
| rightFootRotWeight | float | To store the value between 0 and 1. The value will determine the influence animation will have on the right foot IK rotation. |
| footOffset | Vector3 | To store the offset value between the ground surface and the avatar’s feet. |
| raycastOffsetLeft | Vector3 | To store the offset value for the point of origin of raycast from the left foot. |
| raycastOffsRight | Vector3 | To store the offset value for the point of origin of raycast from the right foot. |
2.3 Update and Calculation
The method OnAnimatorIK() is called by the Animator Component immediately before it updates its internal IK system. This callback can be used to set the positions of the IK goals and their respective weights.
💡 An IK goal is a target position and rotation for a specific body part. Unity can calculate how to move the part toward the target from the starting point (ie, the current position and rotation obtained from the animation).
First, we’ll understand the code for the left leg and the same can be applied for the right leg but with different variable names.
- The variable leftFootPos will be assigned to the position of the left foot IK using the GetIKPosition method Animator API and the AvatarGoalIK enum.
- The variable hitLeftFoot will be used to store the Raycast hit information from the left foot.
- A Raycast shot in the downward direction from the left foot. The bool variable isLeftFootDown will store the value true if the Raycast intersects a collider, otherwise false. If the value is true, it will pass the hit information to the hitLeftFoot variable.
- Next, if the isLeftFootDown variable is true then,
- The positional weight of the left foot IK goal is set to the value stored in the variable leftFootPosWeight using the SetIKPositionWeight method of Animator API.
- The position of the left foot IK is set to the impact point in world space where the ray hits the collider, plus the offset value stored in the variable footOffset. This is done with the help of SetIKPosition method of Animator API.
- To make sure the foot has the same rotation as the ground, the LookRotation API is used to calculate the Quaternion rotation and stored in the variable leftFootRotation.
- The rotational weight of the left foot IK goal is set to the value stored in the variable leftFootRotWeight using the SetIKRotationWeight method of Animator API.
- The rotation of the left foot IK is set to the value that was calculated earlier and stored in the variable leftFootRotation. This is done with the help of SetIKRotation method of Animator API.
- If the isLeftFootDown variable turns out to be false, then, the positional weight of the left foot IK goal is set to 0 using the SetIKPositionWeight method.
The following GIF is for a better understanding of how the weights affect the IK animation. In the coming section, you will see how to implement the same.
3. Animation Controller
We want to play the walking animation when the joystick/trackpad is used to move forward or backwards right? For that, we’ll write another script that will take the Input Reference as a parameter and play the animation when the movement input action is triggered.
💡 You can even play the animation by tracking the head movement. This will be useful when the user walks in room space.
3.1 Setting up the Animator
Before we are writing the script we will have to set up the Animator by creating two parameters that can be accessed via script and also add a new state to transition from Walking to Idle state.
- Lets’s open the Animator controller that we are using for the Avatar by double clicking on it → click on the Parameters tab → add a Bool parameter by clicking on the plus sign + and name it isMoving. Similarly, add a Float parameter and name it animSpeed.
- Right-click on the Base Layer window and click on Create State → Empty. Rename it to Idle.
- Right-click on the Idle state and select Set as layer Default State → right-click on the Idle state once again, but this time select Make Transition and then click on Walking state.
- Similarly, right-click on the Walking state, click on Make Transition and then click on Idle state.
- Next, click on the transition arrow from Idle to Walking state → in the Inspector window, uncheck Has Exit Time box → click on the Plus button ➕ under Condition and make sure the parameter chosen is isMoving and the value is true.
- Similarly, click on the transition arrow from Walking to Idle state → uncheck Has Exit Time box → click on the Plus button + and make sure the parameter chosen is isMoving and the value is false.

- Select the Idle state and in the Inspector window, add the Breathing Idle as the parameter for the variable Motion. Also, set the Speed variable to 0.01.
3.2 Code
In the Project window, create a new C# script, name it as AvatarAnimationController and copy the following script. In the next section we have the breakdown of the code as well, so don't worry if you are not able to understand the math behind the code immediately.
3.3 Code breakdown
This section will help you understand the code, feel free to skip to the next section if you understood the program.
Declarations
| Variable Name | Type | Use |
| move | InputActionReference | To store the reference to the input actions. In our case, we will store the continuous move input action. |
| animator | Animator | To assign the Animator component and use its properties. |
Initialization
- The function OnEnable() is called when the object becomes enabled and active. In OnEnable, we will subscribe to the move input reference’s event callbacks like action.started to animate the legs and action.cancelled to stop the animation.
- The function OnDisable() is called when the behaviour becomes disabled. OnDisable we will unsubscribe from the input reference’s event callbacks so that there is no unnecessary references being created and also to stop memory leak.
3.4 Update and Calculation
The function AnimateLegs get called when there is a callback from the event of input reference.
So, when the function gets called,
So, when the function gets called,
- We will first check if the movement is forward or backwards using the bool statement. Using ReadValue property of the Input Reference API we can check if it's moving forward by seeing if the y-coordinate of the Vector2 value is greater than 0 and moving backwards if the y-coordinate of the Vector2 value is less than 0.
- The bool value of the above statement is stored in the variable isWalkingFoward.
- If the Avatar is walking forward then we will set the Bool parameter isMoving to true. In that way, the animation will transition from Idle to Walking. Also, we will set the speed to 1 to ensure that the animation plays in the right direction.
- If the statement is false then we will still set the Bool parameter isMoving to true. But, we will set the speed to -1 to ensure that the animation plays in the opposite direction (backwards). In that way, when the Avatar moves back the animation will match its direction.
- The function StopAnimation also get called when there is a callback from the event of input reference. When this function gets called we will set the Bool parameter isMoving to false so that the animation will transition from Walking to Idle. Also, we will set the speed to 0.
4. Adding Components
Now let's add the components that we created and set it up to make the lower body animation work.
- From the Animator window, select the Layers tab → click on the Setting button ⚙️ and check the IK Pass field.
- From the Hierarchy, select the Avatar and add the two components we scripted i.e the AvatarAnimationController and the AvatarFootController → drag and drop the Animator component into both of them.
- In the AvatarAnimationController component add the Input Action that corresponds to continuous locomotion, in my case it's the LeftHand/Move.
- To adjust the values of AvatarFootController, hit play and test to find out which value suits the best. Then, copy the values → exit the play mode → paste the values back onto the component.
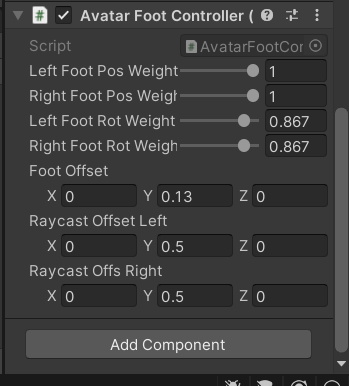

With that, we have finished animating the lower body. Now you can test the scene in VR and experience it.
Conclusion
There are many more improvements that can be done. The AvatarFootController values can be further tweaked to get a better experience.
You can also make use of a blend tree to have different animations for different types of movements. Also, you can upload this avatar to Mixamo, download other walking animation and add it to your Avatar as well.

Created with